Spring notes
» https://docs.spring.io/spring/docs/5.0.3.RELEASE
//: # ()
Dependency injection is the process whereby a framework or such, for example the Spring
framework, establishes the relationships between different parts of an application. This as opposed
to the application code itself being responsible of establishing these relationships.
When using the Spring framework for Java development, some of the advantages of dependency
injection are:
- Reduced coupling between the parts of an application.
- Increased cohesion of the parts of an application.
- Increased testability.
- Better design of applications when using dependency injection.
- Increased reusability.
- Increased maintainability.
- Standardizes parts of application development.
- Reduces boilerplate code.
No code needs to be written to establish relationships in domain classes. Such code or configuration is separated into XML or Java configuration classes.
Spring Configuration
Interfaces recommended for Spring beans
The following are reasons why it is recommended to define interfaces that are later implemented by
the classes implement the Spring beans in an application:
- Increased testability.
Beans can be replaced with
mock or stub objects that implement the same interface(s) as the
real bean implementation.
- Allows for use of the
JDK dynamic proxying mechanism.
- Allows for easier switching of Spring bean implementation.
- Allows for hiding implementation.
For instance, a service implemented in a module only have a public interface while the
implementation is only visible within the module.
Hiding the implementation also allows the developer to freely refactor code to methods,
without having to fear that such methods will be visible outside of the module containing the
implementation.
XML Spring Configuration
In order to tell the Spring Container to create these objects and how to link them together, a configuration must be provided.
This configuration can be provided using XML files or XML + annotations or Java Configuration classes.
Martin Fowler came up with the name Dependency Injection, to rename Inversion of Control principle
Constructor Injection
Constructor injection can be used to define beans when the bean type is a class that has a constructor with arguments defined.
<beans>
  <bean id="complexBean" class="com.ps.beans.ctr.ComplexBeanImpl">
        <constructor-arg ref=" simpleBean"/>
  </bean>

  <bean id= "simpleBean" class="com.ps.beans.SimpleBeanImpl"/>
</beans>
public class ComplexBeanImpl implements ComplexBean {
    private SimpleBean simpleBean;

    public ComplexBeanImpl(SimpleBean simpleBean) {
        this.simpleBean = simpleBean;
    }

}
ref is used to tell the container that the value of this attribute is a reference to another bean.
<bean id="..." class="...">
        <constructor-arg ref="..."/>
</bean>
value is used when the value to inject is a primitive types or their wrappers
<beans>
  <bean id="complexBean" class="com.ps.beans.ctr.ComplexBeanImpl">
        <constructor-arg ref="simpleBean"/>
        <constructor-arg value="true"/>
  </bean>
</beans>
public class ComplexBeanImpl {
      public ComplexBeanImpl(SimpleBean simpleBean, boolean complex) {
         this.simpleBean = simpleBean;
         this.complex = isComplex;
      }
}
index attribute, which should be used when the constructor has more parameters of the same type.
<beans>
    <bean id="simpleBean0" class="com.ps.beans.SimpleBeanImpl"/>
    <bean id="simpleBean1" class="com.ps.beans.SimpleBeanImpl"/>

    <bean id="complexBean2" class="com.ps.beans.ctr.ComplexBean2Impl">
        <constructor-arg ref="simpleBean0" index="0"/>
        <constructor-arg ref="simpleBean1" index="1"/>
    </bean>
</beans>
public class ComplexBean2Impl {
    public ComplexBean2Impl(SimpleBean simpleBean1, SimpleBean simpleBean2) {
            this.simpleBean1 = simpleBean1;
            this.simpleBean2 = simpleBean2;
     }
 }
- Another way to handle constructors with more parameters of the same type is to use the
name attribute
<beans>
    <bean id="simpleBean0" class="com.ps.beans.SimpleBeanImpl"/>
    <bean id="simpleBean1" class="com.ps.beans.SimpleBeanImpl"/>

    <bean id="complexBean2" class="com.ps.beans.ctr.ComplexBean2Impl">
        <constructor-arg ref="simpleBean0" name="simpleBean1"/>
        <constructor-arg ref="simpleBean1" name="simpleBean2"/>
    </bean>
</beans>
c-namespace for reducing parameters injection via constructors
<beans>
    <bean id="simpleBean0" class="com.ps.beans.SimpleBeanImpl"/>
    <bean id="simpleBean1" class="com.ps.beans.SimpleBeanImpl"/>

    <!-- usage for reference to dependency -->
    <bean id="complexBean0" class="com.ps.beans.ctr.ComplexBeanImpl"
           c:simpleBean-ref="simpleBean0"/>

    <!-- usage for primitive type dependency -->
    <bean id="complexBean1" class="com.ps.beans.ctr.ComplexBeanImpl"
          c:simpleBean-ref="simpleBean0" c:complex="true"/>

    <!-- usage for index specified references -->
    <bean id="complexBean2" class="com.ps.beans.ctr.ComplexBean2Impl"
     c:_0-ref="simpleBean0" c:_1-ref="simpleBean1" />

</beans>
If you are using the name of the constructor parameter to inject the dependency,
then the attribute definition with c: should match the pattern c:nameConstructorParameter[-ref],
while if you are using indexes, the attribute definition should match c:_{index}[-ref].
Setter Injection
- When creating a bean using setter injection, the bean is first
instantiated by calling the constructor and then initialized by injecting the dependencies using setters.
<property /> element defines the property to be set and the value to be set with and does so using a pair of attributes: [name, ref] or [name,value].
<bean id="..." class="...">
        <property name="..." ref="..." />
</bean>
- The
name is mandatory, because its value is the name of the bean property to be set.
- The
ref is used to tell the container that the value of this attribute is a reference to another bean.
- The
value, is used to tell the container that the value is not a bean, but a scalar value.
<beans>
    <bean id="simpleBean0" class="com.ps.beans.SimpleBeanImpl"/>
    <bean id="complexBean" class="com.ps.beans.set.ComplexBeanImpl">
         <property name="simpleBean" ref="simpleBean"/>
    </bean>
</beans>
public class ComplexBeanImpl implements ComplexBean {
    private SimpleBean simpleBean;

    public ComplexBeanImpl() {}

    public void setSimpleBean(SimpleBean simpleBean) {
        this.simpleBean = simpleBean;
    }
}
p-namespace for reducing parameters injection via setters
<beans>
    <bean id="simpleBean" class="com.ps.beans.SimpleBeanImpl"/>
    <bean id="complexBean" class="com.ps.beans.set.ComplexBeanImpl"
           p:simpleBean-ref="simpleBean" p:complex="true"/>
</beans>
- Constructor and setter injection can be used together in creating the same bean
<beans>
    <bean id="simpleBean" class="com.ps.beans.SimpleBeanImpl"/>
    <bean id="complexBean2" class="com.ps.beans.set.ComplexBean2Impl">
        <constructor-arg ref="simpleBean"/>
        <property name="complex" value="true"/>
    </bean>

    <!-- configuration optimized using p-namespace and c-namespace -->
    <bean id="complexBean2" class="com.ps.beans.set.ComplexBean2Impl"
               c:simpleBean-ref="simpleBean" p:complex="true"/>
</beans>
//: # ()
| |  | |
| |
Collections
List
<bean id="simpleBean" class="com.ps.beans.SimpleBeanImpl"/>
<bean id="collectionHolder" class="com.ps.beans.others.CollectionHolder">
        <property name="simpleBeanList">
            <list>
                 <ref bean="simpleBean"/>
                 <bean class="com.ps.beans.SimpleBeanImpl"/>
                <null/>
            </list>
        </property>
</bean>
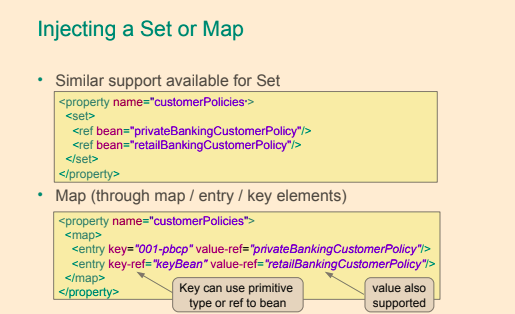
Set
<bean id="simpleBean" class="com.ps.beans.SimpleBeanImpl"/>
<bean id="collectionHolder" class="com.ps.beans.others.CollectionHolder">
        <property name="simpleBeanSet">
            <set>
                <ref bean="simpleBean"/>
            </set>
        </property>
</bean>
Map
<bean id="simpleBean" class="com.ps.beans.SimpleBeanImpl"/>
<bean id="collectionHolder" class="com.ps.beans.others.CollectionHolder">
      <property name="simpleBeanMap">
            <map>
                 <entry key="one" value-ref="simpleBean"/>
            </map>
        </property>
 </bean>
util namespace to deal with collections
- util namespace for reducing code working with collections
<beans>
    <bean id="simpleBean" class="com.ps.beans.SimpleBeanImpl"/>

    <util:list id=" simpleList" list-class="java.util.LinkedList">
        <ref bean="simpleBean"/>
        <bean class="com.ps.beans.SimpleBeanImpl"/>
        <null/>
    </util:list>

    <util:set id=" simpleSet" set-class="java.util.TreeSet">
        <ref bean="simpleBean"/>
    </util:set>

    <util:map id=" simpleMap" map-class="java.util.TreeMap">
        <entry key="one" value-ref="simpleBean"/>
    </util:map>

	<!--Injection collections-->
	<bean id="collectionHolder" class="com.ps.beans.others.CollectionHolder">
        <property name="simpleBeanList" ref="simpleList"/>
        <property name="simpleBeanSet" ref="simpleSet"/>
        <property name="simpleBeanMap" ref="simpleMap"/>
    </bean>
</beans>
Using Bean Factories
factory-method
- To use a singleton class to create a bean, the
factory-method attribute is used, and its value will be the static method name that returns the bean instance
<beans>
    <bean id="simpleSingleton" class="com.ps.beans.others.SimpleSingleton"
          factory-method="getInstance" />
</beans>
public class SimpleSingleton {
    private static SimpleSingleton instance = new SimpleSingleton();
    private SimpleSingleton() { }

    public static SimpleSingleton getInstance(){
        return instance;
    }
}
factory-bean
- To use a factory object to create a bean, the
factory-bean and factory-method attributes are used.
<beans>
    <bean id=" simpleBeanFactory" class="com.ps.beans.others.SimpleFactoryBean"/>
    <bean id="simpleFB" factory-bean="simpleBeanFactory" factory-method="getSimpleBean" />
</beans>
public class SimpleFactoryBean {

    public SimpleBean getSimpleBean() {
        return new SimpleBeanImpl();
    }
}
FactoryBean
By implementing this interface, the factory beans will be automatically picked up by the Spring container,
and the desired bean will be created by automatically calling the getObject method
<beans>
    <bean id="smartBean" class=" com.ps.beans.others.SpringFactoryBean"/>
</beans>
public class SpringFactoryBean implements FactoryBean<SimpleBean> {

    private SimpleBean simpleBean = new SimpleBeanImpl();

    public SimpleBean getObject() {
        return this.simpleBean;
    }

    public Class<?> getObjectType() {
		return SimpleBean.class;
	}

	public boolean isSingleton() {
		return true;
	}
}
FactoryBean
Bean Definition Inheritance
- Sometimes several beans need to be configured in the same way
- Use bean definition inheritance to define the common configuration once
Import configuration files
<beans>
    <!-- using relative path, no prefix-->
    <import resource="ctr/sample-config-01.xml"/>
    <import resource="ctr/sample-config-02.xml"/>

    <!-- using classpath-->
    <import resource="classpath: spring/ctr/sample-config-01.xml"/>
    <import resource="classpath: spring/ctr/sample-config-02.xml"/>

    <!-- using classpath and wildcards-->
     <import resource="classpath: spring/others/sample-config-*.xml"/>
</beans>
Application Context
- In Spring, an object implementing the
ApplicationContext interface is a container.
- The application context in a Spring application is a Java object that implements the
ApplicationContext interface and is responsible for:
- Instantiating beans in the application context.
- Configuring the beans in the application context.
- Assembling the beans in the application context.
- Managing the life-cycle of Spring beans.
Some commonly used implementations of the ApplicationContext interface are:
- AnnotationConfigApplicationContext - Standalone application context used with configuration in the form of annotated classes.
- This type of application context is used with standalone applications that uses Java configuration, that is classes annotated with
@Configuration.
- AnnotationConfigWebApplicationContext - Same as
AnnotationConfigApplicationContext but for web applications.
- ClassPathXmlApplicationContext - Standalone application context used with XML configuration located on the
classpath of the application.
- FileSystemXmlApplicationContext - Standalone application context used with XML configuration located as one or more files in the
file system.
- XmlWebApplicationContext - Web application context used with XML configuration.
The lifecycle of a Spring bean
The lifecycle of a Spring bean looks like this:
- Spring bean configuration is read and metadata in the form of a
BeanDefinition object is created for each bean.
-
- For a configuration using Java Configuration annotations, the classpath is scanned by a bean of type
org.springframework.context.annotation.ClassPathBeanDefinitionScanner, and the bean definitions are registered by a bean of type org.springframework.context.annotation.ConfigurationClassBeanDefinitionReader.
- All instances of
BeanFactoryPostProcessor are invoked in sequence and are allowed an opportunity to alter the bean metadata.
- For each bean in the container:
- An instance of the bean is created using the bean metadata.
- Properties and dependencies of the bean are set.
BeanPostProcessor’s postProcessBeforeInitialization are given a chance to process the new bean instance before initialization.- Any methods in the bean implementation class annotated with
@PostConstruct are invoked.
@PostConstruct is a standard Java lifecycle annotation, as specified in JSR-250.- An annotated method may have any visibility, may not take any parameters and may only have the void return type.
- Any
afterPropertiesSet method in a bean implementation class implementing the InitializingBean interface is invoked (this method is not recommended by the Spring).
- While heavily used in the Spring framework, this method is not recommended by the Spring
Reference Documentation since it introduce unnecessary coupling to the Spring framework.
- Any custom bean initialization method is invoked. Bean initialization methods can be specified either in the value of the
init-method attribute in the corresponding <bean> element in a Spring XML configuration or in the initMethod property of the @Bean annotation.
BeanPostProcessor’s postProcessAfterInitialization are given a chance to process the new bean instance after initialization.- The bean is ready for use.
- When the Spring application context is to shut down, the beans in it will receive destruction callbacks in this order:
- Any methods in the bean implementation class annotated with
@PreDestroy are invoked.
- @PreDestroy is a standard Java lifecycle annotation, as specified in JSR-250.
- An annotated method may have any visibility, may not take any parameters and may only have the void return type.
- Any destroy method in a bean implementation class implementing the
DisposableBean interface is invoked. If the same destruction method has already been invoked, it will not be invoked again. (this method is not recommended by the Spring)
- While heavily used in the Spring framework, this method is not recommended by the Spring Reference Documentation since it introduce unnecessary coupling to the Spring framework.
- Any custom bean destruction method is invoked.
Bean destruction methods can be specified either in the value of the
destroy-method attribute in the corresponding <bean> element in a Spring XML configuration or in the destroyMethod property of the @Bean annotation.
If the same destruction method has already been invoked, it will not be invoked again.
| |
 |
|
- Initialization methods are always called when a Spring bean is created, regardless of the scope of the bean.
- With Spring beans that have prototype scope, that is for which a new bean instance will be created
every time the Spring container receives a request for the bean, no destruction callback methods will be invoked by the Spring container.
BeanFactoryPostProcessor
- Configures bean definitions before beans are created.
- Could change
BeanDefinitions
BeanFactoryPostProcessor may interact with and modify bean definitions, bean metadata, but it may not instantiate beans.BeanFactoryPostProcessor is an interface that defines the property (a single method) of a type of
container extension point that is allowed to modify Spring bean meta-data prior to instantiation of
the beans in a container. A bean factory post processor may not create instances of beans, only
modify bean meta-data. A bean factory post processor is only applied to the meta-data of the beans
in the same container in which it is defined in.
- Example:
PropertySourcesPlaceholderConfigurer - allows for injection of values from the current Spring environment the property sources of this environment.
```java
public class PropertySourcesPlaceholderConfigurer extends PlaceholderConfigurerSupport implements EnvironmentAware {
}
```
DeprecatedBeanWarner - logs warnings about beans which implementation class is annotated with the @Deprecated annotation.PropertySourcesPlaceholderConfigurer - is a BeanFactoryPostProcessor that resolves property
placeholders, on the ${PROPERTY_NAME} format, in Spring bean properties and Spring bean
properties annotated with the @Value annotation.- In XML activates by
<context:property-placeholder location="classpath:db/db.properties" />
- Example how to define own BPFP
public class DeprecationHandlerBeanFactoryPostProcessor implements BeanFactoryPostProcessor {

	@Override
	public void postProcessBeanFactory(ConfigurableListableBeanFactory beanFactory) throws BeansException {
		final String[] beanDefinitionNames = beanFactory.getBeanDefinitionNames();
		for (String name : beanDefinitionNames) {
			final BeanDefinition beanDefinition = beanFactory.getBeanDefinition(name);
			final String beanClassName = beanDefinition.getBeanClassName();
			try {
				final Class<?> beanClass = Class.forName(beanClassName);
				final DeprecatedClass annotation = beanClass.getAnnotation(DeprecatedClass.class);
				if (annotation != null) {
					beanDefinition.setBeanClassName(annotation.newImpl().getName());
				}
			}
			catch (Exception e) {
				e.printStackTrace();
			}
		}
	}
}
Static BeanFactoryPostProcessor
BeanFactoryPostProcessor returning by @Bean methods this is a a special consideration must be taken for @Bean methods that return Spring BeanFactoryPostProcessor (BFPP) types.
Because BFPP objects must be instantiated very early in the container lifecycle, they can interfere with processing of annotations such as @Autowired, @Value, and @PostConstruct within @Configuration classes.
To avoid these lifecycle issues, mark BFPP-returning @Bean methods as static.- Static
@Bean methods can be defined in order to create, for instance, a BeanFactoryPostProcessor
that need to be instantiated prior to the instantiation of any beans that the BeanFactoryPostProcessor is supposed to modify before the beans are being used.
- The ‘static’ modifier allows a method to be called without creating its containing configuration class as an instance.
- It is necessary when beans will get initialized early in the container lifecycle.
- It avoids triggering other parts of the configuration at that point of definition.
- They will never get intercepted by the container, not even within
@Configuration classes.
@Bean
public static PropertySourcesPlaceholderConfigurer pspc() {
  // instantiate, configure and return pspc ...
}
BeanPostProcessor
BeanPostProcessor is an interface that defines callback methods that allow for modification of bean instances.BeanPostProcessor tells spring there some processing that spring have to do after initialising a bean. Spring execute these method for each bean.BeanPostProcessor used to extend spring’s functionality.BeanPostProcessor may even replace a bean instance with, for instance, an AOP proxy.
- Examples
AutowiredAnnotationBeanPostProcessor - implements support for dependency injection with the @Autowired annotation.PersistenceExceptionTranslationPostProcessor - applies exception translation to Spring beans annotated with the @Repository annotation.
- Example how to define own BPP
public class DisplayNameBeanPostProcessor implements BeanPostProcessor {

	@Override
	public Object postProcessBeforeInitialization(Object bean, String beanName) throws BeansException {
		System.out.println("Called postProcessBeforeInitialization " + beanName);
		return bean;
	}

	@Override
	public Object postProcessAfterInitialization(Object bean, String beanName) throws BeansException {
		System.out.println("Called postProcessAfterInitialization " + beanName);
		return bean;
	}
}
- When defining a
BeanPostProcessor using an @Bean annotated method,
it is recommended that the method is static, in order for the post-processor to be instantiated early in the Spring context creation process.
- The
static modifier allows a method to be called without creating its containing configuration class as an instance.
- It is necessary when beans will get initialized early in the container lifecycle.
- It avoids triggering other parts of the configuration at that point of definition.
- They will never get intercepted by the container, not even within
@Configuration classes.
How BeanPostProcessor is different to a BeanFactoryPostProcessor?
- Both
BeanPostProcessor and BeanFactoryPostProcessor are interfaces that allow for definition of container extensions.
- Both
BeanPostProcessor and BeanFactoryPostProcessor instances operate only on beans and bean
definitions respectively that are defined in the same Spring container.
- Classes implementing either the
BeanPostProcessor or the BeanFactoryPostProcessor interfaces
may also implement the Ordered interface in order to allow for setting a priority of a post-processor;
a lower order value will cause the post-processor to be invoked earlier.
- When defining a
BeanPostProcessor or a BeanFactoryPostProcessor using an @Bean annotated
method, it is recommended that the method is static, in order for the post-processor to be
instantiated early in the Spring context creation process.
Initializing beans priority
public class TriangleLifecycle implements InitializingBean {

	//  Calls #1
	@PostConstruct
	public void postConstruct(){
		System.out.println("TriangleLifecycle postConstruct : " + toString());
	}

	// Calls #2
	@Override
	public void afterPropertiesSet() throws Exception {
		System.out.println("TriangleLifecycle afterPropertiesSet : " + toString());
	}

	// Calls #3
	public void initMethod(){
		System.out.println("TriangleLifecycle initMethod : " + toString());
	}

}
@javax.annotation.PostConstruct
- The
@PostConstruct annotation is part of the JSR-250 and is used on a method that needs to be executed after dependency injection is done to perform initialization
- The bean that registers
@PostConstruct is org.springframework.context.annotation.CommonAnnotationBeanPostProcessor
- When creating a Spring application context using an implementation that uses annotation-based configuration, for instance
AnnotationConfigApplicationContext, a default
CommonAnnotationBeanPostProcessor is automatically registered in the application context and no additional configuration is necessary to enable @PostConstruct and @PreDestroy.
- The methods that can be annotated with
@PostConstruct must respect the rules:
- they must have no arguments
- return void
- they can have any access right
- Transactions don’t configured/exists when
@PostConstruct handled, that is why must not call data source in @PostConstruct method
- Because
@PostConstruct works before every proxy are configured
- They configure in
postProcessAfterInitialization stage in BPP, but @PostConstruct handles before postProcessAfterInitialization stage in BPP,
context namespace
<context:annotation-config />
- Enables scanning of all the classes in the project for annotations, so using it on large applications might make them slow
- Activates various annotations to be detected in bean classes:
- Spring’s
@Required and @Autowired
- JSR 250’s
@PostConstruct, @PreDestroy and @Resource
- JPA’s
@PersistenceContext and @PersistenceUnit (if available).
- Register post-processors:
AutowiredAnnotationBeanPostProcessorCommonAnnotationBeanPostProcessor - is automatically registered in the application context and no additional configuration is necessary to enable @PostConstruct and @PreDestroy.PersistenceAnnotationBeanPostProcessorRequiredAnnotationBeanPostProcessor
<context:component-scan />
- Scans the classpath for annotated components that will be auto-registered as Spring beans.
- By default, the Spring-provided
@Component, @Repository, @Service, @Controller, @RestController, @ControllerAdvice, and @Configuration stereotypes will be detected.
- Reduce the number of classes to be scanned
- The use of
<context:component-scan /> implicitly enables the functionality of <context:annotation-config />.
- There is usually no need to include the
<context:annotation-config /> element when using <context:component-scan />.
| |
 |
|
Context name space configuration example
Destroying beans priority
- These 2 ways will result in the publishing of a
ContextClosedEvent. You can create a listener to listen to the mentioned event, and do some actions when the application context is closing.
Both of them will result in doClose() being called. doClose() publishes the ContextClosedEvent.
- Call
close() on the application context
- Use the
registerShutdownHook() on the application context
- Called also when JVM exit normally
- Not called for
prototype beans
- Destroying ways
- Annotate a method with
@PreDestroy, also part of JSR 250 and one of the first supported annotations in Spring.
- Modify the bean to implement the
org.springframework.beans.factory.DisposableBean interface and provide an implementation for the destroy() method (not recommended, since it couples the application code with Spring infrastructure).
- Set a method to be called before destruction using the
destroy-method attribute of the element.
- The equivalent of
destroy-method for Java Configuration @Bean(destroyMethod="...").
public class TriangleLifecycle implements DisposableBean {

	// Calls #1
	@PreDestroy
	public void preDestroy(){
		System.out.println("TriangleLifecycle preDestroy : " + toString());
	}

	// Calls #2
	@Override
	public void destroy() throws Exception {
		System.out.println("TriangleLifecycle destroy : " + toString());
	}

	// Calls #3
	public void destroyMethod(){
		System.out.println("TriangleLifecycle destroyMethod : " + toString());
	}

}
- Set the
destroyMethod element of the @Bean annotation
@Bean(destroyMethod = "destroyMethod")
public MyBeanClass myBeanWithACloseMethodNotToBeInvokedAsLifecycleCallback() {
	final MyBeanClass theBean = new MyBeanClass();
	return theBean;
}
- Destroy method’s rules
- The destroy method may be called only once during the bean lifecycle.
- The destroy method can have any accessor; some developers even recommend to make it
private, so that only Spring can call it via reflection.
- The destroy method must not have any parameters.
- The destroy method must return
void.
Bean Scopes
- Default scope for a bean is
singleton
| Scope |
Description |
| singleton |
[Default] The Spring IoC creates a single instance of this bean, and any request for beans with an id or ids matching this bean definition results in this instance being returned. |
| prototype |
Each time a bean is requested, a new instance is created. Every time a request is made for this specific bean, the Spring IoC creates a new instance. |
| request |
Single bean instance per HTTP request. Only in web-aware Spring application contexts. |
| session |
Single bean instance per HTTP session. Only in web-aware Spring application contexts. |
| application |
Single bean instance per ServletContext. Only in web-aware Spring application contexts. |
| websocket |
Single bean instance per WebSocket. Only in web-aware Spring application contexts. |
| globalSession |
Connected to Portlet applications. Scopes a single bean definition to the lifecycle of a global HTTP Session. |
| custom |
Developers are provided the possibility to define their own scopes with their own rules. |
<bean id="complexBean" class="com.ps.sample.ComplexBean" scope="prototype"/>
@Scope
- proxyMode
- Define bean with scope
request
  @Bean
  @Scope(value = WebApplicationContext.SCOPE_REQUEST, proxyMode = ScopedProxyMode.TARGET_CLASS)
  public HelloMessageGenerator requestScopedBean() {
      return new HelloMessageGenerator();
  }
- Define controller in which autowire bean with scope
request
  @Controller
  public class ScopesController {

      @Autowire
      private HelloMessageGenerator requestScopedBean;

      @RequestMapping("/scopes/request")
      public String getRequestScopeMessage(final Model model) {
          model.addAttribute("previousMessage", requestScopedBean.getMessage());
          requestScopedBean.setMessage("Good morning!");
          model.addAttribute("currentMessage", requestScopedBean.getMessage());
          return "scopesExample";
      }
  }
In case if we don’t specify scope for HelloMessageGenerator we will get error while instantiation ScopesController.
proxyMode will fix this problem, this attribute is necessary because, at the moment of the instantiation of the web application context,
there is no active request. Spring will create a proxy to be injected as a dependency, and instantiate
the target bean when it is needed in a request.
public enum ScopedProxyMode {

	/**
	 * Default typically equals {@link #NO}, unless a different default
	 * has been configured at the component-scan instruction level.
	 */
	DEFAULT,

	/**
	 * Do not create a scoped proxy.
	 * <p>This proxy-mode is not typically useful when used with a
	 * non-singleton scoped instance, which should favor the use of the
	 * {@link #INTERFACES} or {@link #TARGET_CLASS} proxy-modes instead if it
	 * is to be used as a dependency.
	 */
	NO,

	/**
	 * Create a JDK dynamic proxy implementing <i>all</i> interfaces exposed by
	 * the class of the target object.
	 */
	INTERFACES,

	/**
	 * Create a class-based proxy (uses CGLIB).
	 */
	TARGET_CLASS;

}
Lazy and eager beans
- Singleton scoped beans in an application context are
eagerly initialized by default, as the application context is created.
- Prototype scoped bean are typically created
lazily when requested.
- An exception is when a prototype scoped bean is a dependency of a singleton scoped bean,
in which case the prototype scoped bean will be
eagerly initialized.
- As a rule, use the prototype scope for all stateful beans and the singleton scope for stateless beans
Additional ways to create app context
- new AnnotationConfigApplicationContext(AppConfig.class);
- new ClassPathXmlApplicationContext(“com/example/app-config.xml”);
- new FileSystemXmlApplicationContext(“C:/Users/vojtech/app-config.xml”);
- new FileSystemXmlApplicationContext(“./app-config.xml”);
Depends-on
- Initialization of Bean
monitoring will be after initialization of bean app
Accessing a Bean
Java Spring Configuration and Annotations
@Configuration
- Classes annotated with
@Configuration contain bean definitions.
- Configuration classes cannot be final
- The Spring container will create a subclass of each class annotated with
@Configuration when
creating an application context using CGLIB. Final classes cannot be subclassed, thus classes
annotated with @Configuration cannot be declared as final.
- Configuration classes are subclassed by the Spring container using CGLIB and final classes cannot be subclassed.
@Bean methods can’t be final- The reason for the Spring container subclassing
@Configuration classes is to control bean creation for singleton beans,
subsequent requests to the method creating the bean should return the same bean instance as created at the first invocation of the @Bean annotated method.
- Singleton beans are supported by the Spring container by subclassing classes annotated with
@Configuration and overriding the @Bean annotated methods in the class. Invocations to the
@Bean annotated methods are intercepted and, if a bean is a singleton bean and no instance of the
singleton bean exists, the call is allowed to continue to the @Bean annotated method, in order to
create an instance of the bean. If an instance of the singleton bean already exists, the existing
instance is returned
| |
 |
|
Annotations
- Spring manages lifecycle of beans, each bean has its scope
- Default scope is
singleton - one instance per application context
- Scope can be defined by
@Scope(eg. @Scope(BeanDefinition.SCOPE_SINGLETON)) annotation on the class-level of bean class
@Order is used to define sort order for components annotated with this annotation.- Stereotypes annotations are used to mark classes according to their purpose:
@Component: Rootrstereotype, template for any Spring-managed component(bean).@Repository: indicates that a class is a repository (persistence). template for a component used to provide data access, specialization of the @Component annotation for the the Dao layer.@Service: template for a component that provides service execution, specialization of the @Component annotation for the Service layer.@Controller: indicates that a class is a web controller. Template for a web component, specialization of the @Component annotation for the Web layer.@RestController: indicates that a class is a specialized web controller for a REST service. Combines the @Controller and @ResponseBody annotations.@Configuration: configuration class containing bean definitions (methods annotated with @Bean).
@ComponentScan - To enable component scanning, annotate a configuration class in your Spring application with the
@ComponentScan annotation. The default component scanning behavior is to detect classes
annotated with @Component or an annotation that itself is annotated with @Component. Note that
the @Configuration annotation is annotated with the @Component annotation and thus are Spring
Java configuration classes also candidates for auto-detection using component scanning.
Filtering configuration can be added to the @ComponentScan annotation as to include or exclude certain classes.
@ComponentScan(
    basePackages = "com.linnyk.learning",
    basePackageClasses = CalculatorService.class,
    excludeFilters = @ComponentScan.Filter(type = FilterType.REGEX, pattern = ".*Repository"),
    includeFilters = @ComponentScan.Filter(type = FilterType.ANNOTATION, classes = MyService.class)
)
@Configuration
@PropertySource("classpath:db/datasource.properties")
@ImportResource("classpath:spring/user-repo-config.xml")
@Import({DataSourceConfig.class,  UserRepoDSConfig.class})
@ComponentScan(basePackages = "com.ps")
public class DataSourceConfig {

    @Value("${driverClassName}")
    private String driverClassName;

    @Bean
    public static PropertySourcesPlaceholderConfigurer
           propertySourcesPlaceholderConfigurer() {
        return new PropertySourcesPlaceholderConfigurer();
    }
    @Bean
    public DataSource dataSource() throws SQLException {
        DriverManagerDataSource ds = new DriverManagerDataSource();
        ds.setDriverClassName(driverClassName);
        ds.setUrl(url);
        ds.setUsername(username);
        ds.setPassword(password);
        return ds;
    }
}
- @Bean
@Bean annotation is used to tell Spring that the result of the annotated method will be a bean that has to be managed by it.@Bean annotation together with the method are treated as a bean definition, and the method name becomes the bean id.@Bean ( initMethod = "init", destroyMethod = "destroy") - for declare init and destroy methods- Configure autowiring of dependencies; whether by name or type.
autowire() default Autowire.NO;
NO(AutowireCapableBeanFactory.AUTOWIRE_NO)BY_NAME(AutowireCapableBeanFactory.AUTOWIRE_BY_NAME)BY_TYPE(AutowireCapableBeanFactory.AUTOWIRE_BY_TYPE)
- The default bean name, also called bean id, is the name of the
@Bean annotated method.
This default id can be overridden using the name attribute of the @Bean annotation.
@Lazy: dependency will be injected the first time it is used.@PropertySource annotation can be used to add a property source to the Spring environment.
- The annotation is applied to classes annotated with
@Configuration.
| |
 |
|
| |
 |
|
@ComponentScan(
	basePackages = "comlearnig",
	basePackageClasses = CalculatorService.class,
	excludeFilters = @ComponentScan.Filter(type = FilterType.REGEX, pattern = ".*Repository"),
	includeFilters = @ComponentScan.Filter(type = FilterType.ANNOTATION, classes = MyService.class)
)
public class SpringApplication {

}
- Meta-annotations are annotations that can be applied to definitions of annotations. Note that this
means that a meta-annotation must be applicable at type level, apart from any other locations it may
appear at. The following example shows the definition of the Spring
@RestController annotation:
@Target(ElementType.TYPE)
@Retention(RetentionPolicy.RUNTIME)
@Documented
@Controller
@ResponseBody
public @interface RestController {

}
- This annotation is annotated with the Spring meta-annotations
@Controller and @ResponseBody.
@Autowired
- Autowiring and initialization annotations are used to define which dependency is injected and what the bean looks like.
- Java Configuration and all other annotations: a
org.springframework.beans.factory.annotation.AutowiredAnnotationBeanPostProcessor bean is used to autowire dependencies
- If a bean class contains one single constructor, then annotating it with
@Autowired is not required in order for the Spring container to be able to autowire dependencies.
- If a bean class contains more than one constructor and autowiring is desired, at least one of the constructors need to be annotated
with
@Autowired in order to give the container a hint on which constructor to use.
- If there are multiple matching bean candidates and one of them is annotated with
@Primary, then this bean is selected and injected into the field or parameter.
- If there are multiple matching bean candidates and the field or parameter is annotated with the @Qualifier annotation,
then the Spring container will attempt to use the information from the
@Qualifier annotation to select a bean to inject.
- If there is no other resolution mechanism, such as the
@Primary or @Qualifier annotations, and there are multiple matching beans, the Spring container will try to resolve the
appropriate bean by trying to match the bean name to the name of the field or parameter. This is the default bean resolution mechanism used when autowiring dependencies.
- If still no unique match for the field or parameter can be determined, an exception will be thrown.
@Autowired: core annotation for this group; is used on dependencies to instruct Spring IoC to take care of injecting them.
- Can be used on fields, constructors, setters and methods.
- Use with
@Qualifier from Spring to specify name of the bean to inject.
- If a bean class contains one single constructor, then annotating it with
@Autowired is not required
in order for the Spring container to be able to autowire dependencies. If a bean class contains more
than one constructor and autowiring is desired, at least one of the constructors need to be annotated
with @Autowired in order to give the container a hint on which constructor to use.
- Autowire by type then by name
- Typed Map collections can be autowired as long as the expected key type is String.
 @Autowired
public void setMovieCatalogs(Map<String, MovieCatalog> movieCatalogs) {
this.movieCatalogs = movieCatalogs;
}
- When the Autowired annotation is used on an array field or an array method argument ‘MovieCatalog[]’, all beans of type MyClass in the Spring context, will be in the array injected.
@Autowired
private MovieCatalog[] movieCatalogs;
@Inject: equivalent annotation to @Autowired from javax.inject package. Use with @Qualifier from javax.inject to specify name of the bean to inject.@Resource: equivalent annotation to @Autowired from javax.annotation package.
- Autowire by name then by type
@Required: Spring annotation that marks a dependency as mandatory, used on setters.
@Required
public void setMovieFinder(MovieFinder movieFinder) {
  this.movieFinder = movieFinder;
}
@Autowired may also be used for well-known “resolvable dependencies”, these interfaces will be automatically resolved, with no special setup necessary.
BeanFactory interfaceApplicationContext interfaceEnvironment interfaceResourceLoader interfaceApplicationEventPublisher interfaceMessageSource interface
- If the type that is autowired is a map with the key type being String, then the Spring
container will collect all beans matching the value type of the map and insert these into the map with the bean name as key and inject the map.
- When autowiring arrays, collections or maps containing Spring beans, dependency injection will, as default, fail with an error if there are no matching beans.
- Thus an empty array, collection or map will not be injected. If the array, collection or map
parameter is made optional, null (and not an empty array, collection or map) will be injected if there are no beans of the matching type.
@Qualifier
@Qualifier annotation can aid in selecting one single bean to be dependency-injected into a field or parameter annotated with @Autowired when there are multiple candidates.- The most basic use of the
@Qualifier annotation is to specify the name of the Spring bean to be selected the bean to be dependency-injected.
- The
@Qualifier annotation can be used at three different locations:
- At injection points.
- At bean definitions.
- At annotation definitions. This creates a custom qualifier annotation.
@Autowired
@Qualifier("userServiceImpl")
private UserService userService;
@Qualifier at Bean Definitions
@Qualifier can also be applied on bean definitions by annotating a method annotated with @Bean in a configuration class with @Qualifier and supplying a value in the @Qualifier annotation.@Qualifier annotation can also be used on types and fields.@Qualifier annotation can be used on individual constructor arguments.@Qualifier annotations applied on collections (e.g. Set) are valid.- The bean name is considered a default qualifier value.
- The @Qualifier annotation can be used at three different locations:
- At injection points.
- The most basic use of the
@Qualifier annotation is to specify the name of the Spring bean to be selected the bean to be dependency-injected.
- At bean definitions.
- By annotating a method annotated with
@Bean in a configuration class with @Qualifier and supplying a value in the @Qualifier annotation.
- If a bean has not been assigned a qualifier, the default qualifier, being the name of the bean, will be assigned the bean.
- At annotation definitions. This creates a custom qualifier annotation.
@Component
public class FactoryMethodComponent {

    @Bean
    @Qualifier("public")
    public TestBean publicInstance() {
        return new TestBean("publicInstance");
    }

    @Bean
    protected TestBean protectedInstance( @Qualifier("public") TestBean spouse) {
        //...
    }
}
@Bean
@Bean annotation tells the Spring container that the method annotated with the @Bean annotation will instantiate, configure and initialize an object that is to be managed by the Spring container.
- Configure autowiring of dependencies; whether by name or type.
- Configure a method to be called during bean initialization -
initMethod - this method will be called after all the properties have been set on the bean but before the bean is taken in use.
- Configure a method to be called on the bean before it is discarded -
destroyMethod
- The default bean name is the name of the method annotated with the
@Bean annotation and it will be used if there are no other name specified for the bean.
- This functionality can be overridden, however, with the
name attribute
- To add a description to a
@Bean the @Description annotation can be used
- Why
@Bean method cannot be final?
- Spring container subclass classes
@Configuration classes and overrides the methods
annotated with the @Bean annotation, in order to intercept requests for the beans. If the bean is a
singleton bean, subsequent requests for the bean will not yield new instances, but the existing
instance of the bean.
- The
@Bean annotation can be used inside an @Configuration-annotated class.
- The
@Bean annotation can be used inside an @Component-annotated class.
@Bean(name = "myFoo", initMethod = "init", destroyMethod = "cleanup")
@Description("Provides a basic example of a bean")
public Foo foo() {
	return new Foo();
}
Lookup method injection
- Lookup method injection is an advanced feature that you should use rarely. It is useful in cases where a
singleton-scoped bean has a dependency on a prototype-scoped bean
- Configuration example
@Configuration
public class LMIConfiguration {

	@Bean
	@Qualifier("myCommand")
	@Scope("prototype")
	public Command command() {
		return new Command();
	}

	@Bean
	public CommandManager commandManager() {
		return new CommandManager() {

			@Override
			Command createCommand() {
				return command();
			}
		};
	}
}
public class Command {

	public void execute() {
		System.out.println("Command: " + this.hashCode());
	}

}

public abstract class CommandManager {

	@Lookup
	abstract Command createCommand();

	public void process() {
		System.out.println("CommandManager: " + this.hashCode());
		final Command command = createCommand();
		command.execute();
	}

}
- Application example.
Prototype beans is different every time, but Singleton is unique
public class App {

	public static void main(String[] args) {
		ApplicationContext context = new AnnotationConfigApplicationContext(LMIConfiguration.class);
		final CommandManager commandManager = context.getBean(CommandManager.class);

		commandManager.process();
		// CommandManager: 81412691
		// Command: 717176949

		commandManager.process();
		// CommandManager: 81412691
		// Command: 1997353766

		commandManager.process();
		// CommandManager: 81412691
		// Command: 1288235781
	}
}
Bean Naming
- When the name is not defined for a bean declared with
@Bean, the Spring IoC names the bean with the annotated method name.
// bean name = dataSource
@Bean
public DataSource dataSource() throws SQLException {

}

//bean name = one
@Bean(name="one")
public DataSource dataSource() throws SQLException {

}

//bean name =  one, alias = two
@Bean(name={"one", "two"})
public DataSource dataSource() throws SQLException {

}
- When the name is not defined for a bean declared with Component, the Spring IoC creates the name of the bean from the name of the bean type, by lowercasing the first letter.
// bean name = jdbcRequestRepo
@Repository
public class JdbcRequestRepo extends JdbcAbstractRepo<Request> implements RequestRepo{

}

// bean name = requestRepo
@Repository("requestRepo")
public class JdbcRequestRepo extends JdbcAbstractRepo<Request> implements RequestRepo{

}
// or
@Repository(value="requestRepo")
public class JdbcRequestRepo extends JdbcAbstractRepo<Request> implements RequestRepo{

}
//  or
// bean name = requestRepo
@Component("requestRepo")
public class JdbcRequestRepo extends JdbcAbstractRepo<Request> implements RequestRepo{

}
@Description annotation, which was added in Spring 4.x is used to add a description to a bean
@Repository
@Description("This is not the bean you are looking for")
public class JdbcRequestRepo extends JdbcAbstractRepo<Request> implements RequestRepo {

}
Field Injection
- Dependency injection, regardless of whether on fields, constructors or methods, is performed by the
AutowiredAnnotationBeanPostProcessor.
@Autowire can be used on fields, constructors, setters, and even methods.- In using
@Autowired on constructors, it makes not sense to have more than one constructor annotated with it, and Spring will complain about it because it will not know what constructor to use to instantiate the bean.
- Out of the box, Spring will try to autowire by type
- If there are multiple matching bean candidates and one of them is annotated with
@Primary,
then this bean is selected and injected into the field or parameter.
- If there is no other resolution mechanism, such as the
@Primary or @Qualifier annotations, and there are multiple matching beans, the Spring container will try to resolve the
appropriate bean by trying to match the bean name to the name of the field or parameter. This is the default bean resolution mechanism used when autowiring dependencies.
- If still no unique match for the field or parameter can be determined, an exception will be thrown.
- If Spring cannot decide which bean to autowire based on type (because there are more beans of the same type in the application), it defaults to
autowiring by name.
@Qualifier - in case Spring finds more than candidate for autowiring to qualify which bean to inject@Autowired annotation by default requires the dependency to be mandatory, but this behavior can be changed, by setting the required attribute to true (@Autowired(required=false))- If the type that is autowired is an array-type, then the Spring container will collect all beans matching the value-type of the array in an array and inject the array.
- If the type that is autowired is a map with the key type being String, then the Spring container will collect all beans matching the value type of the map and
insert these into the map with the bean name as key and inject the map.
   @Qualifier("requestRepo")
   @Autowired
   RequestRepo reqRepo;
Constructor Injection
- Constructors in Spring bean classes can be annotated with the
@Autowired annotation in order for
the Spring container to look up Spring beans with the same types as the parameters of the
constructor and supply these beans (as parameters) when creating an instance of the bean with the @Autowired - annotated constructor.
- If there is only one single constructor with parameters in a Spring bean class, then there is no need
to annotate this constructor with
@Autowired – the Spring container will perform dependence injection anyway.
- If there are multiple constructors in a Spring bean class and autowiring is desired,
@Autowired may
be applied to one of the constructors in the class.
- Only one single constructor may be annotated with
@Autowired.
- Constructors annotated with
@Autowired does not have to be public in order for Spring to be able
to create a bean instance of the class in question, but can have any visibility.
- If a constructor is annotated with
@Autowired, then all the parameters of the constructor are required. Individual parameters of such constructors can be declared using the Java 8 Optional
container object, annotated with the @Nullable annotation or annotated with @Autowired(required=false) to indicate that the parameter is not required. Such parameters will be
set to null, or Optional.EMPTY if the parameter is of the type Optional.
@Repository("requestRepo")
public class JdbcRequestRepo  extends JdbcAbstractRepo<Request> implements RequestRepo{

    @Autowired
    public JdbcRequestRepo(DataSource dataSource) {
        super(dataSource);
    }
 }
Setter Injection
- Methods with any visibility.
Example: Setter-methods annotated with @Autowired can be private – the Spring container will still detect and invoke them.
- If a method annotated with
@Autowired, regardless of whether required is true or false, has parameters wrapped by the Java 8 Optional, then this method will always be invoked with the
parameters for which dependencies can be resolved having a value wrapped in an Optional object. All parameters for which no dependencies can be resolved will have the value Optional.EMPTY.
public class JdbcUserRepo extends JdbcAbstractRepo<User> implements UserRepo {

	private DataSource dataSource;

	@Autowired
	public void setDataSource(DataSource dataSource) {
		this.dataSource = dataSource;
	}

    //or by name
     @Autowired
    public void setDataSource( @Qualifier("oracleDataSource") DataSource dataSource) {
        this.dataSource = dataSource;
    }
}
Method Injection
- Methods with more than one parameter.
- Methods with any visibility.
Example: Setter-methods annotated with @Autowired can be private – the Spring container will still detect and invoke them.
- Methods that do not have a void return type.
- If a method annotated with
@Autowired(required = false) has multiple parameters then this method
will not be invoked by the Spring container, and thus no dependency injection will take place, unless all the dependencies can be resolved in the Spring context.
- If a method annotated with
@Autowired, regardless of whether required is true or false, has parameters wrapped by the Java 8 Optional, then this method will always be invoked with the
parameters for which dependencies can be resolved having a value wrapped in an Optional object. All parameters for which no dependencies can be resolved will have the value Optional.EMPTY.
@Configuration
public class MethodSecurityConfig {

  @Autowired
  public void registerGlobal(AuthenticationManagerBuilder auth) {
    // some business logic
  }

}
Generic Injection
- This is useful when you have classes that are organized in a hierarchy and they all inherit a certain class that is generic,
like the repositories in the project attached to the book, all of which extend
JdbcAbstractRepo<T>
@ContextConfiguration(classes = {AllRepoConfig.class})
public class GenericQualifierTest {

    @Autowired
    JdbcAbstractRepo<Review> reviewRepo;

    @Autowired
    JdbcAbstractRepo<Response> responseRepo;

}
public class JdbcAbstractRepo<T extends AbstractEntity> implements AbstractRepo<T> {
	...
}
@Value annotation
@Value - can be used to insert scalar values or can be used together with placeholders and SpEL in order to provide flexibility in configuring a bean
- Such values can originate from environment variables, property files, Spring beans etc.
- Is used to inject value
- system properties using ${} - these expressions are evaluated by the
PropertySourcesPlaceholderConfigurer Spring bean prior
to bean creation and can only be used in @Value annnotations.
- SpEL using #{} - Spring Expression Language expressions parsed by a SpEL expression parser and evaluated by a SpEL expression instance.
- Can be on fields, constructor parameters or setter parameters
- On constructors and setters must be combined with
@Autowired on method level, for fields @Value alone is enough
- Can specify default values
${minAmount:100}"${personservice.retry-count:${services.default.retry-count}}
@Value injection using SpEL
#{environment['minAmount'] ?: 100}#{T(java.lang.Math).random() * 50.0 }#{@systemProperties['os.name']}path equivalent to PATHjava.home equivalent to JAVA_HOME
- The
@Valuea annotation can be applied to:
- Fields
- Methods. Typically setter methods
- Method parameters. Including constructor parameters. Note that when annotating a parameter in a method other
than a constructor, automatic dependency injection will not occur. If automatic injection of
the value is desired, the
@Value annotation should be moved to the method instead.
- Definition of annotations. In order to create a custom annotation.
	 @Value("${driverClassName}") private String driverClassName;
	 @Value("${url}") private String url;

	 @Value("#{dbProps.driverClassName}") String driverClassName,
	 @Value("#{dbProps.url}")String url,
	 @Value("#{dbProps.username}")String username,
	 @Value("#{dbProps.password}")String password
Spring Expression language (SpEL)
- Acronym
SpEL
- can be used in @Value annotation values
- enclosed in #{}
- ${} is for properties, #{} is for
SpEL
- Access property of bean #{beanName.property}
- Can reference systemProperties and systemEnvironment
- Used in other spring projects such as Security, Integration, Batch, WebFlow,…
- SpEL has support for:
- Literal expressions.
- Example string: ‘Hello World’
- Properties, arrays, lists and maps.
- Example create a list of integers:
{1, 2, 3, 4, 5}
- Example create a map:
{1 : "one", 2 : "two", 3 : "three", 4 : "four"}
- Example retrieve third item in list referenced by variable theList:
#theList[3]
- Example retrieve value from map in variable personsMap that has key “ivan”:
#personsMap['ivan']
- Method invocation.
- Example invoke a method on a Java object stored in variable javaObject:
#javaObject.firstAndLastName()
- Operators.
- Creating Java objects using new operator.
- Ternary operator: ? :
- The Elvis operator: ?:
- Safe navigation operator: ?.
- Regular expression “matches” operator: ‘168’ matches ‘\d+’
- Variables
- Variables are set on the evaluation context and accessed in SpEL expressions using the # prefix.
- Example access the list in the numbersList variable:
#numbersList
- User defined functions
- Implemented as static methods.
- Referencing Spring beans in a bean factory (application context).
@mySuperComponent.injectedValue
- Collection selection expressions.
- Creates a new collection by selecting a subset of elements from a collection. Syntax: .?[]
- Collection projection.
- Creates a new collection by applying an expression to each element in a collection. Syntax: .![]
- The following entities can be referenced from Spring Expression Language (SpEL) expressions.
- Static methods and static properties/fields.
T(com.linnyk.spring.MyBeanClass).myStaticMethod()T(com.linnyk.spring.MyBeanClass).myClassVariable
- Properties and methods in Spring beans. A Spring bean is references using its name prefixed with @ in SpEL.
- Example accessing property on Spring bean:
@mySuperComponent.injectedValue
- Example invoking method on Spring bean:
@mySuperComponent.toString()
- Properties and methods in Java objects with references stored in SpEL variables.
References and values stored in variables are referenced using the variable name prefixed with # in SpEL.
- Example accessing property on Java object:
#javaObject.firstName
- Example invoking method on Java object:
#javaObject.firstAndLastName()
- (JVM) System properties. Available through the systemProperties reference, which is available by default.
- Example retrieving OS name property:
@systemProperties['os.name']
- System environment properties.
- Example KOTLIN_HOME environment variable:
@systemEnvironment['KOTLIN_HOME']
- Spring application environment. Available through the environment reference, also available by default.
- Example retrieve name of first default profile:
@environment['defaultProfiles'][0]
- Expressions starting with $.
Such expressions reference a property name in the application’s environment. These expressions are evaluated by the
PropertySourcesPlaceholderConfigurer Spring bean prior to bean creation and can only be used in @Value annnotations.
- Expressions starting with #.
Spring Expression Language expressions parsed by a
SpEL expression parser and evaluated by a SpEL expression instance.
Environment
- The
Environment is a part of the application container. The Environment contains profiles and properties, two important parts of the application environment.
@Lazy
- This annotation can be used to postpone the creation of a bean until it is first accessed, by adding this annotation to the bean definition
- To explicitly set whether beans are to be lazily or eagerly initialized, the
@Lazy annotation can be applied either to:
-
Methods annotated with the @Bean annotation.
Bean will be lazy or not as specified by the boolean parameter to the @Lazy annotation (default value is true).
-
Classes annotated with the @Configuration annotation.
All beans declared in the configuration class will be lazy or not as specified by the boolean parameter to the @Lazy annotation (default value is true).
-
Classes annotated with @Component or any related stereotype annotation.
The bean created from the component class will be lazy or not as specified by the boolean parameter to the @Lazy annotation (default value is true).
@Component
@Lazy
public class SimpleBean {

}

// or on a @Bean
@Configuration
public class RequestRepoConfig {

	@Lazy
	@Bean
	public RequestRepo anotherRepo(){
		return new JdbcRequestRepo();
}
}

// on injection point
@Repository
public class JdbcPetRepo extends JdbcAbstractRepo<Pet>
implements PetRepo {

    @Lazy
    @Autowired(required=false)
    public void setDataSource(DataSource dataSource) {
        this.dataSource = dataSource;
    }
}
@Profile
- Bean definition profiles is a mechanism that allows for registering different beans depending on different conditions.
- Testing and development.
Certain beans are only to be created when running tests. When developing, an in-memory
database is to be used, but when deploying a regular database is to be used.
- Performance monitoring.
- Application customization for different markets, customers
- One or more beans can be configured to be registered when one or more profiles are active using the
@Profile annotation.
- The beans in the below configuration class will be registered if the “dev” or “qa” profile is active.
- Beans with no profile is available in all profiles
@Profile({"dev", "qa"})
@Configuration
public class ConfigurationClass {

}
- Profile names in the
@Profile annotation can be prefixed with !, indicating that the bean(s) are to be registered when the the profile with specified name is not active.
- Another example -
@Profile("!a & !b"
@Profile("!prod")
@Configuration
public class ConfigurationClass {

}
- The
@Profile annotation can be applied at the following locations:
- At class level in
@Configuration classes.
- Beans in the configuration class and beans in configuration(s) imported with
@Import annotation(s) will only be created and registered if the conditions in the @Profile annotation are met.
- At class level in classes annotated with
@Component or annotated with any other annotation that in turn is annotated with @Component.
- The component will only be created and registered if the conditions in the
@Profile annotation are met.
- On methods annotated with the
@Bean annotation.
- Applied to a single method annotated with the
@Bean annotations. The bean will only be created and registered if the conditions in the @Profile annotation are met.
- Type level in custom annotations.
- Acts as a meta-annotation when creating custom annotations.
- Activating Profile(s)
- Programmatic registration of active profiles when the Spring application context is created.
applicationContext.getEnvironment().setActiveProfiles("dev1", "dev2");
- Using the spring.profiles.active property
java -Dspring.profiles.active=dev1,dev2 -jar myApp.jar
- In tests, the
@ActiveProfiles annotation may be applied at class level to the test class
specifying which the profile(s) that are to be activated when the tests in the class are run.
- There is a default profile named
default that will be active if no other profile is activated.
- There does not seem to be any limitation concerning how many profiles that can be used in a Spring application.
The Spring framework (in the class ActiveProfilesUtils) use an integer to iterate over an array of active profiles, which implies a maximum number of 2^32 – 1 profiles.
| |
 |
|
Close an application context
- Standalone Application
- Registering a shutdown-hook by calling the method
registerShutdownHook, also
implemented in the AbstractApplicationContext class.
This will cause the Spring application context to be closed when the Java virtual machine is
shut down normally. This is the recommended way to close the application context in a non-web application.
- Calling the
close method from the AbstractApplicationContext class.
This will cause the Spring application context to be closed immediately.
- Web Application
- In a web application, closing of the Spring application context is taken care of by the
ContextLoaderListener, which implements the ServletContextListener interface. The
ContextLoaderListener will receive a ServletContextEvent when the web container stops the web application.
- Spring Boot Closing Application Context
- Spring Boot will register a shutdown-hook as described above when a Spring application that uses Spring Boot is started.
The mechanism described above with the ContextLoaderListener also applies to Spring Boot web applications.
Spring Test
Create an ApplicationContext in an integration test
Depending on whether JUnit 4 or JUnit 5 is used, the annotation @RunWith (JUnit 4) or
@ExtendWith (JUnit 5) is used to annotate the test-class. In addition, the annotation
@ContextConfiguration in both cases to specify either the XML configuration file(s) or the Java
class(es) containing the Spring configuration to be loaded into the application context for the test.
JUnit 4 Example
@RunWith(SpringJUnit4ClassRunner.class)
@ContextConfiguration(classes={TestConfig.class, OtherConfig.class})
public final class FooTest  {

    @Autowired
    private MyService myService;

    @Test
    public void test() {

    }
}
or
AbstractJUnit4SpringContextTests implements ApplicationContextAware and therefore provide access to the ApplicationContext automatically.
@ContextConfiguration
public class MyTestClass extends AbstractJUnit4SpringContextTests {

}
JUnit 5 Example
@SpringJUnitConfig(classes={TestConfig.class, OtherConfig.class})
public final class FooTest  {

    @Autowired
    private MyService myService;

    @Test
    public void test() {

    }
}
Testing Web Application Context
- Spring Unit test with
@WebAppConfiguration
- Creates a
WebApplicationContext
- Can test code that uses web features
- ServletContext, Session and Request bean scopes
- Configures the location of resources
- Defaults to
src/main/webapp
- For classpath resources use classpath: prefix
@SpringJUnitConfig(classes={TestConfig.class, OtherConfig.class})
@WebAppConfiguration
public final class FooTest  {

    @Autowired
    private MyService myService;

    @Autowired
    private WebApplicationContext mWebApplicationContext;

    @Test
    public void test() {

    }
}
- The ApplicationContext is instantiated only once for all tests that use the same set of config files (even across test classes)
- Annotate test method with
@DirtiesContext to force recreation of the cached ApplicationContext if method changes the contained beans
AnnotationConfigContextLoader
@Configuration inner classes (must be static) are automatically detected and loaded in tests
with help of AnnotationConfigContextLoader
@RunWith(SpringJUnit4ClassRunner.class)
@ContextConfiguration(loader = AnnotationConfigContextLoader.class)
public class SpringPetServiceTest3 {

     @Configuration
     public static class TestCtxConfig {
        @Bean
        StubPetRepo petRepo(){
            return new StubPetRepo();
        }
        @Bean
        PetService simplePetService(){
            SimplePetService petService = new SimplePetService();
            petService.setRepo(petRepo());
            return petService;
        }
    }
}
Testing with spring profiles
@ActiveProfiles annotation of test class activates profiles listed@ActiveProfiles( { "foo", "bar" } )
Inject mocks using Mockito
- The
@InjectMock has a behavior similar to the Spring IoC, because its role is to instantiate testing object instances and
to try to inject fields annotated with @Mock or @Spy into private fields of the testing object.
public class MockPetServiceTest {

    @InjectMocks
    private SimplePetService simplePetService;

    @Mock
    private PetRepo petRepo;

    @Before
    public void initMocks() {
        MockitoAnnotations.initMocks(this);
    }
}
- With
@RunWith(MockitoJUnitRunner.class) no need to MockitoAnnotations.initMocks(this)
@RunWith(MockitoJUnitRunner.class)
public class MockPetServiceTest {

    @InjectMocks
    private SimplePetService simplePetService;

    @Mock
    private PetRepo petRepo;

}
PowerMock was born because sometimes code is not testable, perhaps because of bad design or because of some necessity. Below you can find a list of untestable elements:
- static methods
- classes with static initializers
- final classes and final methods; sometimes there is need for an insurance that the code will not be misused or to make sure that an object is constructed correctly
- private methods and fields
Testing Rest with Spring boot
- Can use
SpringRunner as an alternative to the SpringJUnit4ClassRunner
@RunWith(SpringRunner.class)
@WebMvcTest(controllers = CustomerController.class, secure=false)
public class TestCustomerController {

	@MockBean
	private CustomerService service;

	@Autowired
	private MockMvc mockMvc;

	@Test
	public void testSuccessfulFindAllCustomers() throws Exception {
		when(service.findAllCustomers()).thenReturn(Arrays.asList(new Customer(), new Customer()));

		mockMvc.perform(get("/customers"))
            .andExpect(status().isOk())
            .andExpect(content().contentType(MediaType.APPLICATION_JSON_UTF8))
            .andExpect(jsonPath("$", hasSize(2)));
	}
	//..
}
@RestController
@RequestMapping("/customers")
public class CustomerController {

	private CustomerService service;

	public CustomerController(CustomerService service) {
		this.service = service;
	}

	@GetMapping
	public ResponseEntity<Iterable<Customer>> findAllCustomers(){
		return ResponseEntity.ok(service.findAllCustomers());
	}
    //..
 }
Testing JPA with Spring boot
@RunWith(SpringRunner.class)
@DataJpaTest
public class TestCustomerRepo {

	@Autowired
	private TestEntityManager entityManager;

	@Autowired
	private CustomerRepo repo;

	private Customer bojack;

	public TestCustomerRepo() {
		bojack = new Customer.CustomerBuilder().firstName("BoJack").middleName("Horse").lastName("Horseman")
				.suffix("Sr.").build();
	}

	@Test
	public void testFindAllCustomers() {
		this.entityManager.persist(bojack);
		Iterable<Customer> customers = repo.findAll();

		int count = 0;
		for (Customer repoCustomer : customers) {
			assertEquals("BoJack", repoCustomer.getFirstName());
			assertEquals("Horseman", repoCustomer.getLastName());
			assertEquals("Horse", repoCustomer.getMiddleName());
			assertEquals("Sr.", repoCustomer.getSuffix());
			assertTrue(repoCustomer.getId() > 0L);
			assertNull(repoCustomer.getDateOfLastStay());
			count++;
		}
		assertEquals(1, count);
	}
	//..
}
Aspect Oriented Programming
AOP is a type of programming paradigm that aims to help with separation of cross-cutting concerns
to increase modularity; it implies declaring an aspect class that will alter the behavior of
base code, by applying advices to specific join points, specified by pointcuts.
- This is accomplished by specifying the following:
- Location(s) in the code where code of the cross cutting concern is to be inserted.
- Code of the cross cutting concern.
- Cross cutting concern
- Cross cutting concern is functionality that is used in multiple locations throughout an application.
Such functionality is applied/used in areas of an application that normally are not related to each other.
- Cross cutting concerns do not usually fit well in the model of object-oriented or procedural programming.
- Examples of cross-cutting concerns:
- Caching
- Internationalization
- Error detection and correction
- Memory management
- Performance monitoring
- Synchronization
- Logging
- Transaction management
- Security
- Monitoring
- Custom business rules
- Problems which AOP solve
- Avoid code duplication.
- Avoid mixing of, for instance, business logic and cross cutting concerns.
- The original library that provided components for creating aspects is named AspectJ.
AOP Terminology
| |
 |
|
| |
 |
|
- Aspect - An aspect brings together one or more pointcuts with one or more advice.
- Target object - object to which the aspect applies.
- Target method - the advised method.
- Advice - action taken by an aspect at a join point. In Spring AOP there are multiple advice types:
- Before advice - methods annotated with
@Before that will execute before the join point
- After returning advice - methods annotated with
@AfterReturning that will execute after a join point completes normally,
meaning that the target method returns normally without throwing an exception.
- After throwing advice - methods annotated with
@AfterThrowing that will execute after a join point execution ends by throwing an exception.
- After (finally) advice - methods annotated with
@After that will execute after a join point execution, no matter how the execution ended.
- Around advice - methods annotated with
@Around intercept the target method and surround the join point.
This is the most powerful type of advice, since it can perform custom behavior before and after the invocation
- Pointcut - a pointcut selects one or more join points out of the set of all join points in an application.
Pointcut expressions can be defined as arguments for Advice annotations or as arguments for the
@Pointcut annotation.
- Introduction - declaring additional methods, fields, interfaces being implemented, annotations on behalf of another type. Spring AOP allows you to introduce new interfaces (and a corresponding implementation) to any advised object.
- AOP proxy - the object created by AOP to implement the aspect contracts.
- Weaving - linking aspects with other application types or objects to create an advised object.
This can be done at compile time (using the AspectJ compiler, for example), load time, or at runtime.
Spring AOP, like other pure Java AOP frameworks, performs weaving at runtime.
- Compile time weaving
Byte code of classes is modified at compilation time at selected join points to execute advice
code. The AspectJ compiler uses compile time weaving.
- Load time weaving
Byte code of classes is modified at class loading time when the application is run.
- Runtime weaving
Proxy objects are created at runtime when the application is run. The proxy objects are used
instead of the original objects and divert method invocations to advice code.
Spring AOP uses runtime weaving exclusively
| |
 |
|
@Aspect
@Component
public class LoggingAspect {

	/**
	* Pointcut that selects join points being method executions in the se package
	* and sub-packages in classes which name ends with "Service" having arbitrary
	* number of parameters.
	*/
	@Pointcut("execution(* se..*.*Service.*(..))")
	public void applicationServiceMethodPointcut() {}

	/**
	* Pointcut that selects join points being public method executions.
	*/
	@Pointcut("execution(public * *(..))")
	public void publicMethodPointcut() {}

	/**
	* Pointcut that selects join points within the package se.ivankrizsan.spring
	* and sub-packages.
	*/
	@Pointcut("within(se.ivankrizsan.spring..*)")
	public void inSpringPackagePointcut() {}

	/**
	* Pointcut that selects join points on the Spring bean with the
	* name "mySuperService".
	*/
	@Pointcut("bean(mySuperService)")
	public void mySuperServiceSpringBeanPointcut() {}

	/**
	* Pointcut that combines all the above pointcuts to select join points
	* that match all the pointcuts.
	*/
	@Pointcut("publicMethodPointcut() && inSpringPackagePointcut() && applicationServiceMethodPointcut() && mySuperServiceSpringBeanPointcut()")
	public void publicServiceMethodInSpringPackagePointcut() {}

	/**
	* Around advice that prints a string before and after execution of a
	* join point (typically a method).
	*
	* @param inProceedingJoinPoint Join point advised by around advice.
	* @return Result from the join point invocation.
	* @throws Throwable If exception thrown when executing join point.
	*/
	@Around("publicServiceMethodInSpringPackagePointcut()")
	public Object loggingAdvice(final ProceedingJoinPoint inProceedingJoinPoint) throws Throwable {
		System.out.printf("* Before service method '%s' invocation.%n", inProceedingJoinPoint.getSignature().toShortString());

		/* Invoke the join point. */
		final Object theResult = inProceedingJoinPoint.proceed();
		System.out.printf("* After service method '%s' invocation.%n", inProceedingJoinPoint.getSignature().toShortString());

		return theResult;
	}
}
Proxies
| |
 |
|
- Proxy classes are created in the init phase by dedicated BeanPostProcessors
- Two types of proxies
JDK dynamic proxies - creates a proxy object that implements all the interfaces implemented by the object to be proxied.
@EnableAspectJAutoProxy- Can only proxy by interface
- Proxied bean must implement java interface
- Part of JDK
- All interfaces implemented by the class are proxied
- Based on proxy implementing interfaces
- Any methods found in the target object but not in any interface implemented by the target object cannot be proxied.
CGLib proxies - creates a subclass of the class of the object to be proxied.
@EnableAspectJAutoProxy(proxyTargetClass = true)- third-party library
- The CGLIB proxy mechanism will be used by Spring AOP when the Spring bean for which to create a proxy does not implement any interfaces.
- Can create a proxy by subclassing. In this scenario the proxy becomes a subclass of the target class. No need for interfaces.
- Is not part of JDK, included in spring
- Used when class implements no interface
- Cannot be applied to final classes or methods
- Based on proxy inheriting the base class
- Spring AOP can use CGLIB proxies whether the target object implements an interface or not.
| |
 |
|
- The default type of proxy used by the Spring framework is the
JDK dynamic proxy.
- Proxies limitations:
JDK Dynamic Proxies
- Does not support self-invocations.
- Class for which a proxy is to be created must implement an interface.
- Only public methods in implemented interfaces will be proxied.
CGLIB Proxies
- Does not support self-invocations.
- Class for which a proxy is to be created must not be final.
- Method(s) in class for which a proxy is to be created must not be final.
- Only public and protected methods will be proxied.
- Requires a third-party library.
- Not built into the Java language and thus require a library.
- The CGLIB library has been included into Spring, so when using the Spring framework, no additional library is required.
- To enable detection of Spring beans implementing advice which implementation classes are annotated with the
@Aspect annotation,
the @EnableAspectJAutoProxy annotation should be applied to a @Configuration class and aspects must be annotated with @Component
similar to functionality found in Spring’s XML element.
- To enable
@AspectJ support with Java @Configuration add the @EnableAspectJAutoProxy annotation
- When using the
@EnableAspectJAutoProxy annotation, the aspectjweaver.jar library from AspectJ needs to be on the classpath.
- AOP is not the part of spring core container.
@Configuration
@EnableAspectJAutoProxy
public class AppConfig {

}
- When using proxies, suppose method a() calls method b()
on the same class/interface, advice will never be executed for method b()
@Aspect
@Component
public class UserRepoMonitor {

    @Before("execution(public com.ps.repos.˙JdbcTemplateUserRepo+.findById(..))")
    public void beforeFindById(JoinPoint joinPoint) {
        String methodName = joinPoint.getSigTestJdbcTemplateUserReponature().getName();
        System.out.println(" ---> Method " + methodName + " is about to be called");
    }
}
- The
@Before annotation is used with a parameter that is called a pointcut expression.
This is used to identify the method execution on which the behavior will be applied.
@Configuration
@ComponentScan(basePackages = {"com.ps.repos.impl","com.ps.aspects"})
@EnableAspectJAutoProxy
public class AppConfig {

}
| |
 |
|
@EnableAspectJAutoProxy- to enable aspect support, the configuration class must be annotated, default JDK dynamic proxy.@EnableAspectJAutoProxy(proxyTargetClass = true) - if the CGLIB library is to be added to the application classpath, Spring must be told that we want subclass-based proxies by modifying the aspect enabling annotation
- This approach is suitable when the target class does not implement any interface, so Spring will create a new class on the fly that is a subclass of the target class
- CGLIB is suitable for that because it is a bytecode generation library.
- It is obvious that the before advice was executed, but how does it actually work? Spring IoC creates the userTemplateRepo bean.
Then the aspect definition with an advice that has to be executed before the findById method tells Spring that this bean has to be wrapped up in a proxy object that will add additional behavior,
and this object will be injected instead of the original everywhere needed.
And because we are using JDK dynamic proxies, the proxy will implement the UserRepo interface
| |
 |
|
| |
 |
|
- In order to use aspects in a Spring application you need the following:
- spring-aop as a dependency
- declare an
@Aspect class and declare it as a bean as well (using @Component or @Bean or XML typical bean declaration element)
- declare an advice method annotated with a typical advice annotation (
@Before, @After, etc.) and associate it to a pointcut expression
- enable aspects support by annotating a configuration class with
@EnableAspectJAutoProxy
- (optional) add CGLIB as a dependency and enable aspects support using subclassed proxies by annotating a configuration class with
@EnableAspectJAutoProxy(proxyTargetClass = true)
Defining Pointcuts
-
| Pointcuts can be combined using the logical operators && (and), |
|
(or) and ! (not) |
- The template that a pointcut expression follows can be defined as follows:
execution( [Modifiers] [ReturnType] [FullClassName].[MethodName] ([Arguments]) throws [ExceptionType])
-
| The expression can contain wildcards like + and * and can be made of multiple expressions concatenated by boolean operators such as &&(and), |
|
(or), !(not) etc. |
- The * wildcard replaces any group of characters
- The + wildcard is used to specify that the method to advise can also be found in subclasses identified by [FullClassName] criteria.
!within(se.ivankrizsan.spring..*) - will result in join points that are NOT within the package se.ivankrizsan.spring or any of its subpackages being selected.-
-
- Matches types (return and argument types), whole or partial names (package, class, method).
- .. - Matches zero or more arguments or packages.
- There is also a list of designators that can be used to define the reach of the pointcut; for example, the
within(...) designator can be used to limit the pointcut to a package
public * com.ps.repos.*.JdbcTemplateUserRepo+.findById(..)) && +underlinewithin(com.ps.*)
- Pointcut expression can identify only methods defined in a class annotated with a specific annotation:
execution(@org.springframework.transaction.annotation.Transactional public * com.ps.repos.*.*Repo+.findById(..)))
- Pointcut expression can even identify methods that return values with a specific annotation:
execution(public (@org.springframework.stereotype.Service *) *(..))
- by using the
@annotation() designator, only methods annotated with a specific annotation can be taken into consideration:
execution(public (public * com.ps.service.*.*Service+.*(..) && @annotation(org.springframework.security.access.annotation.Secured))
Pointcut Designators
- If using an unsupported AspectJ pointcut designator with Spring AOP, an IllegalArgumentException will be thrown.
- Pointcut designator: execution
- The execution pointcut designator matches method execution join points.
Method visibility
Can be one of private, protected, public. Can be negated using !. May be omitted, in which case all method visibilities will match.Return type
Object or primitive type. Can be negated with !. Wildcard * can be used, in which case all return types will be matched.Package
Package in which class(es) is/are located. May be omitted. Wildcard .. may be used last in
package name to include all sub-packages. Wildcard * may be used in package name.Class
Class in which method(s) to be selected is/are located. May be omitted. Includes subclasses of the specified class. Wildcard * may be used.Method
Name of method(s) in which join points to be selected are located. Whole or partial method
name. Wildcard * may be used, for example “gree*” will match a method named greet and
any other methods which names start with “gree”.Parameters
Object or primitive types of parameters. A parameter-type can be negated with !, that is !int
will match any type except for int. The wildcard .. can be used to match zero or more subsequent parameters.Exceptions
Type(s) of exception(s) that matching method(s) throws. An exception type can be negated using !.
execution(public String com.linnyk.spring.aopexamples.MySuperServiceImpl.*(String))

Pattern
[method visibility] [return type] [package].[class].[method]([parameters] [throws exceptions])
- Pointcut designator: within
- The within pointcut designator matches join points located in one or more classes, optionally
specifying the package(s) in which the class(es) is/are located.
Package
Package in which class(es) to be selected is/are located. May be omitted. Wildcard .. may
be used last in package name to include all sub-packages. Wildcard * may be used in package name.Class
Class(es) in which join points are to be selected. Wildcard * may be used. Join points in
subclasses of the specified class will also be matched.
within(se..MySuperServiceImpl)

Pattern
[package].[class]
- Pointcut designator: this
- The this pointcut designator matches all join points where the currently executing object is of specified type (class or interface).
- The pattern specifying which join points to select only consists of a single type.
- Wildcards can not be used in type names.
- The below pointcut expression will match join points in proxy objects that implement the
MySuperService interface.
- Pointcut designator: target
- The target pointcut designator matches all join point where the target object, for instance the object on which a method call is being made, is of specified type (class or interface).
target(MySuperServiceImpl)
- Pointcut designator: args
- The args pointcut designator matches join points, in Spring AOP method execution, where the argument(s) are of the specified type(s).
- The
.. wildcard may be used to specify zero or more parameters of arbitrary type.
- The
* wildcard can be used to specify one parameter of any type.
- Package information may be included in the pattern specifying which join points to select.
- The below example selects join points where the arguments are two long integers.
- The following example selects all join points where the arguments are of any type from the
java.util package
args(long, long)

args(java.util.*)
- Pointcut designator: @target
- The @target pointcut designator matches join points in classes annotated with the specified annotation(s).
- The below example selects all join points in all classes annotated with the Spring
@Service annotation.
@target(org.springframework.stereotype.Service)
- Pointcut designator: @args
- The
@args pointcut designator matches join points where an argument type (class) is annotated with the specified annotation.
- Note that it is not the argument that is to be annotated, but the class.
@args(com.linnyk.spring.aopexamples.CleanData)
- Pointcut designator: @within
- The @within pointcut designator matches join points in classes annotated with specified annotation.
@within(org.springframework.stereotype.Service)
- Pointcut designator: @annotation
- The @annotation pointcut designator matches join points in methods annotated with specified annotation.
@annotation(com.linnyk.spring.aopexamples.MySuperSecurityAnnotation)
- Pointcut designator: bean
- This pointcut designator selects all join points within a Spring bean.
- The wildcard
* may be used in the pattern, making it possible to match a set of Spring beans with one pointcut expression.
- The below pointcut will select all join points in the Spring bean named
mySuperService.
Implementing Advice
Aspect = PointCut(Where the Aspect is applied) + Advice(What code is executed)
Before
- Executed before a join point.
- Cannot prevent proceeding to the join point unless the advice throws an exception.
- Examples:
- Access control (security)
Authorization can be implemented using before advice, throwing an exception if the current user is not authorized.
- Statistics
Counting the number of invocations of a join point.
- Before advice will, always proceed to the join point unless an execution is thrown from within the advice code.
- Using a
JoinPoint parameter in an advice is optional.
@Before("com.ps.aspects.PointcutContainer.serviceUpdate(id, pass)")
public void beforeServiceUpdate (Long id, String pass) throws Throwable {
	//..
}
- The proxy object receives the call destined for the target bean and calls first the advice method
- If the advice method returns successfully, it then forwards the initial call to the target bean and forwards the result back to the caller.
- If the advice method throws an exception, the exception gets propagated to the caller, and the target method is no longer executed
After Returning
- This type of advice is executed only if the target method executed successfully and does not end by throwing an exception.
- Examples:
- Statistics
Counting the number of successful invocations of a join point.
- Data validation
Validating the data produced by the advised method.
@AfterReturning(value="execution (* com.ps.services.*Service+.update*(..))", returning = "result")
public void afterServiceUpdate(JoinPoint joinPoint, int result) throws Throwable {
	//..
}
After Throwing
- Executed after execution of a join point that resulted in an exception being thrown.
- Examples:
- Error handling
- Statistics
@AfterThrowing(value="execution(* com.ps.services.*Service+.updateUsername(..))", throwing = "e")
public void afterBadUpdate(JoinPoint joinPoint, Exception e) throws Throwable {
	//..
}
After
- The after advice is executed after the target method regardless of how its execution ended, whether successfully or with an exception, and because of this,
it is most suitable to use for auditing or logging.
- Examples:
- Releasing resources.
As with finally-blocks in try-finally, the after (finally) advice is always executed after the
completion of the join point and can thus ensure that resources are always released.
@After("execution(public * com.ps.repos.*.JdbcTemplateUserRepo+.updateUsername(..))")
public void afterFindById(JoinPoint joinPoint) throws Throwable {
	//..
}
Around
- Around advice is the most powerful of the advice types.
- Around advice can be used for all of the use-cases for AOP
- Can chose to execute the join point or not.
- Can chose to return any return value from the execution of the join point or return some other return value.
- Executed before and after (around) a join point.
- The around advice is the most powerful type of advice, because it encapsulates the target method and has control over its execution,
meaning that the advice decides whether the target method is called, and if so, when.
- The type
ProceedingJoinPoint inherits from JoinPoint and adds the proceed() method that is used to call the target method
| |
 |
|
| |
 |
|
@Around("execution(public * com.ps.repos.*.*Repo+.find*(..))")
public Object monitorFind( ProceedingJoinPoint joinPoint) throws Throwable {
	long t1 = System.currentTimeMillis();
	Thread.sleep(1000L);
	return joinPoint.proceed();
	long t2 = System.currentTimeMillis();
	logger.info(" ---> Execution of " + methodName + " took: "   + (t2 - t1) / 1000 + " ms.");
}
JoinPoint
JoinPoint can be added to methods implementing the following types of advice:
- Before
- After returning
- After throwing
- After
- The parameter must, if present, be the first parameter of the advice method.
- When the advice is invoked, the parameter will hold a reference to an object that holds static information about the join point as well as state information.
- Examples of static information:
- Kind (type) of join point
- Signature at the join point
- Examples of dynamic information available from the
JoinPoint object:
- Target object -
JoinPoint.getTarget
- Currently executing object
ProceedingJoinPoint
- Use of the
ProceedingJoinPoint class as a parameter to an Around advice.
- This type is used as the first parameter of a method implementing an around advice.
ProceedingJoinPoint class as a parameter to an around advice.ProceedingJoinPoint parameter, it will be impossible to invoke the next advice method or target method in such a case.ProceedingJoinPoint class is a subclass of the JoinPoint class it contains all the information described in the above section on the JoinPoint class.ProceedingJoinPoint class contains these two additional methods:
- proceed()
Proceed to invoke the next advice method or the target method without passing any
parameters. Will return an Object. May throw a Throwable exception.
- proceed(Object[] args)
Proceed to invoke the next advice method or the target method passing an array of objects as
argument to the method to be invoked. Will return an Object. May throw a Throwable exception.
@Around("publicServiceMethodInSpringPackagePointcut()")
public Object loggingAdvice(
	final ProceedingJoinPoint inProceedingJoinPoint) throws Throwable {
	System.out.printf("* Before service method '%s' invocation.%n", inProceedingJoinPoint.getSignature().toShortString());

	/* Invoke the join point. */
	final Object theResult = inProceedingJoinPoint.proceed();
	System.out.printf("* After service method '%s' invocation.%n", inProceedingJoinPoint.getSignature().toShortString());
	return theResult;
}
PointCuts
Wildcards
Parameter Wildcards
Packages and Classes
Annotation
Spring beans names as PointCut
Boolean expressions in PointCut
@PointCut
PointCuts XML
<aop:config>
    <aop:pointcut id="pointcut" expression="execution(void set*(*))"/>

    <aop:aspect ref="myAspect">
        <aop:after-returning pointcut-ref="pointcut" method="logChange"/>
    </aop:aspect>

    <bean id="myAspect" class="com.example.MyAspect" />
</aop:config>
PointCuts Java
//Pointcut is referenced here by its ID
@Before("setters()")
public void logChange() {
    //...
}

//Method name is pointcut id, it is not executed
@Pointcut("execution(void set*(*))")
public void setters() {
    //...
}
Context Selection
public interface Server {
	public void start(Map input);
	public void stop();
}
Data Access
- DML stands for
Data Manipulation Language, and the database operations presented so far are part of it,
the commands SELECT, INSERT, UPDATE, and DELETE are database statements used to create, update, or delete data from existing tables.
- DDL stands for
Data Definition Language, and database operations that are part of it are used to manipulate database objects:
tables, views, cursors, etc. The commands CREATE, ALTER, DROP
- DataAccessException class and all of its subclasses in the Spring Framework.
- All the exceptions in this exception hierarchy are unchecked.
- The purpose of the data access exception hierarchy is isolate application developers from the
particulars of JDBC data access APIs, for instance database drivers from different vendors.
- This in turn enables easier switching between different JDBC data access APIs.
- Its use helps convert proprietary checked exceptions, to a set of runtime exceptions.
- Its use allows one to switch between persistence technologies fairly easily and it also allows one to code
without worrying about catching exceptions that are specific to each technology.
| |
 |
|
- The
javax.sql.DataSource interface is the interface from which all data-source classes related to SQL stem.
- DelegatingDataSource
- AbstractDataSource
- SmartDataSource
- EmbeddedDatabase
DataSource in a standalone application
@Bean
public DataSource dataSource() {
	final BasicDataSource theDataSource = new BasicDataSource();
	theDataSource.setDriverClassName("org.hsqldb.jdbcDriver");
	theDataSource.setUrl("jdbc:hsqldb:hsql://localhost:1234/mydatabase");
	theDataSource.setUsername("ivan");
	theDataSource.setPassword("secret");
	return theDataSource;
}
DataSource in Spring Boot, then it is not necessary to create a DataSource bean.- Setting the values of a few properties are sufficient:
spring.datasource.url= jdbc:hsqldb:hsql://localhost:1234/mydatabase
spring.datasource.username=ivan
spring.datasource.password=secret
DataSource in an application deployed to a server
- If the application is deployed to an application server then a way to obtain a data-source is by performing a JNDI lookup
@Bean
public DataSource dataSource() {
final JndiDataSourceLookup theDataSourceLookup = new JndiDataSourceLookup();
final DataSource theDataSource =
theDataSourceLookup.getDataSource("java:comp/env/jdbc/MyDatabase");
return theDataSource;
}
- Spring Boot applications need only to rely on setting one single property:
spring.datasource.jndi-name=java:comp/env/jdbc/MyDatabase
Java Config of DataSource and populating db
@Configuration
@Profile("dev")
@PropertySource("classpath:db/db.properties")
public class TestDataConfig {

	@Value("${driverClassName}")
	private String driverClassName;

	@Value("${url}")
	private String url;

	@Value("${username}")
	private String username;

	@Value("${password}")
	private String password;

	@Value("classpath:db/schema.sql")
	private Resource schemaScript;

	@Value("classpath:db/test-data.sql")
	private Resource dataScript;

    @Bean
    public static PropertySourcesPlaceholderConfigurer propertySourcesPlaceholderConfigurer() {
      return new PropertySourcesPlaceholderConfigurer();
    }

    @Lazy
    @Bean
    public DataSource dataSource() {
        try {
            SimpleDriverDataSource dataSource = new SimpleDriverDataSource();
            Class<? extends Driver> driver = (Class<? extends Driver>) Class.forName(driverClassName);
            dataSource.setDriverClass(driver);
            dataSource.setUrl(url);
            dataSource.setUsername(username);
            dataSource.setPassword(password);
            DatabasePopulatorUtils.execute(databasePopulator(), dataSource);
            return dataSource;
        } catch (Exception e) {
            return null;
        }
    }

    @Bean
    public DataSourceInitializer dataSourceInitializer (final DataSource dataSource) {
        final DataSourceInitializer initializer = new DataSourceInitializer();
        initializer.setDataSource(dataSource);
        initializer.setDatabasePopulator(databasePopulator());
        return initializer;
    }

    private DatabasePopulator databasePopulator() {
        final ResourceDatabasePopulator populator = new ResourceDatabasePopulator();
        populator.addScript(schemaScript);
        populator.addScript(dataScript);
        return populator;
    }

    @Bean
    public JdbcTemplate userJdbcTemplate() {
        return new JdbcTemplate(dataSource());
    }
}
Embedded DataSource Java Configuration
- Especially useful for testing
- Supports H2, HSQL and Derby
@Configuration
@Profile("dev")
public class TestDataConfig {

    @Bean
    public DataSource dataSource() {
        return new EmbeddedDatabaseBuilder()
                .setType(EmbeddedDatabaseType.H2)
                .addScript("classpath:db/schema.sql")
                .addScript("classpath:db/test-data.sql")
                .build();
    }

}
Embedded DataSource XML Configuration
- Especially useful for testing
- Supports H2, HSQL and Derby
<jdbc:embedded-database id="dataSource">
	 <jdbc:script location="classpath:db/schema.sql"/>
	 <jdbc:script location="classpath:db/test-data.sql"/>
</jdbc:embedded-database>
Spring Cache
- The
@Cacheable annotation is one of the most important and common annotation for caching the requests.
If developers annotate a method with @Cacheable annotation and multiple requests are received by the application,
then this annotation will not execute the method multiple times, instead, it will send the result from the cached storage
- The
@CachePut annotation helps for updating the cache with the latest execution without stopping the method execution.
The primary difference between the @Cacheable and the @CachePut annotation is that @Cacheable will skip running the method whereas
@CachePut will actually run the method and then put its results in the cache
- Must specify a cache-manager
@Configuration
@ComponentScan("com.learning.linnyk")
@EnableCaching
public class AppConfig {

	@Bean
	public CacheManager cacheManager() {
		final SimpleCacheManager cacheManager = new SimpleCacheManager();
		cacheManager.setCaches(Arrays.asList(new ConcurrentMapCache("cities")));
		return cacheManager;
	}

}
- For each cache name, it creates a
ConcurrentHashMap
- Third-party alternatives
- Terracotta’s EhCache
- Google’s Guava and Caffeine
- Pivotal’s Gemfire
@Service
public class CitiesService {

	private CitiesRepository citiesRepository;

	@Autowired
	public CitiesService(CitiesRepository citiesRepository) {
		this.citiesRepository = citiesRepository;
	}

	@Cacheable(value = "cities")
	public City getCityByIdCacheable(long id) {
		return citiesRepository.getCityById(id);
	}

	@CachePut(value = "cities")
	public City getCityByIdCachePut(long id) {
		return citiesRepository.getCityById(id);
	}
}
ACID
- Atomicity The changes within a transaction are either all applied or none applied. “All or nothing”
- Consistency Any integrity constraints, for instance of a database, are not violated.
- Isolation Transactions are isolated from each other and do not affect each other.
- Durability is the property of a transaction that should persist even in cases of power off, crashes, and other errors on the underlying system
Transactional Environment
-
A transaction is an operation that consists of a number of tasks that takes place as a single unit – either all tasks are performed or no tasks are performed.
If a task that is part of a transaction do not complete successfully, the other tasks in the transaction will either not be performed or,
for tasks that have already been performed, be reverted.
-
In a transactional environment, transactions have to be managed.
In Spring, this is done by an infrastructure bean called the transaction manager.
- Configuring transactional behavior is done declaratively by annotating methods with
@Transactional
- It is mandatory to use
@Transactional on repository classes, too, in order to ensure transactional behavior
- Methods that need to be executed in a transactional context are annotated with
@Transactional Spring annotation
- This annotation must be used only on public methods; otherwise, the transactional proxy won’t be able to apply the transactional behavior
- The standard
javax.transaction.Transactional annotation is also supported as a drop-in replacement to Spring’s own annotation.
| |
 |
|
Difference between a local and a global transaction
-
Global transactions allow for transactions to span multiple transactional resources. As an example
consider a global transaction that spans a database update operation and the posting of a message to
the queue of a message broker. If the database operation succeeds but the posting to the queue fails
then the database operation will be rolled back (undone).
-
Local transactions are transactions associated with one single resource, such as one single database
or a queue of a message broker, but not both in one and the same transaction.
- Configure transaction management support
- add a declaration of a bean of type
org.springframework.jdbc.datasource.DataSourceTransactionManager
DataSourceTransactionManager class is a PlatformTransactionManager implementation for single JDBC datasources.
It binds a JDBC connection from the specified data source to the currently executing thread, potentially allowing for one thread connection per data source.”
<tx:annotation-driven ../>
<bean id="transactionManager"
         class="org.springframework.jdbc.datasource.DataSourceTransactionManager">
         <property name="dataSource" ref="dataSource"/>
</bean>

<tx:annotation-driven transaction-manager="transactionManager"/>
public class TestDataConfig {

    @Bean
    public PlatformTransactionManager txManager(){
        return new DataSourceTransactionManager(dataSource());
    }
}
- Apply the
@EnableTransactionManagement annotation to exactly one @Configuration class in the application.
@EnableTransactionManagement can be used so that the @Transactional in the code will work
@Configuration
@EnableTransactionManagement
@ComponentScan(basePackages = {"com.ps.repos.impl", "com.ps.services.impl"})
public class AppConfig {

}
- Declare transactional methods
- Method that is to be executed in a transaction must be annotated with the Spring
@Transaction annotation.
@Transactional
@Override
public User findById(Long id) {
	return userRepo.findById(id);
}
-
The @Transactional annotation can be used at the class level too.
In this case, all the methods in the class become transactional, and all properties defined for the transaction are inherited from the 1@Transactional1 class level definition,
-
Both @EnableTransactionManagement and <tx:annotation-driven ../> enable all infrastructure beans necessary for supporting transactional execution.
But there is a minor difference between them. The XML configuration element can be used like this: <tx:annotation-driven /> without the transaction-manager attribute.
In this case, Spring will look for a bean named transactionManager by default, and if it is not found, the application won’t start.
The @EnableTransactionManagement is more flexible; it looks for a bean of any type that implements the org.springframework.transaction.PlatformTransactionManager, so the name is not important.
@Transactional
- @Transactional annotation is used for
declarative transaction management and can be used on class and method level both in classes and interfaces.
- In the Spring framework declarative transaction management is implemented using Spring AOP.
-
When using Spring AOP proxies, only @Transactional annotations on public methods will have any effect –
applying the @Transactional annotation to protected or private methods or
methods with package visibility will not cause errors but will not give the desired transaction management,
- Parameters:
transactionManager - the transaction manager used to manage the transaction in the context of which the annotated method is executed.readOnly - should be used for transactions that involve operations that do not modify the database (example: searching, counting records)
- Allows Spring to optimize the transactional resource for read-only data access
- Read-only transaction prevents Hibernate from flushing its session. Hibernate does not apply dirty checking thus it increases its performance
- When JDBC transaction is marked as read-only, Oracle only accepts SELECT SQL statements.
propagation - transaction propagation. org.springframework.transaction.annotation.Propagationisolation - the transaction isolation level. org.springframework.transaction.annotation.Isolationtimeout - value represents the number of milliseconds after which a transaction is considered failed,rollbackFor - when this type of exception is thrown during the execution of a transactional method, the transaction is rolled backrollbackForClassName - name of exception class(es) that are to cause a transaction rollback.noRollbackFor - exception class(es) that never are to cause a transaction rollback.noRollbackForClassName - names of exception class(es) that never are to cause a transaction rollback.
| |
 |
|
- Spring allows for using the JPA
javax.transaction.Transactional annotation as a replacement for the
Spring @Transactional annotation, though it does not have as many configuration options.
- If one
@Transactional method call another @Transactional method,
the method will execute in the same transaction context as the first.
- Declarative transaction management
- This is accomplished using annotations or Spring XML configuration.
- Rollback police
- The default rollback policy of Spring transaction management is that automatic rollback only takes
place in the case of an unchecked exception being thrown.
- The types of exceptions that are to cause a rollback can be configured using the
rollbackFor
element of the @Transactional annotation. In addition, the types of exceptions that not are to cause
rollbacks can also be configured using the noRollbackFor element.
- If a test-method annotated with
@Test is also annotated with @Transactional, then the test-method
will be executed in a transaction. Such a transaction will automatically be rolled back after the completion of the test-method.
- The rollback policy of a test can be changed using the
@Rollback annotation and setting the value to false.
- Target object wrapped in a proxy
- Proxy implements the following behavior
- Transaction started before entering the method
- Commit at the end of the method
- Rollback if method throws
java.lang.RuntimeExceptionunchecked exceptionjava.lang.Error
- By default, a transaction is rolled back if a
RuntimeException has been thrown
@Transactional("myOtherTransactionManager") - runs a transaction with specific transaction managers
| |
 |
|
| |
 |
|
PlatformTransactionManager is the base interface for all transaction managers that can be used in the Spring framework’s transaction infrastructure.
PlatformTransactionManager interface contain the following methods:
- void
commit(TransactionStatus)
- void
rollback(TransactionStatus)
- TransactionStatus
getTransaction(TransactionDefinition)
- The transaction name can be explicitly set only programmatically.
DefaultTransactionDefinition def = new DefaultTransactionDefinition();
// explicitly setting the transaction name is something that can only be done programmatically
def.setName("SomeTxName");
def.setPropagationBehavior(TransactionDefinition.PROPAGATION_REQUIRED);

TransactionStatus status = txManager.getTransaction(def);
try {
    // execute your business logic here
}
catch (MyException ex) {
    txManager.rollback(status);
    throw ex;
}
txManager.commit(status);
Programmatic Transactions using TransactionTemplate
@Service
public class ProgramaticUserService implements UserService {

    private UserRepo userRepo;

    private TransactionTemplate txTemplate;

    @Autowired
    public ProgramaticUserService(UserRepo userRepo, PlatformTransactionManager txManager) {
        this.userRepo = userRepo;
        this.txTemplate = new TransactionTemplate(txManager);
    }

    @Override
    public int updatePassword(Long userId, String newPass) throws MailSendingException {
        return txTemplate.execute(status -> {
            try {
                int result = userRepo.updatePassword(userId, newPass);
                User user = userRepo.findById(userId);
                String email = user.getEmail();
                sendEmail(email);
                return result;
            } catch (MailSendingException e) {
                status.setRollbackOnly();
            }
            return 0;
        });
    }
}
@EnableTransactionManagement
@EnableTransactionManagement annotation is to annotate exactly one configuration class in
an application in order to enable annotation-driven transaction management using the @Transactional annotation.
- Components registered when the
@EnableTransactionManagement annotation is used are:
TransactionInterceptor.
- Intercepts calls to
@Transactional methods creating new transactions as necessary etc.
- Spring’s declarative transaction uses the
TransactionInterceptor class in its AOP proxies in applying transactional advice.
- A JDK Proxy or AspectJ advice.
This advice intercepts methods annotated with @Transactional (or methods that are located in a class annotated with @Transactional).
@EnableTransactionManagement annotation have the following three optional elements:
mode
Allows for selecting the type of advice that should be used with transactions. Possible values
are AdviceMode.ASPECTJ and AdviceMode.PROXY with the latter being the default.order
Precedence of the transaction advice when more than one advice is applied to a join-point. Default value is Ordered.LOWEST_PRECEDENCE.proxyTargetClass
True of CGLIB proxies are to be used, false if JDK interface-based proxies are to be used in the application
Transaction Propagation
- Happens when code from one transaction calls another transaction
- Transaction propagation says whether everything should be run in single transaction or nested transactions should be used
- There are 7 levels of propagation
- 2 Basic ones - REQUIRED and REQUIRES_NEW
org.springframework.transaction.annotation.Propagation
- REQUIRED: an existing transaction will be used or a new one will be created to execute the method annotated with
@Transactional(propagation = Propagation.REQUIRED).
- REQUIRES_NEW: a new transaction is created to execute the method annotated with
@Transactional(propagation = Propagation.REQUIRES_NEW). If a current transaction exists, it will be suspended.
- NESTED: an existing nested transaction will be used to execute the method annotated with
@Transactional(propagation = Propagation.NESTED). If no such transaction exists, it will be created.
- MANDATORY: an existing transaction must be used to execute the method annotated with
@Transactional(propagation = MANDATORY). If there is no transaction to be used, an exception will be thrown.
- NEVER: methods annotated with
@Transactional(propagation = Propagation.NEVER) must not be executed within a transaction. If a transaction exists, an exception will be thrown.
- NOT_SUPPORTED: no transaction is used to execute the method annotated with
@Transactional(propagation = Propagation.NOT_SUPPORTED). If a transaction exists, it will be suspended.
- SUPPORTS: an existing transaction will be used to execute the method annotated with
@Transactional(propagation = Propagation.SUPPORTS). If no transaction exists, the method will be executed anyway, without a transactional context.
Isolation Levels
- Transaction isolation in database systems determine how the changes within a transaction are
visible to other users and systems accessing the database prior to the transaction being committed.
- 4 isolation levels available (from least strict to the most strict)
- READ_UNCOMMITTED
- READ_COMMITTED
- REPEATABLE_READ
- SERIALIZABLE
- Not all isolation levels may be supported in all databases
- Different databases may implement isolation is slightly different ways
org.springframework.transaction.annotation.Isolation
| |
 |
|
- DEFAULT: the default isolation level of the DBMS.
- READ_UNCOMMITED: data changed by a transaction can be read by a different transaction while the first one is not yet committed, also known as dirty reads.
Dirty reads may occur.
- READ_COMMITTED: dirty reads are not possible when a transaction is used with this isolation level.
This is the default strategy for most databases. But a different phenomenon could happen here: repeatable read: when the same query is executed multiple times,
different results might be obtained. (Example: a user is extracted repeatedly within the same transaction. In parallel, a different transaction edits the user and commits.
If the first transaction has this isolation level, it will return the user with the new properties after the second transaction is committed.)
Phantom reads and non-repeatable reads can occur.
- REPEATABLE_READ: this level of isolation does not allow dirty reads, and repeatedly querying a table row in the same transaction will always return the same result,
even if a different transaction has changed the data while the reading is being done. The process of reading the same row multiple times in the context of a transaction and
always getting the same result is called repeatable read.
Phantom reads can occur.
- SERIALIZABLE: this is the most restrictive isolation level, since transaction are executed in a serialized way. So no dirty reads, no repeatable reads,
and no phantom reads are possible. A phantom read happens when in the course of a transaction, execution of identical queries can lead to different result sets being returned.
READ_UNCOMMITTED
@Transactional (isolation=Isolation.READ_UNCOMMITTED)- The lowest isolation level
- Dirty reads can occur - one transaction may be able to see uncommitted data of other transaction
- May be viable for large transactions or frequently changing data
READ_COMMITTED
@Transactional (isolation=Isolation.READ_COMMITTED)- Default isolation strategy for many databases
- Other transactions can see data only after it is properly committed
- Prevents dirty reads
REPEATABLE_READ
@Transactional (isolation=Isolation.REPEATABLE_READ)- Prevents non-repeatable reads - when a row is read multiple times in a single transaction, its value is guaranteed to be the same
SERIALIZABLE
@Transactional (isolation=Isolation.SERIALIZABLE)- Prevents phantom reads
- The serializable isolation level will lock the entire range, for both reading and writing by other transactions – a so-called range-lock.
Testing transactional methods
- If a test-method annotated with
@Test is also annotated with @Transactional, then the test-method will be executed in a transaction.
Such a transaction will automatically be rolled back after the completion of the test-method.
- No need to clean up your database after testing!
- The rollback policy of a test can be changed using the
@Rollback annotation and setting the value to false.
- The
@Sql annotation can be used to specify SQL scripts to be executed against a given database during integration tests.
- The
@SqlGroup annotation can be used on classes and methods to group together @Sql annotations.
- The
@SqlConfig is used to specify the configuration of the SQL script.
@Test
@Sql(statements = {"drop table NEW_P_USER if exists;"})
 public void testCreateTable(){
	 int result = userRepo.createTable("new_p_user");
	 assertEquals(0, result);
 }
@Test
@SqlGroup({
		@Sql(
				value = "classpath:db/extra-data.sql",
				config = @SqlConfig(encoding = "utf-8", separator = ";", commentPrefix = "--")
		),
		@Sql(
				scripts = "classpath:db/delete-test-data.sql",
				config = @SqlConfig(transactionMode = SqlConfig.TransactionMode.ISOLATED),
				executionPhase = Sql.ExecutionPhase.AFTER_TEST_METHOD
		)
})
public void testCount() {
	int count = userService.countUsers();
	assertEquals(8, count);
}
@Sql
@Commit
- The TestContext framework can be instructed to cause the transaction to commit instead of roll back via the
@Commit annotation
@BeforeTransaction
Spring JDBC
- Spring’s
JdbcTemplate
- Greatly simplifies use of the JDBC API
- Eliminates repetitive boilerplate code
- Alleviates common causes of bugs
- Handles SQLExceptions properly
- Without sacrificing power
- Provides full access to the standard JDBC constructs
- After getting configured, instances of the
JdbcTemplate class are threadsafe.
- It is thread-safe to inject a single configured instance of a
JdbcTemplate reference into multiple DAOs.
JdbcTemplate has a property whose type is DataSource.JdbcTemplate class is a Spring class that simplifies the use of JDBC by implementing common workflows for querying, updating, statement execution
- Instances of
JdbcTemplate are thread-safe after they have been created and configured
JdbcTemplate acquire and release a database connection for every method called.JdbcTemplate callback
ResultSetExtractor - allows for processing of an entire result set, possibly consisting multiple rows of data, at once.
- Note that the
extractData method in this interface returns a Java object.
RowCallbackHandler - allows for processing rows in a result set one by one typically accumulating some type of result.
- Note that the
processRow method in this interface has a void return type.
RowMapper - allows for processing rows in a result set one by one and creating a Java object for each row.
- Note that the
mapRow method in this interface returns a Java object.
-JdbcTemplate methods
- batchUpdate
- execute
- query - uses for
insert update delete
- queryForList
- queryForMap
- queryForObject
- queryForRowSet
- update
JdbcTemplate acquire and release a database connection for every method called.SimpleJdbcCall class can be used to call Stored Procedures in spring.
| |
 |
|
| |
 |
|
	<bean id="dataSource" class="org.springframework.jdbc.datasource.DriverManagerDataSource"
		  p:driverClassName="${driverClassName}"
		  p:url="${url}"
		  p:username="${username}"
		  p:password="${password}"
	/>

	<bean id="jdbcTemplate" class="org.springframework.jdbc.core.JdbcTemplate" p:dataSource-ref="dataSource"/>
Inject into repository
jdbcTemplate.update("insert INTO RIDE(NAME, DURATION) values (?, ?)", ride.getName(), ride.getDuration());
Select
jdbcTemplate.query("SELECT * FROM MY_TABLE", new RowMapper());

jdbcTemplate.queryForObject("SELECT * FROM MY_TABLE WHERE ID = id", new RowMapper());
Insert
jdbcTemplate.update(
			"insert INTO MY_TABLE(NAME, DURATION) values (?, ?)",
			obj.getName(), obj.getDuration());
Update
jdbcTemplate.update("UPDATE MY_TABLE set NAME = ?, DURATION = ? where id = ?",
			obj.getName(), obj.getDuration(), obj.getId());
Delete
jdbcTemplate.update("delete from MY_TABLE where id = ?", id);
Execute
- You can use the
execute(..) method to execute any arbitrary SQL, and as such the method is often used for DDL statements.
- It can execute SQL
insert statements.
- It can execute SQL
delete statements.
- Invokes a simple stored procedure
this.jdbcTemplate.update("call SUPPORT.REFRESH_ACTORS_SUMMARY(?)", Long.valueOf(unionId));
- It is heavily overloaded with variants taking callback interfaces, binding variable arrays, and so on.
this.jdbcTemplate.execute("create table mytable (id integer, name varchar(100))");
Callback Interfaces
RowMapper - best choice when each row of a ResultSet maps to a domain objectRowCallbackHandler - best choice when no value should be returned from the callback method for each row, especially large queriesResultSetExtractor - best choice when multiple rows of a ResultSet map to a single object
RowMapper
- Spring provides a
RowMapper interface for mapping a single row of a ResultSet to an object
- Allows for processing rows in a result set one by one and creating a Java object for each row.
public interface RowMapper<T> {
	T mapRow(ResultSet rs, int rowNum) throws SQLException;
}
- Querying and populating a single domain object:
Actor actor = this.jdbcTemplate.queryForObject(
      "select first_name, last_name from t_actor where id = ?",
      new Object[]{1212L},
      new RowMapper<Actor>() {
          public Actor mapRow(ResultSet rs, int rowNum) throws SQLException {
              Actor actor = new Actor();
              actor.setFirstName(rs.getString("first_name"));
              actor.setLastName(rs.getString("last_name"));
              return actor;
          }
      });
- Querying and populating a number of domain objects:
List<Actor> actors = this.jdbcTemplate.query(
      "select first_name, last_name from t_actor",
      new RowMapper<Actor>() {
          public Actor mapRow(ResultSet rs, int rowNum) throws SQLException {
              Actor actor = new Actor();
              actor.setFirstName(rs.getString("first_name"));
              actor.setLastName(rs.getString("last_name"));
              return actor;
          }
      });
RowCallbackHandler
- It extracts values from each row of a
ResultSet.
- Spring provides a simpler RowCallbackHandler interface when there is no return object
- Streaming rows to a file
- Converting rows to XML
- Filtering rows before adding to a Collection
public interface RowCallbackHandler {
	void processRow(ResultSet rs) throws SQLException;
}
- Spring provides a ResultSetExtractor interface for processing an entire ResultSet at once
- You are responsible for iterating the
ResultSet
- Suitable when more than a single row of data is needed to create a Java object holding query result data.
public interface ResultSetExtractor<T> {
	T extractData(ResultSet rs) throws SQLException, DataAccessException;
}
Querying for Generic Maps
In-Memory Database
@Bean
public DataSource dataSource() {
    EmbeddedDatabaseBuilder builder = new EmbeddedDatabaseBuilder();
    builder.setName("inmemorydb")
           .setType(EmbeddedDatabaseType.HSQL)
           .addScript("classpath:/inmemorydb/schema.db")
           .addScript("classpath:/inmemorydb/data.db");

           return builder.build();
}
The same in XML
<jdbc:embedded-database id="dataSource" type="HSQL">
    <jdbc:script location="classpath:schema.sql" />
    <jdbc:script location="classpath:data.sql" />
</jdbc:embedded-database>
Initialise db
<jdbc:initialize-database data-source="dataSource">
    <jdbc:script location="classpath:schema.sql" />
    <jdbc:script location="classpath:data.sql" />
</jdbc:initialize-database>
EmbeddedDatabaseBuilder automatically run data.sql and schema.sql scripts from resources folder
Spring and Hibernate
org.springframework.orm.hibernate5.LocalSessionFactoryBuilderorg.hibernate.SessionFactoryorg.hibernate.Sessionorg.springframework.orm.hibernate4.HibernateTransactionManager
Hibernate proper
hibernate.dialect - the value is a dialect class matching the database used in the applicationhibernate.hbm2ddl.auto - the value represents what Hibernate should do when the application startshibernate.format_sql - the generated SQL statements are printed to the console in a pretty and readable way.hibernate.show_sql - if true, all the generated SQL statements are printed to the console.hibernate.use_sql_comments - if true, Hibernate will put a comment inside the SQL statement to tell the developer what that statement is trying to do.
Spring + Hibernate Java configuration
- Inject database params and use them when create beans
@Value("${driverClassName}")
private String driverClassName;
@Value("${url}")
private String url;
@Value("${login}")
private String username;
@Value("${password}")
private String password;
@Bean
public DataSource dataSource() {
	final DriverManagerDataSource dataSource = new DriverManagerDataSource();
	dataSource.setDriverClassName(driverClassName);
	dataSource.setUrl(url);
	dataSource.setUsername(username);
	dataSource.setPassword(password);
	return dataSource;
}
@Bean
public Properties hibernateProperties() {
	final Properties hibernateProp = new Properties();
	hibernateProp.put("hibernate.dialect", "org.hibernate.dialect.H2Dialect");
	hibernateProp.put("hibernate.hbm2ddl.auto", "create-drop");
	hibernateProp.put("hibernate.format_sql", true);
	hibernateProp.put("hibernate.use_sql_comments", true);
	hibernateProp.put("hibernate.show_sql", true);
	return hibernateProp;
}

@Bean
public SessionFactory sessionFactory() {
	return new LocalSessionFactoryBuilder(dataSource())
			.scanPackages("com.ps.ents")
			.addProperties(hibernateProperties())
			.buildSessionFactory();
}
- Create
transactionManager
@Bean
public PlatformTransactionManager transactionManager() {
	return new HibernateTransactionManager(sessionFactory());
}
@Repository
@Transactional
public class HibernateUserRepo implements UserRepo {

}
- Inject
sessionFactory into @Repository beans and use session to deal with database
@Repository
@Transactional
public class HibernateUserRepo implements UserRepo {

	@Autowired
	private SessionFactory sessionFactory;

	public Session session() {
		return sessionFactory.getCurrentSession();
	}
}
Spring + Hibernate XML configuration
<bean id="dataSource" class="org.springframework.jdbc.datasource.DriverManagerDataSource">
	<property name="driverClassName" value="${driverClassName}" />
	<property name="url" value="${url}" />
	<property name="username" value="${login}" />
	<property name="password" value="${password}" />
</bean>
<bean id="sessionFactory" class="org.springframework.orm.hibernate5.LocalSessionFactoryBean">
	<property name="dataSource" ref="dataSource" />
	<property name="packagesToScan" value="com.ps" />
	<property name="hibernateProperties">
		<props>
			<prop key="hibernate.hbm2ddl.auto">create-drop</prop>
			<prop key="hibernate.dialect">org.hibernate.dialect.H2Dialect</prop>
		</props>
	</property>
</bean>
- Create
transactionManager
<bean id="transactionManager" class="org.springframework.orm.hibernate5.HibernateTransactionManager">
	<property name="sessionFactory" ref="sessionFactory" />
</bean>
@Repository
@Transactional
public class HibernateUserRepo implements UserRepo {

}
- Inject
sessionFactory into @Repository beans and use session to deal with database
@Repository
@Transactional
public class HibernateUserRepo implements UserRepo {

	@Autowired
	private SessionFactory sessionFactory;

	public Session session() {
		return sessionFactory.getCurrentSession();
	}
}
@Repository
@Repository’s job is to catch persistence specific exceptions and rethrow them as one of Spring’s unified unchecked exception.- Spring has built-in exception translation mechanism, so that all exceptions thrown by the JPA persistence providers are converted into Spring’s
DataAccessException - for all beans annotated with @Repository
NonTransientDataAccessException – these are the exceptions where a retry of the same operation would fail unless the cause of the Exception is corrected. So if you pass non existing id for example, it will fail unless the id exists in the database.RecoverableDataAccessException – these are the “opposite” of the previous one – exceptions which are recoverable – after some recovery steps. More details in the API docsScriptException – SQL related exceptions, when trying to process not well-formed script for example.TransientDataAccessException – these are the exception when recovery is possible without any explicit step, e.g. when there is a timeout to the database, you are retrying after few seconds.
- The
DataAccessException has a ton of subclasses which you can dig through, the hierarchy is extensive.
- The logic done by
org.springframework.dao.annotation.PersistenceExceptionTranslationPostProcessor
- Bean post-processor that automatically applies persistence exception translation to any bean marked with Spring’s
@Repository annotation
Spring + JPA Java configuration
- The following steps are needed if you want to work with JPA in a Spring application:
- Declare the appropriate dependencies.
In a Maven application, this is accomplished by creating dependencies in the pom.xml file. The dependencies in question are typically the ORM framework dependency, a database driver dependency and a transaction manager dependency.
- Implement entity classes with mapping metadata in the form of annotations.
As a minimum, entity classes need to be annotated with the @Entity annotation on class
level and the @Id annotation annotating the field or property that is to be the primary key of the entity.
- The
@Entity annotation is used to annotate classes in order to make it possible to turn instances of the class into persistent entities.
- The
@Entity annotation can be applied only at class level.
- Define an
EntityManagerFactory bean.
The JPA support in the Spring framework offer three alternatives when creating an EntityManagerFactoryBean:
LocalEntityManagerFactoryBean
Use this option, which is the simplest option, in applications that only use JPA for
persistence and in integration tests.- Obtain an
EntityManagerFactory using JNDI
Use this option if the application is run in a JavaEE server.
LocalContainerEntityManagerFactoryBean
Gives the application full JPA capabilities.
- Define a
DataSource bean.
- Define a
TransactionManager bean.
Typically using the JpaTransactionManager class from the Spring Framework.
JpaTransactionManager is an implementation of PlatformTransactionManager for a single JPA EntityManagerFactory
- Implement repositories.
@PersistenceContext- annotation is applied to a instance variable of the type EntityManager or a setter method, taking a single parameter of the EntityManager type, into which an entity manager is to be injected.
- Persistence context is a set of managed objects, entities.
- JPA’s equivalent to
@Autowired
- The
EntityManager provides an API for managing a persistence context and interacting with the entities in the persistence context.
- The
EntityManager manages the persistence context.
- The
EntityManager contains the implementation of operations for managing and interacting with persistence context.
@PersistenceContext
private EntityManager entityManager;
PlatformTransactionManager
@Bean
public PlatformTransactionManager txManager(){
    return new DataSourceTransactionManager(dataSource());
}

@Bean
public DataSource dataSource() {
	final DriverManagerDataSource dataSource = new DriverManagerDataSource();
	dataSource.setDriverClassName(driverClassName);
	dataSource.setUrl(url);
	dataSource.setUsername(username);
	dataSource.setPassword(password);

	return dataSource;
}
- Create
HibernateProperties
@Bean
public Properties hibernateProperties() {
	final Properties hibernateProp = new Properties();
	hibernateProp.put("hibernate.dialect", "org.hibernate.dialect.H2Dialect");
	hibernateProp.put("hibernate.hbm2ddl.auto", "create-drop");
	hibernateProp.put("hibernate.format_sql", true);
	hibernateProp.put("hibernate.use_sql_comments", true);
	hibernateProp.put("hibernate.show_sql", true);
	return hibernateProp;
}
- Create
EntityManagerFactory - An entity manager factory is used to interact with a persistence unit. @PersistenceUnit
@Bean
public EntityManagerFactory entityManagerFactory() {
	final LocalContainerEntityManagerFactoryBean factoryBean = new LocalContainerEntityManagerFactoryBean();
	factoryBean.setPackagesToScan("com.ps.ents");
	factoryBean.setDataSource(dataSource());
	factoryBean.setJpaVendorAdapter(new HibernateJpaVendorAdapter());
	factoryBean.setJpaProperties(hibernateProperties());
	factoryBean.afterPropertiesSet();
	return factoryBean.getNativeEntityManagerFactory();
}
- Create
TransactionManager
@Bean
public PlatformTransactionManager transactionManager() {
	return new JpaTransactionManager(entityManagerFactory());
}
@Repository("userJpaRepo")
public class JpaUserRepo implements UserRepo {

}
- Inject
EntityManager into @Repository beans and use session to deal with database
@PersistenceContext
private EntityManager entityManager;
Spring + JPA XML configuration
- Add transaction management
<tx:annotation-driven />

<bean id="transactionManager" class="org.springframework.orm.jpa.JpaTransactionManager">
		<property name="entityManagerFactory" ref="entityManagerFactory" />
</bean>
<bean id="dataSource" class="org.springframework.jdbc.datasource.DriverManagerDataSource">
	<property name="driverClassName" value="${driverClassName}" />
	<property name="url" value="${url}" />
	<property name="username" value="${username}" />
	<property name="password" value="${password}" />
</bean>
- Add
EntityManagerFactory bean
<bean id="entityManagerFactory"
	  class="org.springframework.orm.jpa.LocalContainerEntityManagerFactoryBean">
	<property name="dataSource" ref="dataSource" />
	<property name="packagesToScan" value="com.ps" />
	<property name="jpaVendorAdapter">
		<bean class="org.springframework.orm.jpa.vendor.HibernateJpaVendorAdapter" />
	</property>
	<property name="jpaProperties">
		<props>
			<prop key="hibernate.hbm2ddl.auto">create-drop</prop>
			<prop key="hibernate.dialect">org.hibernate.dialect.MySQL5Dialect</prop>
		</props>
	</property>
</bean>
@Repository("userJpaRepo")
public class JpaUserRepo implements UserRepo {

}
- Inject
EntityManager into @Repository beans and use session to deal with database
@PersistenceContext
private EntityManager entityManager;
Spring Data JPA
Spring Data Repositories
public interface PersonRepository extends Repository<Person, Long> {

}
public interface PersonRepository extends JpaRepository<Person, SocialSecurityNumber> {

}
@Service
public class PersonService {

    @Autowired
    private PersonRepository personRepository;

}
- Locations, where spring should look for Repository interfaces need to be explicitly defined
- Spring scans for
Repository interfaces
- Implements them and creates as a Spring bean
@Configuration
@EnableJpaRepositories(basePackages="com.example.**.repository")
public class JpaConfig {...}

@Configuration
@EnableGemfireRepositories(basePackages="com.example.**.repository")
public class GemfireConfig {...}

@Configuration
@EnableMongoRepositories(basePackages="com.example.**.repository")
public class MongoDbConfig {...}
Naming convention for finder methods
- If following the naming convention below, Spring Data will recognize these find methods and supply an implementation for these methods.
find(First[count])By[property expression][comparison operator][ordering operator]
- Finder method names
- Optionally,
First can be added after find in order to retrieve only the first found entity.
- The optional property expression selects the property of a managed entity that will be used to select the entity/entities that are to be retrieved.
IgnoreCase- Multiple property expressions can be chained using
AND or OR
- The optional comparison operator enables creation of finder methods that selects a range of entities.
LessThanGreaterThanBetweenLike
- The optional ordering operator allows for ordering a list of multiple entities on a property in the entity.
OrderByAscDescfindPersonByLastnameOrderBySocialsecuritynumberDesc - find persons that have a supplied last name and order them in descending order by social security number.
Spring Data Configuration
- For Java configuration
@EnableJpaRepositories(basePackages="com.example.**.repository") - Annotation to enable JPA repositories.
- With the Spring Data repository interfaces in place annotate a Spring configuration class with an annotation,
@EnableJpaRepositories in the case of Spring Data JPA, to enable the discovery and creation of repositories.
- For XML configuration
<jpa:repositories base-package=""com.example.**.repository""/> - Annotation to enable JPA repositories.
Query DSL
Query Annotation
- Queries annotated to the
@Query will take precedence over queries defined using @NamedQuery or named queries declared in orm.xml.
@Query annotation allows to execute native queries by setting the nativeQuery flag to true- The execution of pagination or dynamic sorting for
native queries is not supported.
Named Query
Native Query
Query Precedence
Paging and Sorting
@Test
public void testQueryByPriceRangeAndWoodTypePaging_SpringData() {
    final Pageable pageable = new PageRequest(0, 2);

    Page<Model> page = modelDataJPARepository
            .queryByPriceRangeAndWoodTypePaging(
                    BigDecimal.valueOf(1000L), BigDecimal.valueOf(2000L), "%Maple%", pageable);
    /* select name from Model m where m.price>=? and m.price<=? and (m.woodType like ?) limit ? */

    Iterator<Model> iterator = page.iterator();
    while (iterator.hasNext()){
        System.out.println(iterator.next());
    }
    // American Stratocaster
    // Les Paul

    page = modelDataJPARepository
            .queryByPriceRangeAndWoodTypePaging(
                    BigDecimal.valueOf(1000L), BigDecimal.valueOf(2000L), "%Maple%", page.nextPageable());

    /* select name from Model m where m.price>=? and m.price<=? and (m.woodType like ?) limit ? offset ?*/
    iterator = page.iterator();
    while (iterator.hasNext()){
        System.out.println(iterator.next());
    }
    // SG
}
Custom Repositories
Auditing
Locking
Spring data for updating data
@Transactional
@Modifying
@Query("update Book b set b.pageCount = ?1 where b.title like ?2")
int setPageCount(int pageCount, String title);
Spring MVC
- A typical Java Web application architecture
DispatcherServlet
- The Spring Reference says:
“In the Web MVC framework, each
DispatcherServlet has its own WebApplicationContext, which inherits all the beans already defined in the root WebApplicationContext.
These inherited beans can be overridden in the servlet-specific scope, and you can define new scope-specific beans local to a given Servlet instance.”
- The Spring Reference also says:
“The
WebApplicationContext is an extension of the plain ApplicationContext that has some extra features necessary for web applications.
It differs from a normal ApplicationContext in that it is capable of resolving themes, and that it knows which Servlet it is associated with (by having a link to the ServletContext)
- The central piece of Spring Web MVC is the
DispatcherServlet class, which is the entry point for every Spring Web application.
- The
DispatcherServlet converts HTTP requests into commands for controller components and manages rendered data as well.
- In a Spring Web application, all HTTP requests first reach the
DispatcherServlet
- The
DispatcherServlet must be defined in web.xml when the application is configured using the old-style XML configuration
- The
DispatcherServlet must be defined in web.xml when the application is configured using the old-style XML configuration.
- When using a configuration without
web.xml, a configuration class that extends AbstractDispatcherServletInitializer or AbstractAnnotationConfigDispatcherServletInitializer must be declared
- Defined by
WebApplicationInitializer or web.xml
- Creates separate “servlet” application context
- Receives requests and delegates them to registered handlers.
- Spring MVC has a JSP tag library that enables data binding and themes.
- The
DispatcherServlet is not instantiated via an application context. It is instantiated before any application context is created.
| |
 |
|
- Model - The model holds the current data and business logic of the application.
- View - The view is responsible for presenting the data of the application to the user. The user interacts with the view.
- Controller - Controllers acts as a mediator between the model and the view accepting requests from the
view, issuing commands to the model to manipulate the data of the application and finally interacts with the view to render the result.
The DispatcherServlet creates a separate servlet application context containing all specific web beans (controller, views, view resolvers).
This context is also called the web context or the DispatcherServletContext.
The root application context is also called RootApplicationContext. It contains all non-web beans and is instantiated using a bean of type org.springframework.web.context.ContextLoaderListener.
The relationship between the two contexts is a parent–child relationship, with the application context being the parent.
Thus, beans in the web context can access the beans in the parent context, but not conversely
- When a request is issued to the application:
DispatcherServlet of the application receives the request.DispatcherServlet maps the request to a method in a controller. The DispatcherServlet holds a list of classes implementing the HandlerMapping interface.DispatcherServlet dispatches the request to the controller.- The method in the controller is executed.
XML Configuration
<!-- web.xml -->
<web-app>
    <!-- The front controller, the entry point for all requests -->
    <servlet>
        <servlet-name>pet-dispatcher</servlet-name>
        <servlet-class>
           org.springframework.web.servlet.DispatcherServlet
        </servlet-class>
        <init-param>
        	<!--mvc-config.xml contains the Spring configuration for the front end (controllers and MVC infrastructure beans), the file is loaded by the DispatcherServlet-->
            <param-name>contextConfigLocation</param-name>
            <param-value>
                /WEB-INF/spring/mvc-config.xml
            </param-value>
        </init-param>
        <load-on-startup>1</load-on-startup>
    </servlet>
    <!-- Map all requests to the DispatcherServlet for handling -->
    <servlet-mapping>
        <servlet-name>pet-dispatcher</servlet-name>
        <url-pattern>/</url-pattern>
    </servlet-mapping>
    ...
</web-app>
Java Configuration
- To tell the
DispatcherServlet that the configuration will be provided by a configuration java class(WebConfig) instead of a file, the following changes have to be made in web.xml
- Need use
AnnotationConfigWebApplicationContext for contextClass param
- Also need to provide Java configuration class (
com.ps.config.WebConfig) for contextConfigLocation param
<web-app>
    <!-- The front controller, the entry point for all requests -->
   <servlet>
       <servlet-name>pet-dispatcher</servlet-name>
       <servlet-class>
           org.springframework.web.servlet.DispatcherServlet
       </servlet-class>
       <init-param>
           <param-name>contextClass</param-name>
           <param-value>
               org.springframework.web.context.support.AnnotationConfigWebApplicationContext
           </param-value>
       </init-param>
       <init-param>
           <param-name>contextConfigLocation</param-name>
           <param-value>
               com.ps.config.WebConfig
           </param-value>
       </init-param>
       <load-on-startup>1</load-on-startup>
   </servlet>
</web-app>
@Controller annotation
- Controllers are classes that define methods used to handle HTTP request
@Controller
@RequestMapping("/users")
public class UserController {

}
- Create a controller class by implementing the
Controller interface or extending any of Controller’s implementations like AbstractController.
- The ways of declaring controllers without annotation are not deprecated and there is no mention anywhere that they will be removed in the next major Spring version.
public class MyController extends AbstractController{

	  @Override
	  protected ModelAndView handleRequestInternal(HttpServletRequest request, HttpServletResponse response) throws Exception {
		   ModelAndView model = new ModelAndView("MyPage");
		   model.addObject("myReply", "hi there");
		   return model;
	  }
 }
BeanNameUrlHandlerMapping is included in the Spring framework, and it is the default if no HandlerMapping bean is registered in the application context.
- Declare
BeanNameUrlHandlerMapping is optional, by default, if Spring can’t found handler mapping, the DispatcherServlet will creates a BeanNameUrlHandlerMapping automatically.
<beans ...>

   <bean class="org.springframework.web.servlet.handler.BeanNameUrlHandlerMapping"/>

   <bean name="/welcome.htm"
        class="com.common.controller.WelcomeController" />

   <bean name="/streetName.htm"
        class="com.common.controller.StreetNameController" />

   <bean name="/process*.htm"
        class="com.common.controller.ProcessController" />

</beans>
or using Java config
@Configuration
public class BeanNameUrlHandlerMappingConfig {

    @Bean
    BeanNameUrlHandlerMapping beanNameUrlHandlerMapping() {
        return new BeanNameUrlHandlerMapping();
    }

    @Bean("/beanNameUrl")
    public WelcomeController welcome() {
        return new WelcomeController();
    }
}
- Using
SimpleUrlHandlerMapping
@Configuration
public class SimpleUrlHandlerMappingConfig {

    @Bean
    public SimpleUrlHandlerMapping simpleUrlHandlerMapping() {
        SimpleUrlHandlerMapping simpleUrlHandlerMapping
          = new SimpleUrlHandlerMapping();

        Map<String, Object> urlMap = new HashMap<>();
        urlMap.put("/simpleUrlWelcome", welcome());
        simpleUrlHandlerMapping.setUrlMap(urlMap);

        return simpleUrlHandlerMapping;
    }

    @Bean
    public WelcomeController welcome() {
        return new WelcomeController();
    }
}
Simpler Mapping Annotations
@RequestMapping- Exist for each HTTP method
@GetMapping@PostMapping@PutMapping@DeleteMapping@PatchMapping
@RequestMapping annotation
- Can specify URL, which annotated method should handle - @RequestMapping(“/foo”)
- => server-url/app-context-root/servlet-mapping/request-mapping
- can use wildcards @RequestMapping(“/foo/*”)
- Can specify HTTP method, which annotated method should handle
@RequestMapping(value = "/list", method = RequestMethod.GET)
public String list(Model model) {

}
@RequestParam annotation
- Url
http://localhost:8080/mvc-basic/showUser?userId=105
handled by a method that has a parameter annotated with @RequestParam because the request is parametrized.
- Can specify parameter from http request to be injected as method parameter
- Can specify parameter weather required or not, required by default
@RequestMapping(value = "/showUser", method = RequestMethod.GET)
public String show(@RequestParam("userId") Long id, Model model) {

}
@PathVariable annotation
- Url
http://localhost:8080/mvc-basic/users/105
handled by a method that has a parameter annotated with @PathVariable because the request URI contains a piece that is variable.
- Can extract value as a method parameter from the url requested
@RequestMapping(value = "/{userId}", method = RequestMethod.GET)
public String show(@PathVariable("userId") Long id, Model model) {

}
Views and Models
<bean class="org.springframework.web.servlet.view.InternalResourceViewResolver">
    <property name="prefix" value="/WEB-INF/"/>
    <property name="suffix" value=".jsp"/>
</bean>
Model
- The model can supply attributes used for rendering views.
@GetMapping("/showViewPage")
public String passParametersWithModel(Model model) {
    final Map<String, String> map = new HashMap<>();
    map.put("spring", "mvc");

    model.addAttribute("message", "Baeldung");
    model.mergeAttributes(map);
    return "viewPage";
}
ModelMap
- Just like the
Model interface above, ModelMap is also used to pass values to render a view.
- The advantage of
ModelMap is it gives us the ability to pass a collection of values and treat these values as if they were within a Map:
@GetMapping("/printViewPage")
public String passParametersWithModelMap(ModelMap map) {
    map.addAttribute("welcomeMessage", "welcome");
    map.addAttribute("message", "Baeldung");
    return "viewPage";
}
ModelAndView
- This interface allows us to pass all the information required by Spring MVC in one return:
@GetMapping("/goToViewPage")
public ModelAndView passParametersWithModelAndView() {
    final ModelAndView modelAndView = new ModelAndView("viewPage");
    modelAndView.addObject("message", "Baeldung");
    return modelAndView;
}
SessionAttributes
- Configure controller
- add
@SessionAttributes()
- add
@ModelAttribute()
@RestController
@SessionAttributes("visitor")
public class TodoListController {

	private final TodoListService todoListService;

	@Autowired
	public TodoListController(TodoListService todoListService) {
		this.todoListService = todoListService;
	}

	@ModelAttribute("visitor")
	public Visitor getVisitor(HttpServletRequest request) {
		return new Visitor(request.getSession().getId());
	}

	@RequestMapping(value = "/add", method = RequestMethod.POST)
	public Todo addTodo(@ModelAttribute("visitor") Visitor visitor, @RequestBody Todo todoToAdd) {
		final Todo todo = new Todo(todoToAdd.getName(), todoToAdd.getDescription(), visitor);
		todoListService.addToList(todo);
		return todo;
	}

	@RequestMapping(value = "/get", method = RequestMethod.GET)
	public List<Todo> getAllTodos() {
		return todoListService.findAllTodos();
	}
}
- Configure service
- Need to has scope
@Scope(value = "session", proxyMode = ScopedProxyMode.INTERFACES)
@Service
@Scope(value = "session", proxyMode = ScopedProxyMode.INTERFACES)
public class TodoListServiceImpl implements TodoListService {

	private List<Todo> todos = new CopyOnWriteArrayList<>();

	@Override
	public void addToList(Todo todo) {
		todos.add(todo);
	}

	@Override
	public List<Todo> findAllTodos() {
		return new ArrayList<>(todos);
	}

}
- For different sessions will be injected different
TodoListServiceImpl class
- Result of
findAllTodos for session id = 7946F5947D2A8A1F63C9EA30114112B1
[
  {
    "name": "my todo",
    "description": "my description",
    "visitor": {
      "address": "7946F5947D2A8A1F63C9EA30114112B1"
    }
  },
  {
    "name": "my todo 1",
    "description": "my description 1",
    "visitor": {
      "address": "7946F5947D2A8A1F63C9EA30114112B1"
    }
  }
]
- Result of
findAllTodos for session id = BB9D159075F2158176856A5A2C53F778
[
  {
      "name": "my todo 1",
      "description": "my description 1",
      "visitor": {
          "address": "BB9D159075F2158176856A5A2C53F778"
      }
  },
  {
      "name": "my todo",
      "description": "my description",
      "visitor": {
          "address": "BB9D159075F2158176856A5A2C53F778"
      }
  },
  {
      "name": "my todo 2",
      "description": "my description 2",
      "visitor": {
          "address": "BB9D159075F2158176856A5A2C53F778"
      }
  }
]
Parameter types for a @Controller method
Annotations might be used on a @Controller method parameter
The valid return types of a @Controller method
Spring MVC XML Configuration
- The main component of an SpringMVC XML configuration is the
<mvc:annotation-driven/> which registers all necessary default infrastructure beans for a web application to work: handler mapping, validation, conversion beans
<mvc:default-servlet-handler/> - default servlet mapping “/” is mapped to the DispatcherServlet
<beans ...>

    <!-- Defines basic MVC defaults (handler mapping, date formatting, etc) -->
   <mvc:annotation-driven/>

   <!-- Configures a handler for serving static resources by forwarding to the
        Servlet container’s default Servlet.-->
   <mvc:default-servlet-handler/>

   <mvc:resources mapping="pdfs" location="/pdfs/**"/>

    <!-- Views -->
    <bean class="org.springframework.web.servlet.view.InternalResourceViewResolver">
        <property name="prefix" value="/WEB-INF/jsp/"/>
        <property name="suffix" value=".jsp"/>
        <property name="order" value="2"/>
    </bean>

</beans>
Spring MVC Java Configuration
@EnableWebMvc - is the equivalent of <mvc:annotation-driven/>- The configuration class has to be
- annotated with the
@Configuration annotation
- annotated with the
@EnableWebMvc annotation
- implement
WebMvcConfigurer
- or extend an implementation of this interface
WebMvcConfigurerAdapter
@EnableWebMvc — to enable auto-detection @Controller beans, request/response converters
@Configuration
@EnableWebMvc // <=><mvc:annotation-driven/>
@ComponentScan(basePackages = {"com.ps.web"})// <=> <context:component-scan base-package="com.ps.web"/>
public class WebConfig extends WebMvcConfigurerAdapter {

    // <=> <mvc:default-servlet-handler/>
    @Override
    public void configureDefaultServletHandling(
             DefaultServletHandlerConfigurer configurer) {
        configurer.enable();
    }

    @Bean
    public InternalResourceViewResolver getViewResolver(){
        final InternalResourceViewResolver resolver = new InternalResourceViewResolver();
        resolver.setPrefix("/WEB-INF/");
        resolver.setSuffix(".jsp" );
        resolver.setRequestContextAttribute("requestContext");
        return resolver;
    }
   // other beans and method implementations that are not in scope
}
Get rid of web.xml
-
Starting with Servlet 3.0+, the web.xml file is no longer necessary to configure a web application.
It can be replaced with a class implementing the WebApplicationInitializer interface
-
This can be done by implementing WebApplicationInitializer, used for servlet engine
public class WebInitializer implements WebApplicationInitializer {

    @Override
    public void onStartup(ServletContext servletContext) throws ServletException {
      ServletRegistration.Dynamic registration =
      servletContext.addServlet("dispatcher", new DispatcherServlet());
      registration.setLoadOnStartup(1);
      registration.addMapping("/");
      registration.setInitParameter("contextConfigLocation",
            "com.ps.config.WebConfig");
      registration.setInitParameter("contextClass",
           "o.s.w.c.s.AnnotationConfigWebApplicationContext");
    }
}
- Another way extending the
AbstractAnnotationConfigDispatcherServletInitializer
- Base-class for all Spring MVC apps to implement for servlet configuration without
web.xml
public class WebAppConfigInitializer extends AbstractAnnotationConfigDispatcherServletInitializer {

    @Override
    protected Class<?>[] getRootConfigClasses() {
        return new Class<?>[]{RootConfig.class};
    }

    @Override
    protected Class<?>[] getServletConfigClasses() {
        return new Class<?>[]{WebConfig.class};
    }

    @Override
    protected String[] getServletMappings() {
        return new String[]{"/"};
    }
}
- For Java configuration need also to extends
WebMvcConfigurerAdapter
@Configuration
@EnableWebMvc
@ComponentScan(basePackages = {"com.ps.web"})
public class WebConfig extends WebMvcConfigurerAdapter {

    @Override
    public void addResourceHandlers(ResourceHandlerRegistry registry) {
        registry.addResourceHandler("/images/**").addResourceLocations("/images/").setCachePeriod(31556926);
        registry.addResourceHandler("/styles/**").addResourceLocations("/styles/").setCachePeriod(31556926);
    }

    @Override
    public void configureDefaultServletHandling(DefaultServletHandlerConfigurer configurer) {
        configurer.enable();
    }

    @Override
    public void addViewControllers(ViewControllerRegistry registry) {
        registry.addViewController("/").setViewName("home");
        registry.addViewController("/home").setViewName("home");
    }

}
- Use
WebApplicationContextUtils to gets Spring ApplicationContext from ServletContext
public class TopSpendersReportGenerator extends HttpServlet {

	private ClientService clientService;

	public void init() {
		ApplicationContext context = WebApplicationContextUtils.getRequiredWebApplicationContext(getServletContext());
		clientService = (ClientService) context.getBean(“clientService”);
	}
...
}
Spring MVC Quick Start
- Register Dispatcher servlet (web.xml or in Java)
- Implement Controllers
- Register Controllers with Dispatcher Servlet
- Can be discovered using component-scan
- Implement Views
- Register View resolver or use the default one
- Need to set prefix (eg. /WEB-INF/views/) and suffix (eg. .jsp)
- Deploy
Spring Rest
- REST stands for REpresentational State Transfer and is an architectural style which allows clients to access and manipulate textual representations of web resources given a set of constraints.
- Resource - Any information that can be named can be a resource: a document or image, a temporal service, a collection of other resources, a non-virtual objec
Uniform Resource Identifier (URI) is a string of characters designed for unambiguous identification of resources and extensibility via the URI scheme.- HTTP methods (GET, POST, PUT, DELETE) are actions performed on resource (like CRUD)
@RestController - this is @Controller + @ResponseBody and not need to configure ContentNegotiationViewResolver@ResponseStatus can set HTTP response status code
- If used, void return type means no View (empty response body) and not default view!
- 2** - success (201 Created, 204 No Content,…)
- 3** - redirect
- 4** - client error (404 Not found, 405 Method Not Allowed, 409 Conflict,…)
- 5** - server error
- Scalability
- The statelessness, the cacheability and the layered system constraints of the REST architectural style allows for scaling a REST web service
- Statelessness ensures that requests can be processed by any node in a cluster of services without having to consider server-side state.
- Interoperability
- A REST service can support different formats for the resource representation transferred to clients and allow for clients to specify which format it wants to receive data in.
- REST resources are commonly identified using URIs, which do not depend on any particular language or implementation
- The REST architectural style allows for a fixed set of operations on resources.
Accessing Request/Response Data
- Annotate incoming data with
@RequestBody
- Annotate outgoing data with
@ResponseBody
@ResponseBody before controller method return type means that the response should be directly rendered to client and not evaluated as a logical view name
public void updatePerson(@RequestBody Person person, @PathVariable("id") int personId)
@RequestHeader can inject value from HTTP request header as a method parameter@ExceptionHandler({MyException.class}) - Controller methods annotated with it are called when declared exceptions are thrown
Spring Security
- The Spring Security Reference says:
“Spring Security’s web infrastructure is based entirely on standard servlet filters.
It doesn’t use servlets or any other servlet-based frameworks (such as Spring MVC) internally, so it has no strong links to any particular web technology.
It deals in
HttpServletRequests and HttpServletResponses and doesn’t care whether the requests come from a browser, a web service client, an HttpInvoker or an AJAX application.”
- Concepts
Principal is the term that signifies a user, device, or system that could perform an action within the application.Credentials are identification keys that a principal uses to confirm its identity.Authentication is the process of verifying the validity of the principal’s credentials.
- authentication must always come before authorization
- An example is the login of a computer system; a user enters a user name and a password.
- other ways of authenticating a user of a computer system such as PIN numbers, security questions, id cards, fingerprints
Authorization is the process of making a decision whether an authenticated user is allowed to perform a certain action within the application
- For instance, the only type of users that can create and delete users in a computer system is users in the administrator role.
Thus the only users that have access to the create and delete functions of the application are users in the administrator role.
Secured item is the term used to describe any resource that is being secured.
- Spring secures web requests using standard Filters.
- Spring secures method invocations using Spring AOP.
- Common attacks
- Cache Control
- HTTPS
- XSS
- Content Sniffing
- CSRF Protection
- Session Fixation
- Click Jacking
- CSP
- RFD Attacks
- HttpFirewall
- Most of the attacks already known and protected by default if using Spring Security
| |
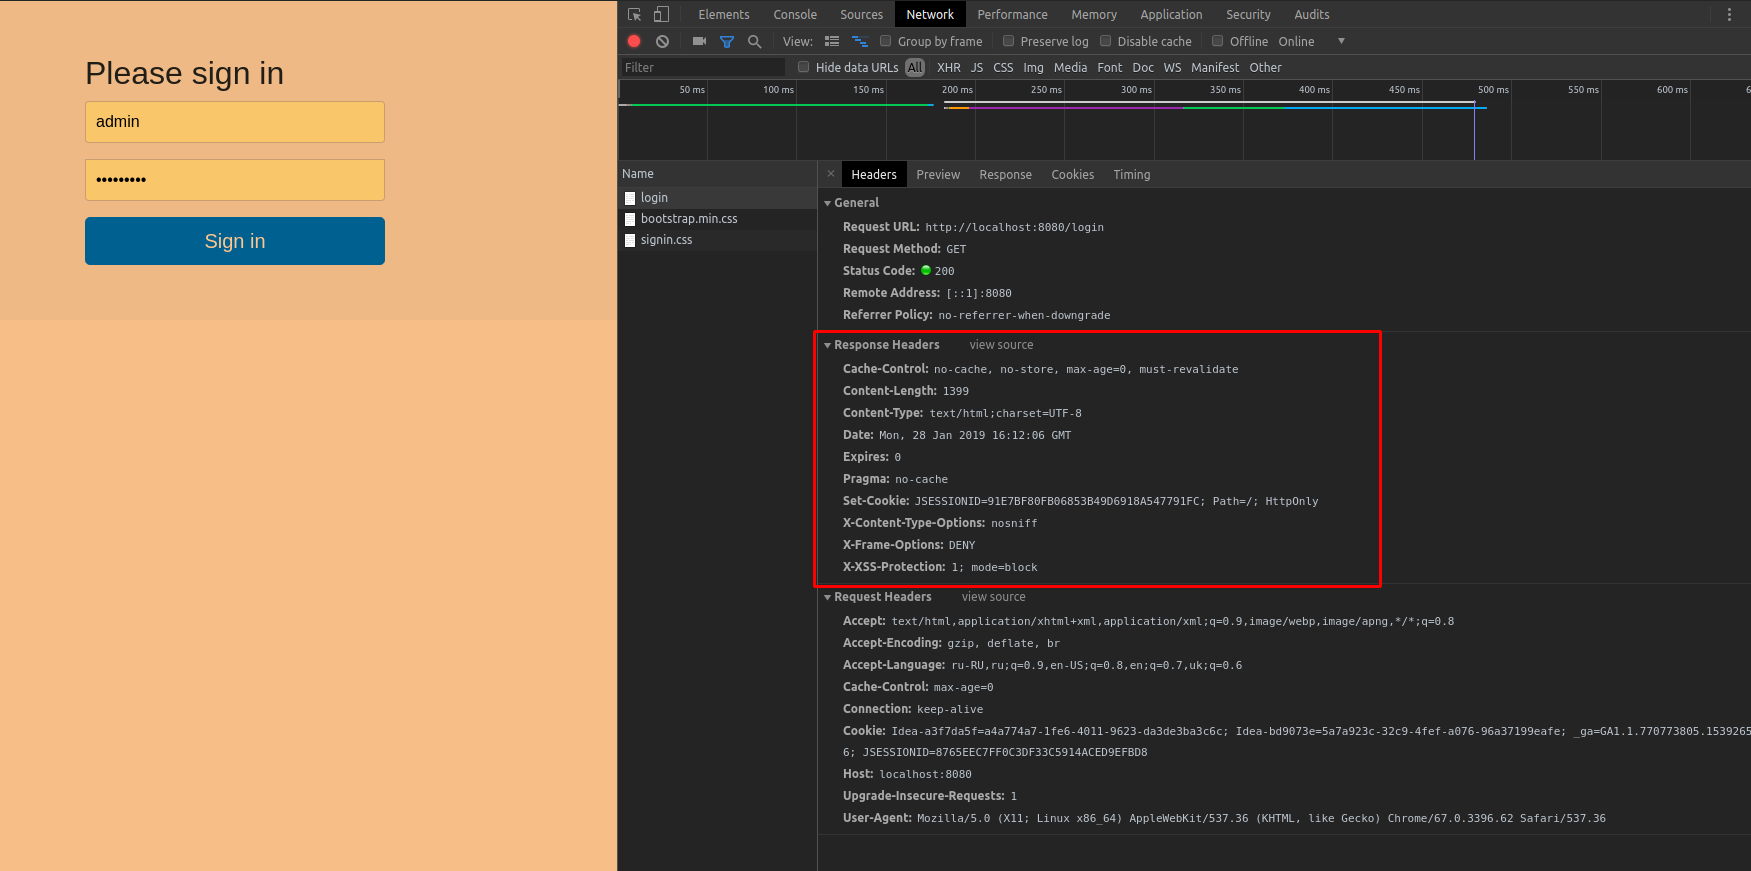 |
- Common user roles
ADMIN is a role used for full powerMEMBER is used for limited powerGUEST is used for restricted use of the application
| |
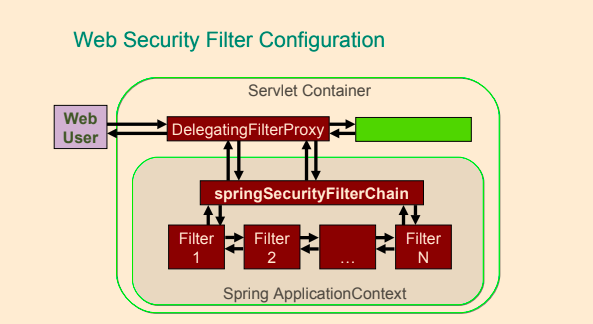 |
- A user tries to access the application by making a request. The application requires the user to provide the credentials so it can be logged in.
- The credentials are verified by the
Authenticaltion Manager and the user is granted access to the application. The authorization rights for this user are loaded into the Spring Security context.
- The user makes a resource request (view, edit, insert, or delete information) and the Security Interceptor intercepts the request before the user accesses a protected/secured resource.
- The
Security Interceptor extracts the user authorization data from the security context and…
- … delegates the decision to the
Access Decision Manager.
- The
Access Decision Manager polls a list of voters to return a decision regarding the rights of the authenticated user to system resources.
- Access is granted or denied to the resource based on the user rights and the resource attributes.
<form-login ../> - configuration element is used to define the request URL for the login form where the user can provide its credentials.
<form-login login-page="/login.jsp" authentication-failure-url="/login.jsp?login_error=1"/>
<logout ../> - configuration element is used to define the request URL for the logout form.
<logout logout-success-url="/index.jsp"/>
<intercept-url …/> - The paths defined as values for the pattern attribute are pieces of URLs definedmvcMatchers API is newer than the antMatchers API.
- As an example
antMatchers("/services") only matches the exact “/services” URL while mvcMatchers("/services") matches “/services”
but also “/services/”, “/services.html” and “/services.abc”.
mvcMatcher matches more than the antMatcher and is more forgiving as far as configuration mistakes are concerned.mvcMatchers API uses the same matching rules as used by the @RequestMapping annotation.
- ` ` - using CSFR tokens in Spring forms to prevent cross-site request forgery
authentication-failure-url - is used to define where the user should be redirected when there is an authentication failuredefault-target-url - is used to define where the user will be redirected after a successful authentication- Configuring authentication for
UserDetailsService
<authentication-manager>
        <authentication-provider>
            <user-service>
                <user name="john" password="doe"  authorities="ROLE_USER"/>
                <user name="jane" password="doe" authorities="ROLE_USER,ROLE_ADMIN"/>
                <user name="admin" password="admin" authorities="ROLE_ADMIN"/>
            </user-service>
        </authentication-provider>
</authentication-manager>
intercept-url
- One single
<intercept-url> element in Spring Security 5 XML configuration is used to specify an
URL pattern in the application and information deciding who will be able to access the resource(s) which URLs match the URL pattern.
<intercept-url> element in Spring Security 5 XML configuration is used to specify an
URL pattern in the application and information deciding who will be able to access the resource(s) which URLs match the URL pattern.
<intercept-url> element has the following attributes:
- access - Access attributes, commonly role names, specifying the user(s) that has access
- filters - Omitted or having the value
none. This will cause any matching request to bypass the Spring Security filter chain entirely.
- method - HTTP method used with URL pattern and, optionally, servlet path to match requests. If omitted all HTTP methods will match.
- Examples of its values are
DELETE, POST
- pattern - URL path pattern for which the Spring Security filter chain will be applied.
- request-matcher-ref - Reference to RequestMatcher bean used to determine if this will be used.
- requires-channel - Possible values are
http https and any. The first two are for access over HTTP and
HTTPS respectively. Omitting this attribute or using the value any matches both HTTP and HTTPS.
- servlet-path - Servlet path used in combination with method and pattern to match requests. Optional.
- Multiple
<intercept-url> elements may be defined and they will be evaluated in the order in which they are defined. When an <intercept-url> element with a matching pattern is found, evaluation
stops. It is therefore recommended to define more <intercept-url> elements with more specific pattern earlier and more general patterns later.
- There are two wildcards that can be used in URL patterns:
-
*
Matches any path on the level at which the wildcard occur.
Example: /services/* matches /services/users and /services/orders but not /services/orders/123/items.
-
**
Matches any path on the level at the wildcard occurs and all levels below. If only /** or ** then will match any request.
Example: /services/** matches /services, /services/, /services/users and /services/orders and also /services/orders/123/items etc.
- Multiple
<intercept-url> elements may be defined and they will be evaluated in the order in which they are defined.
- When an
<intercept-url> element with a matching pattern is found, evaluation stops.
- It is therefore recommended to define more
<intercept-url> elements with more specific pattern earlier and more general patterns later.
- If there are multiple
intercept-url elements used, the first match will be used.
<beans:beans  ...>
        <http>
              <intercept-url pattern="/services/users*" access="ROLE_ADMIN" />
              <intercept-url pattern="/users/edit" access="ROLE_ADMIN"/>
              <intercept-url pattern="/users/list" access="ROLE_USER"/>
              <intercept-url pattern="/users/**" access="IS_AUTHENTICATED_FULLY"/>
              <intercept-url pattern="/**" access="ROLE_USER" filters="none"/>
              <intercept-url pattern="/**" access="authenticated"/>
              <intercept-url pattern="/myPage.jsp*" access="ROLE_USER"/>
              <intercept-url pattern="/**" access="ROLE_USER,ROLE_ADMIN" />
              <intercept-url pattern="/**" requires-channel="http,https,any"/>
              <intercept-url pattern="/**" access="authenticated" method="POST" requires-channel="https" />
        </http>
</beans:beans>
Spring Security Core Components
SecurityContextHolder - Contains and provides access to the SecurityContext of the application. Default behavior is to associate the SecurityContext with the current thread.SecurityContext - Default and only implementation in Spring Security holds an Authentication object. May also hold additional request-specific information.Authentication - Represents token for authentication request or authenticated principal after the request has been granted. Also contains the authorities in the application that an authenticated principal has been granted.GrantedAuthority - Represents an authority granted to an authenticated principal.UserDetails - Holds user information, such as user-name, password and authorities of the user.
This information is used to create an Authentication object on successful authentication. May be extended to contain application-specific user information.UserDetailsService - Given a user-name this service retrieves information about the user in a UserDetails object.
Depending on the implementation of the user details service used, the information may be stored in a database, in memory or elsewhere if a custom implementation is used.
| |
 |
| |
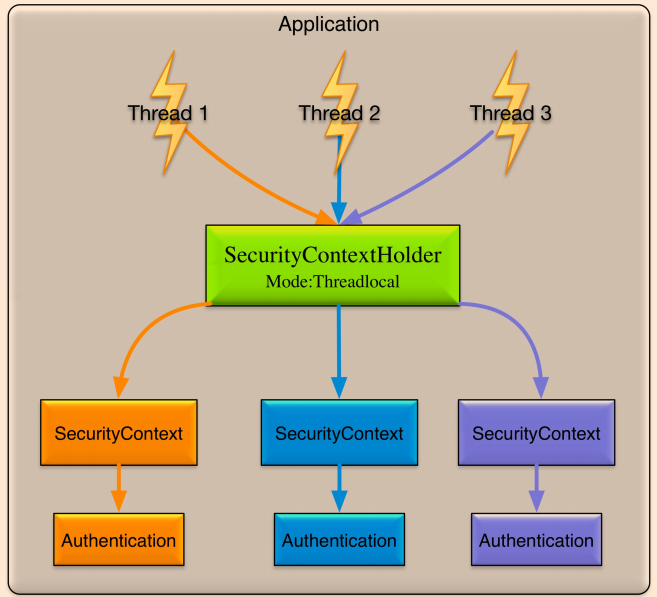 |
Spring XML Configuration without web.xml
- The security filter gets transformed into a class extending a Spring specialized class:
org.springframework.security.web.context.AbstractSecurityWebApplicationInitializer
- The class that matches the DispatcherServlet declaration must be made to extend the
org.springframework.web.servlet.support.AbstractDispatcherServletInitializer so the root context can be set to be the security context
public class SecurityInitializer extends AbstractSecurityWebApplicationInitializer {
    // Empty class needed to register the springSecurityFilterChain bean
}

public class WebInitializer extends AbstractDispatcherServletInitializer {

    @Override
	protected WebApplicationContext createRootApplicationContext() {
		final XmlWebApplicationContext ctx = new XmlWebApplicationContext();
		ctx.setConfigLocation("/WEB-INF/spring/security-config.xml");
		return ctx;
    }

    @Override
    protected WebApplicationContext createServletApplicationContext() {
        final XmlWebApplicationContext ctx = new XmlWebApplicationContext();
        ctx.setConfigLocations(
            // MVC configuration
            "/WEB-INF/spring/mvc-config.xml",
            // Service configuration
            "/WEB-INF/spring/app-config.xml");
        return ctx;
    }
}
Java Configuration
- Annotate your
@Configuration with @EnableWebSecurity
- Your
@Configuration should extend WebSecurityConfigurerAdapter
- Register your SecurityConfig class with
AbstractSecurityWebApplicationInitializer
| |
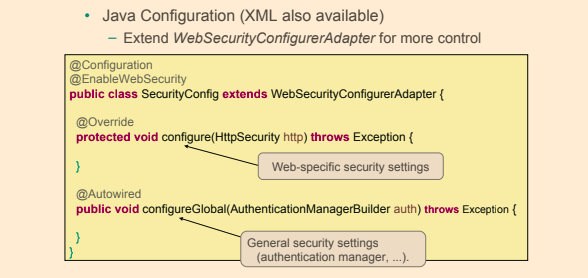 |
public class SecurityWebAppInitializer extends AbstractSecurityWebApplicationInitializer {

    public SecurityWebAppInitializer() {
        super(SecurityConfig.class);
    }

}

@Configuration
@EnableWebSecurity
public class SecurityConfig extends WebSecurityConfigurerAdapter {

    @Override
    public void configure(WebSecurity web) {
        web.ignoring().antMatchers("/resources/**","/images/**","/styles/**");
    }

    @Override
    protected void configure(HttpSecurity http) {
        http
                .authorizeRequests()
                .antMatchers("/user/edit").hasRole("ADMIN")
                .antMatchers("/**").hasAnyRole("ADMIN","USER")
                .anyRequest()
                .authenticated()
                .and()
            .formLogin()
                .usernameParameter("username")  //  customizable
                .passwordParameter("password") // customizable
                .loginProcessingUrl("/login") // customizable
                .loginPage("/auth")
                .failureUrl("/auth?auth_error=1")
                .defaultSuccessUrl("/home")
                .permitAll()
                .and()
            .logout()
                .logoutUrl("/logout")
                .logoutSuccessUrl("/")
            .and()
            .csrf().disable();
    }
}
Authorization
- Process of checking a principal has privileges to perform requested action
- Specific urls can have specific Role or authentication requirements
- Can be configured using HttpSecurity.authorizeRequests().*
@Configuration
@EnableWebSecurity
public class HelloWebSecurityConfiguration extends WebSecurityConfigurerAdapter {

  @Override
  protected void configure(HttpSecurity httpSecurity) throws Exception {
      httpSecurity.authorizeRequests().antMatchers("/css/**","/img/**","/js/**").permitAll()
                                      .antMatchers("/admin/**").hasRole("ADMIN")
                                      .antMatchers("/user/profile").hasAnyRole("USER","ADMIN")
                                      .antMatchers("/user/**").authenticated()
                                      .antMatchers("/user/private/**").fullyAuthenticated()
                                      .antMatchers("/public/**").anonymous();
  }
}
- Rules are evaluated in the order listed
- Should be from the most specific to the least specific
- Options
hasRole() - has specific rolehasAnyRole() - multiple roles with ORhasRole(FOO) AND hasRole(BAR) - having multiple rolesisAnonymous() - unauthenticatedisAuthenticated() - not anonymous
- The
antMatcher(…) method is the equivalent of the <intercept-url.../> element from XML,
- To enable
CSRF usage, the configuration above must also define a CSRF provider bean
Authentication
- In-memory Authentication provider example
@Configuration
@EnableWebSecurity
public class HelloWebSecurityConfiguration extends WebSecurityConfigurerAdapter {

  @Override
  public void configureGlobal(AuthenticationManagerBuilder authManagerBuilder) throws Exception  {
      authManagerBuilder.inMemoryAuthentication().withUser("alice").password("letmein").roles("USER").and()
                                                 .withUser("bob").password("12345").roles("ADMIN").and();
  }
}
- JDBC Authentication provider
- Authenticates against DB
- Can customize queries using
- .usersByUsernameQuery(),
- .authoritiesByUsernameQuery(),
- .groupAuthoritiesByUsername()
- Otherwise default queries will be used
@Configuration
@EnableWebSecurity
public class HelloWebSecurityConfiguration extends WebSecurityConfigurerAdapter {

  @Autowired
  private DataSource dataSource;

  @Override
  public void configureGlobal(AuthenticationManagerBuilder authManagerBuilder) throws Exception {
      authManagerBuilder.jdbcAuthentication().dataSource(dataSource)
                                             .usersByUsernameQuery(...)
                                             .authoritiesByUsernameQuery(...)
                                             .groupAuthoritiesByUsername(...);
  }
}
Password Encoding
- Supports passwords hashing (md5, sha, …)
- The Spring Security Reference says:
‘Spring Security’s
PasswordEncoder interface is used to support the use of passwords which are encoded in some way in persistent storage.’
- The Spring Security Reference says:
‘A hash is “one-way” in the sense that it is very difficult (effectively impossible) to obtain the original input given the hash value,
or indeed any possible input which would produce that hash value. This property makes hash values very useful for authentication purposes.
They can be stored in your user database as an alternative to plaintext passwords and even if the values are compromised they do not immediately reveal a password which can be used to login.
Note that this also means you have no way of recovering the password once it is encoded.’
@Configuration
@EnableWebSecurity
public class HelloWebSecurityConfiguration extends WebSecurityConfigurerAdapter {

@Autowired
private DataSource dataSource;

@Override
public void configureGlobal(AuthenticationManagerBuilder authManagerBuilder) throws Exception {
    authManagerBuilder.jdbcAuthentication().dataSource(dataSource)
                                           .passwordEncoder(new StandardPasswordEncoder("this is salt"));
}
}
<password-encoder> is used for supporting encoded passwords.
<password-encoder> Attributes
base64 - Whether a string should be base64 encodedhash - Defines the hashing algorithm used on user passwords. We recommend strongly against using MD4, as it is a very weak hashing algorithm.ref - Defines a reference to a Spring bean that implements PasswordEncoder .
```xml
```
Password Hashing
Password hashing is the process of calculating a hash-value for a password. The hash-value is stored, for instance in a database, instead of storing the password itself. Later when a user attempts
to log in, a hash-value is calculated for the password supplied by the user and compared to the stored hash-value. If the hash-values does not match, the user has not supplied the correct password.
hash("hello") = 2cf24dba5fb0a30e26e83b2ac5b9e29e1b161e5c1fa7425e73043362938b9824
hash("hbllo") = 58756879c05c68dfac9866712fad6a93f8146f337a69afe7dd238f3364946366
Salting
A salt used when calculating the hash-value for a password is a sequence of random bytes that are used in combination with the cleartext password to calculate a hash-value. The salt is stored in
cleartext alongside the password hash-value and can later be used when calculating hash-values for user-supplied passwords at login.
The reason for salting is to avoid always having the same hash-value for a certain word, which
would make it easier to guess passwords using a dictionary of hash-values and their corresponding passwords.
hash("hello" + "QxLUF1bgIAdeQX") = 9e209040c863f84a31e719795b2577523954739fe5ed3b58a75cff2127075ed1
hash("hello" + "bv5PehSMfV11Cd") = d1d3ec2e6f20fd420d50e2642992841d8338a314b8ea157c9e18477aaef226ab
Spring Security filters order
The order that filters are defined in the chain is very important. Irrespective of which filters you are actually using, the order should be as follows:
ChannelProcessingFilter, because it might need to redirect to a different protocolSecurityContextPersistenceFilter, so a SecurityContext can be set up in the SecurityContextHolder at the beginning of a web request, and any changes to the SecurityContext can be copied to the HttpSession when the web request ends (ready for use with the next web request)ConcurrentSessionFilter, because it uses the SecurityContextHolder functionality and needs to update the SessionRegistry to reflect ongoing requests from the principal- Authentication processing mechanisms -
UsernamePasswordAuthenticationFilter, CasAuthenticationFilter, BasicAuthenticationFilter etc - so that the SecurityContextHolder can be modified to contain a valid Authentication request token
- The
SecurityContextHolderAwareRequestFilter, if you are using it to install a Spring Security aware HttpServletRequestWrapper into your servlet container
- The
JaasApiIntegrationFilter, if a JaasAuthenticationToken is in the SecurityContextHolder this will process the FilterChain as the Subject in the JaasAuthenticationToken
RememberMeAuthenticationFilter, so that if no earlier authentication processing mechanism updated the SecurityContextHolder, and the request presents a cookie that enables remember-me services to take place, a suitable remembered Authentication object will be put thereAnonymousAuthenticationFilter, so that if no earlier authentication processing mechanism updated the SecurityContextHolder, an anonymous Authentication object will be put thereExceptionTranslationFilter, to catch any Spring Security exceptions so that either an HTTP error response can be returned or an appropriate AuthenticationEntryPoint can be launchedFilterSecurityInterceptor, to protect web URIs and raise exceptions when access is denied
Spring Security web infrastructure:
- FilterChainProxy
- Entry point for all of the web based security.
<filter-chain> is used to set up security filter chains. It includes an attribute where you can specify the filters that you prefer to use.
- DelegatingFilterProxy
- To configure Spring Security, the
web.xml must be modified to include the security filter
DelegatingFilterProxy - Spring’s DelegatingFilterProxy provides the link between web.xml and the application context.DelegatingFilterProxy class implements the javax.servlet.Filter interface and thus is a servlet filter.
```xml
springSecurityFilterChain
org.springframework.web.filter.DelegatingFilterProxy
springSecurityFilterChain
/*
```
- SecurityFilterChain
- The security filter chain implements the SecurityFilterChain interface and the only implementation provided by Spring Security is the DefaultSecurityFilterChain class.
| |
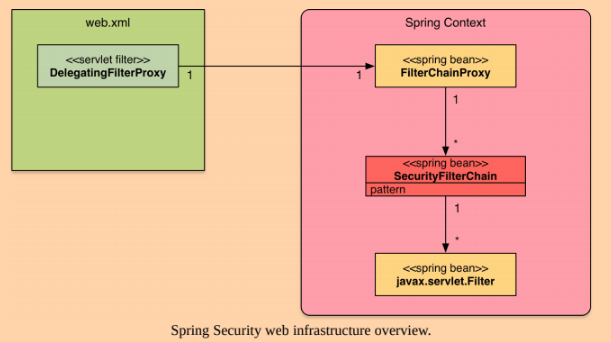 |
<bean id="filterChainProxy" class="org.springframework.security.web.FilterChainProxy">
  <sec:filter-chain-map path-type="ant">
     <sec:filter-chain pattern="/webServices/**" filters="
           securityContextPersistenceFilterWithASCFalse,
           basicAuthenticationFilter,
           exceptionTranslationFilter,
           filterSecurityInterceptor" />
     <sec:filter-chain pattern="/**" filters="
           securityContextPersistenceFilterWithASCTrue,
           formLoginFilter,
           exceptionTranslationFilter,
           filterSecurityInterceptor" />
  </sec:filter-chain-map>
</bean>
Login and Logout
@Configuration
@EnableWebSecurity
public class HelloWebSecurityConfiguration extends WebSecurityConfigurerAdapter {

  @Override
  protected void configure(HttpSecurity httpSecurity) throws Exception {
      httpSecurity.authorizeRequests().formLogin().loginPage("/login.jsp") .permitAll()
                                      .and()
                                      .logout().permitAll();
  }
}
Method Security
- Method-level security is accomplished using Spring AOP proxies.
- Annotations based on Spring annotations or JSR-250 annotations
- Java configuration to activate detection of annotations
- Security on the method level needs to be explicitly enabled using the
@EnableGlobalMethodSecurity
- Method security is an additional level of security in web applications but can also be the only layer of security in applications that do not expose a web interface.
- Method-level security is commonly applied to services in the service layer of an application.
@Secured
XML
- In xml
<global-method-security pre-post-annotations="enabled"/>
<global-method-security secured-annotations="enabled" />
	<protect-pointcut expression="execution(* com.ps.*.*Service.findById(*))" access="hasRole(’ADMIN’)" />
</global-method-security>
Java
- Configuration class annotate with
@EnableGlobalMethodSecurity(securedEnabled = true)
- Methods annotate with annotation
@Secured
- The
@Secured annotation is a legacy Spring Security 2 annotation that can be used to configured method security.
- Does not support using Spring Expression Language (SpEL)
@Configuration
@EnableWebSecurity
@EnableGlobalMethodSecurity(securedEnabled = true)
public class SecurityConfig extends WebSecurityConfigurerAdapter {

}

@Service
@Transactional(readOnly = true, propagation = Propagation.REQUIRED)
public class UserServiceImpl implements UserService {

    @Secured("ROLE_ADMIN")
    public User findById(Long id) {
        return userRepo.findOne(id);
    }

}
@RolesAllowed
- Configuration class annotate with
@EnableGlobalMethodSecurity(jsr250Enabled = true)
- The
@RolesAllowed annotation has its origin in the JSR-250 Java security standard. This annotation is more limited than the @PreAuthorize annotation in that it only supports role-based security.
- The
@RolesAllowed annotation with which method security can be configured either on individual methods or on class level.
@Configuration
@EnableWebSecurity
@EnableGlobalMethodSecurity(jsr250Enabled = true)
public class SecurityConfig extends WebSecurityConfigurerAdapter {

}

@Service
@Transactional(readOnly = true, propagation = Propagation.REQUIRED)
public class UserServiceImpl implements UserService {

    @RolesAllowed("ROLE_ADMIN")
    public User findById(Long id) {
        return userRepo.findOne(id);
    }

}
@PreAuthorize @PreFilter @PostAuthorize @PostFilter
- In order to be able to use
@PreAuthorize, the prePostEnabled attribute in the @EnableGlobalMethodSecurity annotation needs to be set to true.
@EnableGlobalMethodSecurity(prePostEnabled=true)@PreAuthorize annotation allows for specifying access constraints to a method using the Spring Expression Language (SpEL). These constraints are evaluated prior to the method being
executed and may result in execution of the method being denied if the constraints are not fulfilled. The @PreAuthorize annotation is part of the Spring Security framework.- Use Pre/Post annotations for SpEL
@PreAuthorize@PreFilter@PostAuthorize@PostFilter
- The
@PreAuthorize annotation with which method security can be configured either on individual methods or on class level.
@Service
@Transactional(readOnly = true, propagation = Propagation.REQUIRED)
public class UserServiceImpl implements UserService {

    @PreAuthorize("hasRole(’USER’)")
    public void create(User user){

    }

    @PreAuthorize("hasPermission(#user, ’admin’)")
    public void delete(User user, Sid recipient, Permission permission){

    }

    @PreAuthorize("#user.username == authentication.name")
    public void modifyProfile(User user){

    }
}
Security annotation are you allowed to use SpEL
Spring Security expressions
CSRF - Cross-Site Request Forgery protection is enabled by default in the Java configuration
@Bean
public CsrfTokenRepository repo() {
   HttpSessionCsrfTokenRepository repo = new HttpSessionCsrfTokenRepository();
   repo.setParameterName("_csrf");
   repo.setHeaderName("X-CSRF-TOKEN");
   return repo;
}
Spring Security Tag Libraries
<%@ taglib prefix="security" uri="http://www.springframework.org/security/tags" %>
- The
authorize tag - the contents of the authorize tag will only be visible if the expression in the access attribute is evaluated to true.
<sec:authorize access="hasRole('aadministrator')">
    Hello, I know you are an administrator!
</sec:authorize>
- The
authentication tag - the authentication tag allows for accessing the Authentication object in the current security context.
<sec:authentication property="principal.username" />
- The
accesscontrollist tag - deprecated, use the authorize tag instead. Checks a list of permissions for a specific domain object.
<sec:accesscontrollist hasPermission="5, 7" domainObject="${order}">
- The
csrfInput tag - when cross-site request forgery (CSRF) protection is enabled, this tag inserts a hidden form with the name and value of the CSRF protection token in the rendered page.
<form action="login" method="post">
   <sec:csrfInput />
   <div><label>User Name: <input type="text" name="username"/> </label></div>
   <div><label>Password : <input type="password" name="password"/> </label></div>
   <div><input type="submit" value="Sign In"/></div>
</form>
- The
csrfMetaTags tag - When cross-site request forgery (CSRF) protection is enabled, this tag inserts meta tags containing
the CSRF protection token form field and header names and CSRF protection token value. These meta tags can then be accessed from JavaScript in your application.
<sec:csrfMetaTags />
<script type="text/javascript" language="javascript">
   var csrfParameter = $("meta[name='_csrf_parameter']").attr("content");
   var csrfHeader = $("meta[name='_csrf_header']").attr("content");
   var csrfToken = $("meta[name='_csrf']").attr("content");
   ...
- Facelet fags for JSF also available
- Displaying properties of Authentication object -
<security:authentication property=“principal.username”/>
- Display content only if principal has certain role
<security:authorize access="hasRole('ADMIN')">
    <p>Admin only content</p>
</security:authorize>
- Or inherit the role required from specific url (roles required for specific urls are centralized in config and not across many JSPs)
<security:authorize url="/admin">
    <p>Admin only content</p>
</security:authorize>
Spring Boot
Start collect the project with spring initializr by » https://start.spring.io/
-
Spring Boot is a set of preconfigured frameworks/technologies designed to reduce boilerplate configuration(infrastructure)
and provide a quick way to have a Spring web application up and running
It’s goal is to allow developers to focus on implementation of the actual required functionality instead of how to configure an application,
by providing out of the box ready-to-use infrastructure beans
- Provide common non-functional features
- embedded servers (Tomcat, Jetty, Undertow)
| |
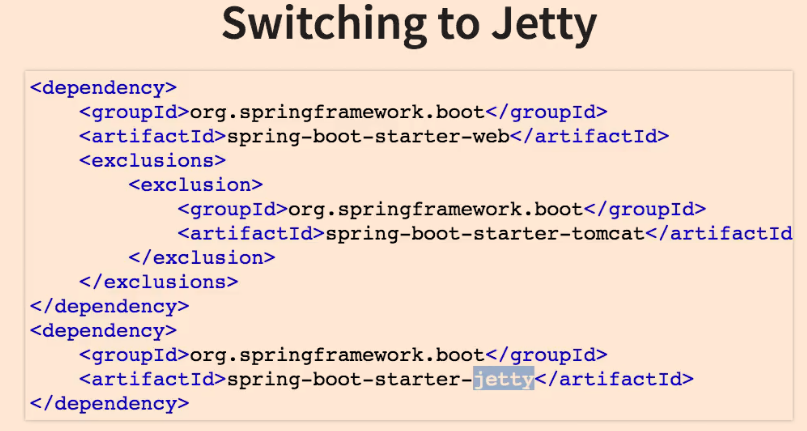
- metrics
- health checks
- external configuration
- Spring boot is NOT
- No code generation
- Neither an application server nor a web server
- Spring Boot uses sensible defaults, “opinions”, mostly based on the classpath contents.
- For example
- Sets up a
JPA Entity Manager Factory if a JPA implementation is on the classpath.
- Creates a default
Spring MVC setup, if Spring MVC is on the classpath.
- Everything can be overridden easily, but most of the time not needed
- Project must have as a parent the
spring-boot-starter-parent
<parent>
	<groupId>org.springframework.boot</groupId>
	<artifactId>spring-boot-starter-parent</artifactId>
	<version>2.0.5.RELEASE</version>
	<relativePath/> <!-- lookup parent from repository -->
</parent>
- Spring Boot Starters
- Spring Boot starters are dependency descriptors for different technologies that can be used in Spring
Boot applications. For example, if you want to use Apache Artemis for JMS messaging in your Spring Boot application, then you simply add the
spring-boot-starter-artemis dependency to your
application and rest assured that you have the appropriate dependencies to get you started using Artemis in your Spring Boot application.
- Every starter dependency contains all necessary dependencies to start developing
- starter-web
spring-boot-starter-jsonspring-boot-starter-tomcathibernate-validatorspring-webspring-web-mvc- …
- starter-data-jpa
hibernate-corehibernate-validatorspring-aspectsjdbctransaction- …
- Advantages of using Spring Boot
- Automatic configuration of “sensible defaults” reducing boilerplate configuration.
- Configuration adapted to dependencies on the classpath so that, for example, if a HSQLDB
dependency is available on the class path, then a data-source bean connecting to an in-memory HSQLDB database is created.
- A Spring Boot project can produce an executable stand-alone JAR-file.
- Such a JAR-file can be run from the command line using the regular java -jar command and may even contain an embedded web server, for web applications, like Tomcat or Jetty.
- Provides a set of managed dependencies that have been verified to work together
- Provides a set of managed Maven plug-ins configured to produce certain artifacts.
- Provides non-functional features commonly needed in projects.
Some such features are security, externalized configuration, metrics and health-checks.
- Does not generate code.
- Does not require XML configuration.
- Popular in the developer community.
- Standardize parts of application structure.
- How does it work? How does it know what to configure?
- Spring Boot has an opinion on how development of an application is to be done, for
instance concerning the technology-related modules (starters and autoconfiguration), organization of properties, configuration of modules etc.
- Spring Boot detects the dependencies available on the classpath and configures Spring beans accordingly.
- There are a number of annotations, examples are
@ConditionalOnClass, @ConditionalOnBean, @ConditionalOnMissingBean and @ConditionalOnMissingClass,
that allows for applying conditions to Spring configuration classes or Spring bean declaration methods in such classes.
- A Spring bean is to be created only if a certain dependency is available on the classpath. (
@ConditionalOnClass)
- A Spring bean is to be created only if there is no bean of a certain type or with a certain name created. (
@ConditionalOnMissingBean)
| | 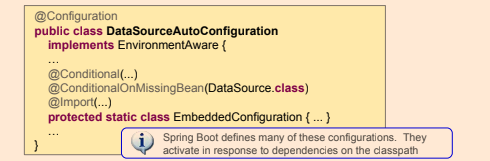
- A Spring bean is to be created only if a certain dependency is available on the classpath. Use
@ConditionalOnClass and supply a class contained in the dependency in question.
- A Spring bean is to be created only if there is no bean of a certain type or with a certain name created. Use
@ConditionalOnMissingBean and specify name or type of bean to check.
| |
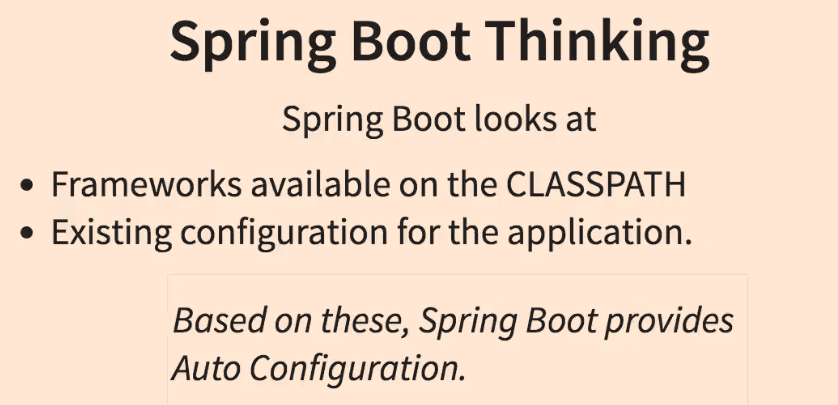 |
- Properties controlling the behavior of Spring Boot applications can be defined using:
- Property files
requestreceiver.timeout=5000
- YAML files
- A structured alternative to property files.
- Environment variables
- Command-line arguments
java -jar myspringbootapp.jar –server.port=8081
- The default properties of a Spring Boot application are stores in the application’s JAR in a file named application.properties in the src/main/resources.
When developing, this file is found in the
src/main/resources directory.
main method is the entry point of the application and it follows the Java convention for an application entry pointmain method calls the static run method from the org.springframework.boot.SpringApplication class that will bootstrap the application and start the Spring IoC container,
which will start the configured embedded web server.
@SpringBootApplication(scanBasePackages = {"com.ps.start"})
public class Application {

    public static void main(String... args) {
        SpringApplication.run(Application.class, args);
        System.out.println("Started ...");
    }

}
- If the
war we want to produce a deployable web archive that can be deployed on any application server and since the project does not contain a web.xml file,
- to define a class extending
SpringBootServletInitializer and override its configure method.
-
war
in pom.xml
@RestController
@SpringBootApplication(scanBasePackages = {"com.ps.start"})
public class Application extends SpringBootServletInitializer {

    private final AppSettings appSettings;

    @Autowired
    public Application(AppSettings appSettings) {
        this.appSettings = appSettings;
    }

    @Override
    protected SpringApplicationBuilder configure(SpringApplicationBuilder application) {
        return application.sources(Application.class);
    }

    public static void main(String... args) {
        SpringApplication.run(Application.class, args);
        System.out.println("Started ...");
    }

}
- Can still be executed with embedded Tomcat using
java -jar yourapp.war
- Traditional WAR file is produced as well
- without embedded Tomcat
- just drop it in your application server web app directory
@SpringBootApplication
Configuration Using YAML
- Alternative to .properties files, allows hierarchical configuration
YAML is a superset of JSON and has a very convenient syntax for storing external properties in a hierarchical formatYML files are files containing properties in the YAML format. YAML stands for YAML Ain’t Markup Language.- Java parser for YAML is called SnakeYAML
- Must be in the classpath
- Provided by spring-boot-starters
app:
     name: ps-boot
datasource:
    driverClassName:  org.h2.Driver
    url: jdbc:h2:sample;DB_CLOSE_ON_EXIT=TRUE
    username: sample
    password: sample
server:
    port: 9000
    context:  /ps-boot
Multiple Profiles Inside an YAML File
@ConfigurationProperties
- To use YAML, the
application.properties must be replaced with application.yml file
- To get YAML data need to use
@ConfigurationProperties with defined prefix for the properties
- Class is annotated with
@ConfigurationProperties(prefix= "com.example")
- Fields of the class are automatically injected with values from properties
@ConfigurationProperties(prefix= "com.example") + com.example.foo → foo field injected- Needs to be enabled on
@Configuration class - @EnableConfigurationProperties(MyProperties.class)
@ConfigurationProperties(prefix = "app")
public class AppSettings {

    @NotNull
    private Integer port;

    @NotNull
    private Integer sessionTimeout;

    @NotNull
    private String context;

    @PostConstruct
    public void check() {
        log.info("Initialized [{}] [{}] [{}]", port, context, sessionTimeout);
    }
}
@EnableConfigurationProperties - enable support for beans annotated with @ConfigurationProperties
@SpringBootApplication(scanBasePackages = {"com.ps.start"})
@EnableConfigurationProperties(AppSettings.class)
public class Application extends SpringBootServletInitializer {
   ...
}
- YAML files can not be loaded via the
@PropertySource annotation. This annotation is specific to properties files.
Common Spring Boot Annotations
- @SpringBootApplication - is a convenience-annotation that can be applied to Spring Java configuration classes.
						The @SpringBootApplication is equivalent to the three annotations  @Configuration, @EnableAutoConfiguration and @ComponentScan
- @EnableAutoConfiguration - is a  annotation enables Spring Boot auto-configuration. As earlier, Spring Boot autoconfiguration attempts to create and configure Spring beans based on the
                           dependencies available on the class-path to allow developers to quickly get started with different technologies in a Spring Boot application and reducing boilerplate code and configuration.
- @Conditional[yyy] - Class of Spring Boot annotations that enable conditional creation of Spring beans. Commonly used in auto-configuration modules.
- @EnableConfigurationProperties - Enables support for Spring beans annotated with @ConfigurationProperties
- @ConfigurationProperties - Allows for binding a selected group of configuration properties to a class.
- @WebMvcTest - Annotation used in Spring MVC tests testing only Spring MVC components.
- @EntityScan - Specifies which packages to scan when scanning for entity classes.
- @SpringBootConfiguration - Alternative to @Configuration for Spring Boot applications.
- @ServletComponentScan - Enables scanning for servlets, WebFilter filters, WebServlet servlets and WebListener listeners when using an embedded web server.
- @LocalServerPort - Alternative to @Value("${local.server.port}")
- @JsonComponent - Specialization of the @Component annotation for components that provides a Jackson JSON serializer or deserializer.
- @TestConfiguration - Alternative to @Configuration for test configuration classes.
- @Endpoint - Identifies a class as being an actuator endpoint that provides information about the Spring Boot application.
- @ReadOperation - Marks a method in a class annotated with @Endpoint as being a read operation.
- @MockBean - Used to add a mock bean to the Spring application context.
- @SpyBean - Applies Mockito spies to one or more Spring beans.
- @SpringBootTest - Annotates test classes that run Spring Boot based tests.
- @TestComponent - Component annotation for beans that only are to be used in tests.
- @OverrideAutoConfiguration - Used to override th @EnableAutoConfiguration.
- @ImportAutoConfiguration - Import an apply specified auto-configuration classes.
- @AutoConfigureTestEntityManager - Enable auto-configuration of a test entity manager in tests.
- @DataJpaTest - Used with @RunWith(SpringRunner.class) in tests that only tests JPA components.
- @PropertyMapping - Maps attributes from a test annotation into a PropertySource.
- @AutoConfigureRestDocs - Enable auto-configuration of Spring REST Docs in tests.
- @AutoConfigureMockRestServiceServer - Enable auto-configuration of a single mock REST service server in tests.
- @RestClientTest - Used with @RunWith(SpringRunner.class) in tests that use a Spring REST client.
- @AutoConfigureWebClient - Enables auto-configuration of web clients in test classes.
- @AutoConfigureWebTestClient - Enables a web test client in WebFlux application tests.
- @WebFluxTest - Used with @RunWith(SpringRunner.class) in tests that only tests Spring WebFlux components.
- @AutoConfigureMockMvc - Enables auto-configuration of MockMvc in test-classes.
- @WebMvcTest - Used with @RunWith(SpringRunner.class) in tests that focuses on Spring MVC components.
- You need to opt-in to auto-configuration by adding the
@EnableAutoConfiguration or @SpringBootApplication annotations to one of your @Configuration classes
@EnableAutoConfiguration annotation enables Spring Boot auto-configuration. Spring Boot autoconfiguration attempts to create and configure Spring beans based on the
dependencies available on the class-path to allow developers to quickly get started with different technologies in a Spring Boot application and reducing boilerplate code and configuration.- Spring Boot does not do component scanning unless a configuration class, annotated with
@Configuration, that is also annotated with the @ComponentScan annotation or an annotation, for
instance @SpringBootApplication, that is annotated with the @ComponentScan annotation.
- The base package(s) which to scan for components can be specified using the basePackages element in the
@ComponentScan annotation or by specifying one or more classes that are located in
the base package(s) to scan for components by using the basePackageClasses element. If none of the above elements are used, component scanning will take place using the package in
which the configuration class annotated with @ComponentScan as the base package.
- Starter POM - the advantage of having starter POMs are that all the dependencies needed to get started
with a certain technology have been gathered. A developer can rest assured that there are no dependencies missing and that all the dependencies have versions that work well together.
Testing with Spring Boot
@SpringBootTest - this annotation should be used on a test class that runs Spring Boot-based tests
- If no
@ContextConfiguration, it uses org.springframework.boot.test.context.SpringBootContextLoader by default.
- Automated search for a Spring Boot configuration when nested
@Configuration classes are used.
- Loading environment-specific properties via the
properties attribute. This attribute allows for specification of properties (key=value pairs) as values for the attribute.
- Defining different web environment modes and starting a fully running container on a random port, using the
webEnvironment attribute
- Registering a
org.springframework.boot.test.web.client.TestRestTemplate bean for use in web tests that use a fully running container.
- The
SpringRunner is an alias for SpringJUnit4ClassRunner
@RunWith(SpringRunner.class)
@SpringBootTest(classes = Application.class,
webEnvironment = SpringBootTest.WebEnvironment.RANDOM_PORT,
properties = {"app.port=9090"}
)
public class CtxControllerTest {
@LocalServerPort
private int port;
@Test
public void integrationTestSpringBoot(){
TestRestTemplate testRestTemplate = new TestRestTemplate();
ResponseEntity<String> response = testRestTemplate.getForEntity(FOO_RESOURCE_URL + "/1", String.class);
assertThat(response.getStatusCode(), equalTo(HttpStatus.OK));
}
}
@SpringApplicationConfiguration(classes= MyApplication.class)- For testing web app -
@WebAppConfiguration
@RunWith(SpringJUnit4ClassRunner.class)
@SpringApplicationConfiguration(classes=MyApplication.class)
public class FooServiceTest {
...
}
Monitoring using Spring Actuator
- Example monitoring Spring Boot application using actuator and HAL
Logging
- Spring Boot uses Commons Logging for all internal logging but leaves the underlying log implementation open
- Logback
- Log4J2
- Java Util Logging
- As per default, messages written with the ERROR, WARN and INFO levels will be output in a Spring Boot application. To enable DEBUG or TRACE logging for the entire application,
use the
--debug or --trace flags or set the properties debug=true or trace=true in the application.properties file.
- By default
Logback over SLF4J
- By default logs to console, but can define log file
#Logging through SLF4J
logging.level.org.springframework=DEBUG
logging.level.com.example=INFO
logging.file=logfile.log
#OR spring.log file in to configured path
logging.path=/log
- Overriding default log patterns
# Logging pattern for the console
logging.pattern.console=%d{yyyy-MM-dd HH:mm:ss} - %msg%n
# Logging pattern for file
logging.pattern.file=%d{yyyy-MM-dd HH:mm:ss} [%thread] %-5level %logger{36} - %msg%n
- Color-coding of Log Levels
- Where the color can be one of blue, cyan, faint, green, magenta, red or yellow.
logging.pattern.console=%clr(%d{yyyy-MM-dd HH:mm:ss}){yellow}
DataSource
- Either include spring-boot-starter-jdbc or spring-boot-starter-data-jpa
- JDBC driver required on classpath, datasource will be created automatically
- Tomcat JDBC as default pool, other connection pools can be used if present - e.g. HikariCP
#Connection
spring.datasource.url=jdbc:mysql://localhost/test
spring.datasource.username=dbuser
spring.datasource.password=dbpass
spring.datasource.driver-class-name=com.mysql.jdbc.Driver
spring.datasource.url=jdbc:mysql://localhost/test
# jpa properties
spring.jpa.properties.hibernate.show-sql=true
spring.jpa.properties.hibernate.format-sql=true
spring.jpa.properties.hibernate.use_sql_comments=true
spring.jpa.properties.hibernate.session_factory.statement_inspector=com.package.StatementInspectorImpl
# cache
spring.jpa.properties.javax.persistence.sharedCache.mode=ENABLE_SELECTIVE
spring.jpa.properties.hibernate.cache.use_second_level_cache=true
spring.jpa.properties.hibernate.cache.use_query_cache=true
spring.jpa.properties.hibernate.cache.region.factory_class=org.hibernate.cache.ehcache.EhCacheRegionFactory
# statistics
spring.jpa.properties.hibernate.generate_statistics=true
# batch processing
spring.jpa.properties.hibernate.jdbc.batch_size=10
spring.jpa.properties.hibernate.order_inserts=true
spring.jpa.properties.hibernate.order_updates=true
spring.jpa.properties.hibernate.jdbc.batch_versioned_data=true
#Scripts to be executed
spring.datasource.schema=
spring.datasource.data=
#Connection pool
spring.datasource.initial-size=
spring.datasource.max-active=
spring.datasource.max-idle=
spring.datasource.min-idle=
Container
server.port=9000
server.address=192.168.1.20
server.session-timeout=1800
server.context-path=/rewards
server.servlet-path=/admin
- Web container can be configured in Java dynamically by implementing
EmbeddedServletContainerCustomizer interface and registering resulting class as a @Component
- if needed more fine-grained configuration - declare bean of type
EmbeddedServletContainerFactory
@Override
public void customize(ConfigurableEmbeddedServletContainer container) {
container.setPort(8081);
container.setContextPath("/foo");
}
@Conditional
- Enables bean instantiatiation only when specific condition is met
- Core concept of spring boot
- Only when specific bean found -
@ConditionalOnBean(type={DataSource.class})
- Only when specific bean is not found -
@ConditionalOnMissingBean
- Only when specific class is on classpath -
@ConditionalOnClass
- Only When specific class is not present on classpath -
@ConditionalOnMissingClass
- Only when system property has certain value -
@ConditionalOnProperty(name="server.host", havingValue="localhost")
@Profile is a special case of conditional- org.springframework.boot.autoconfigure contains a lot of conditionals for auto-configuration
- eg.
@ConditionalOnMissingBean(DataSource.class) → Created embedded data source
- Specifically declared beans usually disable automatically created ones
- If needed, specific autoconfiguration classes can be excluded explicitly
@EnableAutoConfiguration(exclude=DataSourceAutoConfiguration.class)
- @ConditionalOnClass - Presence of class on classpath.
- @ConditionalOnMissingClass - Absence of class on classpath.
- @ConditionalOnBean - Presence of Spring bean or bean type (class).
- @ConditionalOnMissingBean - Absence of Spring bean or bean type (class).
- @ConditionalOnProperty - Presence of Spring environment property.
- @ConditionalOnResource - Presence of resource such as file.
- @ConditionalOnWebApplication - If the application is considered to be a web application, that is uses the Spring WebApplicationContext, defines a session scope or has a StandardServletEnvironment.
- @ConditionalOnNotWebApplication - If the application is not considered to be a web application.
- @ConditionalOnExpression - Bean or configuration active based on the evaluation of a SpEL expression.
- @ConditionalOnCloudPlatform - If specified cloud platform, Cloud Foundry, Heroku or SAP, is active.
- @ConditionalOnEnabledEndpoint - Specified endpoint is enabled.
- @ConditionalOnEnabledHealthIndicator - Named health indicator is enabled.
- @ConditionalOnEnabledInfoContributor - Named info contributor is enabled.
- @ConditionalOnEnabledResourceChain - Spring resource handling chain is enabled.
- @ConditionalOnInitializedRestarter - Spring DevTools RestartInitializer has been applied with non-null URLs.
- @ConditionalOnJava - Presence of a JVM of a certain version or within a version range.
- @ConditionalOnJndi - Availability of JNDI InitialContext and specified JNDI locations exist.
- @ConditionalOnManagementPort - Spring Boot Actuator management port is either: Different from server port, same as server port or disabled.
- @ConditionalOnRepositoryType - Specified type of Spring Data repository has been enabled.
- @ConditionalOnSingleCandidate - Spring bean of specified type (class) contained in bean factory and single candidate can be determined.
| |
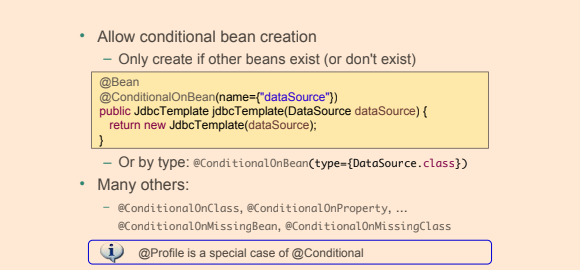 |
CommandLineRunner
This class also implements Spring’s CommandLineRunner interface.
CommandLineRunner is a simple Spring Boot interface with a run method.
Spring Boot will automatically call the run method of all beans implementing this interface after the application context has been loaded.
@Component
public class CommandLineAppStartupRunner implements CommandLineRunner {
private static final Logger logger = LoggerFactory.getLogger(CommandLineAppStartupRunner.class);
@Override
public void run(String...args) throws Exception {
logger.info("Application started with command-line arguments: {} . \n To kill this application, press Ctrl + C.", Arrays.toString(args));
}
}
Spring Boot’s property sources
Spring Boot uses a very particular PropertySource order that is designed to allow sensible overriding of values.
Properties are considered in the following order:
- Devtools global settings properties on your home directory (~/.spring-boot-devtools.properties when devtools is active).
@TestPropertySource annotations on your tests.@SpringBootTest#properties annotation attribute on your tests.- Command line arguments.
- Properties from
SPRING_APPLICATION_JSON (inline JSON embedded in an environment variable or system property).
ServletConfig init parameters.ServletContext init parameters.- JNDI attributes from
java:comp/env.
- Java System properties (
System.getProperties()).
- OS environment variables.
- A
RandomValuePropertySource that has properties only in random.*.
- Profile-specific application properties outside of your packaged jar (
application-{profile}.properties and YAML variants).
- Profile-specific application properties packaged inside your jar (
application-{profile}.properties and YAML variants).
- Application properties outside of your packaged jar (
application.properties and YAML variants).
- Application properties packaged inside your jar (
application.properties and YAML variants).
@PropertySource annotations on your @Configuration classes.- Default properties (specified by setting
SpringApplication.setDefaultProperties).
Integration
- Remoting and Web Services are ways of communicating between applications
- The communication is done using a binary, XML, or JSON format
Web Services constitute a cross-platform interprocess communication method using common standards and able to work through firewalls.
They work with messages, not objects. So the client basically sends a message, and a reply is returned.
Web services work in a stateless environment whereby each message results in a new object created to service the request.
Web services support interoperability across platforms and are good for heterogeneous environments.
They expose their own arbitrary sets of operations such as via WSDL (Web Services Description Language) and SOAP (Simple Object Access Protocol).
REST, or representational state transfer, also called RESTful web services, is currently the most popular way applications communicate with each other.
REST services allow access and manipulation of textual representations of web resources using a uniform and predefined set of stateless operations.
The most common protocol used with REST services is HTTP, so the HTTP methods map on REST operations such as GET, POST, PUT, DELETE.
Initially, web resources were documents or files accessed using a URL (Uniform Resource Locator, also known as a web address), but recently,
a web resource became able to be anything (object, entity) that can be accessed via the web and is identified by a URI (Uniform Resource Identifier).
- There are three types of middleware:
- Remote Procedure Call, or RPC, which allows one application to call procedures from another application remotely as if they were local calls.
- Object Request Broker, or ORB-based, which enables an application’s objects to be distributed and shared across heterogeneous networks. (Remoting falls in this category.)
- Message Oriented Middleware or MOM-based middleware, which allows distributed applications to communicate and exchange data by sending and receiving messages.
- Spring provides support for the
JMS (Java Messaging Service) API, which is an abstraction written in Java for accessing MOM middleware.
- An application produces messages, and a client application consumes them asynchronously.
- The application sending the messages has no knowledge of its client (or clients)
- Messaging is a form of loosely coupled distributed communication.
JMX (Java Management Extensions) is a Java technology that supplies tools for managing and monitoring applications, system objects, devices (such as printers) and service-oriented networks
- Those resources are represented by objects called
MBeans (Managed Bean)
Spring Remoting
Java Remote Method Invocation
Java Remote Invocation allows for an object running in one JVM to invoke methods on an object running in another JVM.RMI (Remote Method Invocation) is Java’s version of RPC (Remote Procedure Call).
- RMI applications often consist of two processes: a server and a client.
- The server creates the objects that will be accessed remotely, and it will expose a skeleton (the interface of the remote object).
- The client invokes methods on a stub (proxy object).
- Objects transferred using RMI must therefore be serializable and they must implement
java.io.Serializable
Spring Remote Method Invocation
- The abstract schema of client and server applications remoting using Spring
Spring Remote Configuration
- Configure a bean extending
org.springframework.remoting.rmi.RmiServiceExporter
@Configuration
public class RmiServerConfig {
@Autowired
@Qualifier("userServiceImpl")
UserService userService;
@Bean
public RmiServiceExporter userService() {
RmiServiceExporter exporter = new RmiServiceExporter();
exporter.setRegistryPort(1099);
exporter.setAlwaysCreateRegistry(true);
exporter.setServiceName("userService");
exporter.setServiceInterface(UserService.class);
exporter.setService(userService);
return exporter;
}
}
- Create a
server application that will contain the remote exported bean and the application beans that need to be accessed remotely.
public class RmiExporterBootstrap {
public static void main(String args) throws Exception {
ClassPathXmlApplicationContext ctx =
new ClassPathXmlApplicationContext(
"spring/rmi-server-config.xml",
"spring/app-config.xml");
System.out.println("RMI server started.");
System.in.read();
ctx.close();
}
}
The RmiExporterBootstrap contains all the service and repository beans needed to be executed on the remote server.
public class RmiExporterBootstrap {
public static void main(String args) throws Exception {
AnnotationConfigApplicationContext ctx = new AnnotationConfigApplicationContext(
RmiServerConfig.class, ServiceConfig.class);
System.out.println("RMI reward network server started.");
System.in.read();
ctx.close();
}
}
- Configure a bean of type
org.springframework.remoting.rmi.RmiProxyFactoryBean that will take care of creating the proxy objects needed on the client side to access the RMI service
@Configuration
public class RmiClientConfig {
@Bean
public UserService userService() {
RmiProxyFactoryBean factoryBean = new RmiProxyFactoryBean();
factoryBean.setServiceInterface(UserService.class);
factoryBean.setServiceUrl("rmi://localhost:1099/userService");
factoryBean.afterPropertiesSet();
return (UserService) factoryBean.getObject();
}
}
- Create a
client application that will use the client factory bean
@ContextConfiguration(locations = {"classpath:spring/rmi-client-config.xml"})
@RunWith(SpringJUnit4ClassRunner.class)
public class RmiTests {
@Autowired
private UserService userService;
public void setUp() {
assertNotNull(userService);
}
@Test
public void testRmiAll() {
List<User> users = userService.findAll();
assertEquals(5, users.size());
}
@Test
public void testRmiJohn() {
User user = userService.findByEmail("john.cusack@pet.com");
assertNotNull(user);
}
}
Spring RMI services over HTTP
- Spring provides classes that allow exposing RMI services over HTTP, using a lightweight binary HTTP-based protocol.
- The classes to use are
HttpInvokerProxyFactoryBean and HttpInvokerServiceExporter
- RMI methods will be converted to HTTP methods: GET and POST
- Spring’s
HttpInvoker is another Java-to-Java binary remoting protocol; it requires that Spring be used on both the server and the client.
- The properties for the Spring Http Invoker classes have the same meaning as for the RMI Spring classes; the only difference is that they apply to the HTTP protocol
- On the server side, a bean of type
HttpInvokerServiceExporter must be configured.
@Configuration
public class HttpInvokerConfig {
@Autowired
@Qualifier("userServiceImpl")
UserService userService;
@Bean(name = "/httpInvoker/userService")
HttpInvokerServiceExporter httpInvokerServiceExporter(){
HttpInvokerServiceExporter invokerService = new HttpInvokerServiceExporter();
invokerService.setService(userService);
invokerService.setServiceInterface(UserService.class);
return invokerService;
}
}
- On the client side, a bean of type
HttpInvokerProxyFactoryBean must be configured.
@Configuration
public class HttpInvokerClientConfig {
@Bean
public UserService userService() {
HttpInvokerProxyFactoryBean factoryBean = new HttpInvokerProxyFactoryBean();
factoryBean.setServiceInterface(UserService.class);
factoryBean.setServiceUrl
("http://localhost:8080/invoker/httpInvoker/userService");
factoryBean.afterPropertiesSet();
return (UserService) factoryBean.getObject();
}
}
- Provide configuration via
web.xml or via implements WebApplicationInitializer
Spring JMS
JMS Core Components
- Message
- Destination
- Connection
- Session
- MessageProducer
-
MessageConsumer
- Implementations of the Destination interface
- Queue
- Point-to-point messaging
| |
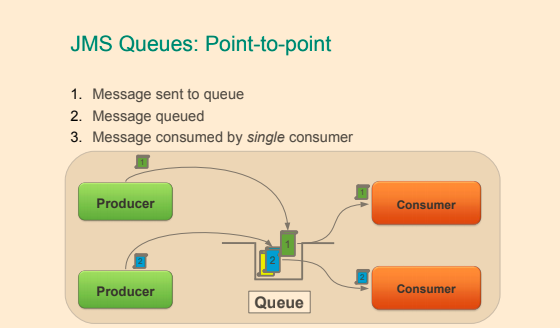
- Topic
- Publish/subscribe messaging
| |
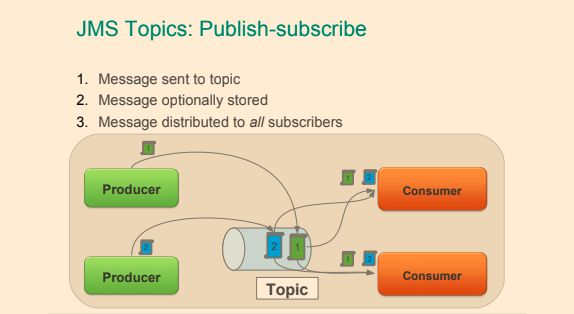
JMS Messages
- The message has a standard structure, being composed of a header and a body
- The header contains system-level information common to all messages, such as the destination and the time it was sent and application-specific information, stored as keyword/value properties
- The body contains the effective application data, and JMS defines five distinct message body types represented as Java interfaces extending
javax.jms.Message
JMS Connection
JMS Session
JMS Destinations
- The
javax.jms.Destination interface is implemented on the client side and is used to specify the target of the messages produced by the client and the source of messages the client consumes
- Depending on the messaging domain, the implementation differs:
- a queue in
point-to-point domains, where each message has one producer and one consumer.
- a topic in
publisher/subscriber domains, where each message that is published is consumed by multiple subscribers.
// Configuring a ConnectionFactory
@Bean
public ConnectionFactory connectionFactory() {
ActiveMQConnectionFactory cf = new ActiveMQConnectionFactory();
cf.setBrokerURL("tcp://localhost:60606");
return cf;
}
// Configuring Destinations
@Bean
public Queue userQueue(){
return new ActiveMQQueue("queues.users");
}
JMSTemplate
- Must provide reference to
ConnectionFactory
@Bean
public JmsTemplate jmsTemplate () {
final JmsTemplate template = new JmsTemplate( connectionFactory() );
template.setMessageConverter ( ... );
template.setDestinationResolver ( ... );
template.setDefaultDestinationName ("order.queue");
return template;
}
JMS Sending Message
public class JmsOrderManager implements OrderManager {
@Autowired JmsTemplate jmsTemplate;
@Autowired Destination orderQueue;
public void placeOrder(Order order) {
String stringMessage = "New order " + order.getNumber();
jmsTemplate.convertAndSend("message.queue", stringMessage );
// use destination resolver and message converter
jmsTemplate.convertAndSend(orderQueue, order); // use message converter
jmsTemplate.convertAndSend(order); // use converter and default destination
}
}
JMS Receiving Message
- Automatically converted using MessageConverter
public void receiveData() {
// use message converter and destination resolver
String s = (String) jmsTemplate.receiveAndConvert("message.queue");
// use message converter
Order order1 = (Order) jmsTemplate.receiveAndConvert(orderQueue);
// use message converter and default destination
Order order2 = (Order) jmsTemplate.receiveAndConvert(\);
}
public void receiveMessages() {
// handle JMS native message from default destination
ObjectMessage orderMessage = (ObjectMessage) jmsTemplate.receive();
Order order2 = (Order) orderMessage.getObject();
// receive(destination) and receive(destinationName) also available
}
Synchronous Message Exchange
- JmsTemplate also implements a request/reply pattern
- Using
sendAndReceive()
- Sending a message and blocking until a reply has been received (also uses receiveTimeout)
- Manage a temporary reply queue automatically by default
public void processMessage(String msg) {
Message reply = jmsTemplate.sendAndReceive("message.queue",
(session) -> {
return session.createTextMessage(msg);
}
);
// handle reply
}
Asynchronous Message Handling
Web Services
SOAP Messages
SOAP is an acronym for Simple Object Access Protocol. It is a protocol specification for exchanging structured information in the implementation of web services in computer networks- SOAP messages have a structure similar to JMS Messages: they have a header and a body that are enclosed in a special SOAP envelope that identifies the XML document as a SOAP message.
- SOAP message containing user information looks like the following XML snippet.
Header contains authentication or authorisationBody contains requests
SOAP Request
<SOAP-ENV:Envelope xmlns:SOAP-ENV="http://schemas.xmlsoap.org/soap/envelope/"
<SOAP-ENV:Header/>
<SOAP-ENV:Body>
<ns2:GetCourseDetailsRequest xmlns:ns2="http://localhost:8080/courses" />
<ns2:course>
<ns2:id>1</ns2:id>
</ns2:GetCourseDetailsRequest>
</ns2:getCourseDetailsResponse>
</SOAP-ENV:Body>
</SOAP-ENV:Envelope>
SOAP Response
<SOAP-ENV:Envelope xmlns:SOAP-ENV="http://schemas.xmlsoap.org/soap/envelope/"
<SOAP-ENV:Header/>
<SOAP-ENV:Body>
<ns2:getCourseDetailsResponse xmlns:ns2="http://localhost:8080/courses"/>
<ns2:course>
<ns2:id>1</ns2:id>
<ns2:name>Spring</ns2:name>
<ns2:description>10 Steps</ns2:description>
</ns2:course>
</ns2:getCourseDetailsResponse>
</SOAP-ENV:Body>
</SOAP-ENV:Envelope>
<Envelope xmlns="http://schemas.xmlsoap.org/soap/envelope/">
<Header>
<wsse:Security
xmlns:wsse="http://docs.oasis-open.org/wss/2004/01/oasis-200401-wss-wssecurity-secext-1.0.xsd"
mustUnderstand="1">
<wsse:UsernameToken>
<wsse:Username>user</wsse:Username>
<wsse:Password>password</wsse:Password>
</wsse:UsernameToken>
</wsse:Security>
</Header>
<Body>
<GetCourseDetailsRequest xmlns="http://localhost:8080/courses"
<id>1</id>
</GetCourseDetailsRequest>
</Body>
</Envelope>
WSDL
- WSDL is often used in combination with SOAP and XML Schema to provide web services over the Internet
- WSDL (Web Services Description Language) describes your service and its operations - what is the service called, which methods does it offer,
what kind of in parameters and return values do these methods have?
<definitions name = "HelloService"
targetNamespace = "http://www.examples.com/wsdl/HelloService.wsdl"
xmlns = "http://schemas.xmlsoap.org/wsdl/"
xmlns:soap = "http://schemas.xmlsoap.org/wsdl/soap/"
xmlns:tns = "http://www.examples.com/wsdl/HelloService.wsdl"
xmlns:xsd = "http://www.w3.org/2001/XMLSchema">
<message name = "SayHelloRequest">
<part name = "firstName" type = "xsd:string"/>
</message>
<message name = "SayHelloResponse">
<part name = "greeting" type = "xsd:string"/>
</message>
<portType name = "Hello_PortType">
<operation name = "sayHello">
<input message = "tns:SayHelloRequest"/>
<output message = "tns:SayHelloResponse"/>
</operation>
</portType>
<binding name = "Hello_Binding" type = "tns:Hello_PortType">
<soap:binding style = "rpc"
transport = "http://schemas.xmlsoap.org/soap/http"/>
<operation name = "sayHello">
<soap:operation soapAction = "sayHello"/>
<input>
<soap:body
encodingStyle = "http://schemas.xmlsoap.org/soap/encoding/"
namespace = "urn:examples:helloservice"
use = "encoded"/>
</input>
<output>
<soap:body
encodingStyle = "http://schemas.xmlsoap.org/soap/encoding/"
namespace = "urn:examples:helloservice"
use = "encoded"/>
</output>
</operation>
</binding>
<service name = "Hello_Service">
<documentation>WSDL File for HelloService</documentation>
<port binding = "tns:Hello_Binding" name = "Hello_Port">
<soap:address
location = "http://www.examples.com/SayHello/" />
</port>
</service>
</definitions
XSD Contract-first approach
<soapenv:Envelope xmlns:soapenv="http://schemas.xmlsoap.org/soap/envelope/" xmlns:hs="http://localhost:8080/courses">
<soapenv:Body>
<hs:GetCourseDetailsRequest>
<hs:id>1</hs:id>
</hs:GetCourseDetailsRequest>
</soapenv:Body>
</soapenv:Envelope>
@PayloadRoot(namespace = "http://localhost:8080/courses", localPart = "GetCourseDetailsRequest")
@ResponsePayload
public GetCourseDetailsResponse processCourseDetailsRequest(@RequestPayload GetCourseDetailsRequest request) {
Course course = service.findById(request.getId());
if (course == null)
throw new CourseNotFoundException("Invalid Course Id " + request.getId());
return mapCourseDetails(course);
}
<SOAP-ENV:Envelope xmlns:SOAP-ENV="http://schemas.xmlsoap.org/soap/envelope/">
<SOAP-ENV:Header/>
<SOAP-ENV:Body>
<ns2:GetCourseDetailsResponse xmlns:ns2="http://localhost:8080/courses">
<ns2:CourseDetails>
<ns2:id>1</ns2:id>
<ns2:name>Spring</ns2:name>
<ns2:description>10 Steps</ns2:description>
</ns2:CourseDetails>
</ns2:GetCourseDetailsResponse>
</SOAP-ENV:Body>
</SOAP-ENV:Envelope>
SOAP Processing
- Generating Java objects with XJC
- The JDK comes with a utility executable called
xjc
xjc -d src/main/jaxb -p com.ps.ws src/main/resources/sample/userMessage.xsd
- Intellij IDEA have the capability of generating JAVA code from a built-in XSD schema
- select the
userMessages.xsd file and right click
- on the menu that appears, there is a
WebServices option
- click on it, and it will expand. In the submenu there is a
Generate Java Code from XML Schema using JAXB
- Generating Java objects with JAXB Plugin
```xml
org.codehaus.mojo
jaxb2-maven-plugin
1.6
xjc
xjc
${project.basedir}/src/main/resources
${project.basedir}/src/main/java
false
| | 
- The main disadvantage of SOAP is only the use of XML, which is verbose and takes a lot of time to be parsed
# REST
[>> Architectural Styles and the Design of Network-based Software Architectures by Roy Thomas Fielding](https://www.ics.uci.edu/~fielding/pubs/dissertation/top.htm)
- `REpresentational State Transfer`
- REST is a lightweight alternative to mechanisms like `RPC (Remote Procedure Calls)` and `Web Services (SOAP, WSDL, etc)`
- REST is an architecture style for designing networked (distributed) applications
- The idea is that rather than using complex mechanisms such as `CORBA`, `RPC`, or `SOAP` to connect between machines, simple `HTTP` is used to make calls between machines
- RESTful applications use HTTP requests to post data (create and/or update), read data (e.g., make queries), and delete data.
- REST uses HTTP for all four CRUD (Create/Read/Update/Delete) operations
- Statelessness of a REST service is one of the fundamental constraints of the REST architectural style. Thus REST is always stateless or else it is no longer REST
| | 
| | 
- URIs (Uniform Resource Identifiers) are used to identify resources
- HTTP response: response codes, body, and headers are used to deliver the state to clients
- Spring MVC does not implement JAX-RS, but it does provide REST Support
- `@RestController` is a combination of `@Controller` and `@ResponseBody`, and when used on a class,
it assumes that all values returned by the methods in this controller should be bound to the web response body.
```java
@RestController
public class RestUserController {
@Autowired
UserService userService;
@RequestMapping(value = "/users", method = RequestMethod.GET)
public List<User> all() {
return userService.findAll();
}
...
}
- With Spring MVC, the status code of a response can be set easily using the
@ResponseStatus annotation on controller methods.
- If for some reason
@RestController cannot be used, in Spring MVC, type org.springframework.http.ResponseEntity can be used as the return value from
a @Controller method to tell the dispatcher that the response is to be serialized and forwarded to the client instead of being resolved to a view
@Controller
public class UserController {
@Autowired
UserService userService;
@Autowired
PetService petService;
@RequestMapping(value = "/pets/{$username}", method = RequestMethod.POST)
public ResponseEntity<String> createPet(@PathVariable("$username") String username,
@RequestBody Pet pet,
@Value("#{request.requestURL}") StringBuffer url)
throws UserException {
User owner = userService.findByUsername(username);
if (owner == null) {
throw new UserException("User not found with username " + username);
}
petService.save(pet);
HttpHeaders headers = new HttpHeaders();
headers.add("Location", getLocationForPet(url, pet.getRfid()));
return new ResponseEntity<>(headers, HttpStatus.CREATED);
}
private String getLocationForPet(StringBuffer url, Object petRfid) {
UriTemplate template = new UriTemplate(url.append("/{$petid}").toString());
return template.expand(petRfid).toASCIIString();
}
}
Exception Handling
@RestController
public class RestUserController {
@ResponseStatus(HttpStatus.NOT_FOUND)
@ExceptionHandler({IllegalArgumentException.class})
public void handleNotFound() {
// just return empty 404
}
@ResponseStatus(HttpStatus.CONFLICT)
@ExceptionHandler({DataIntegrityViolationException.class})
public void handleAlreadyExists() {
// just return empty 409
}
}
- Another method to process REST request-related exceptions is to define a specialized exception class for a REST controller and a specialized component to intercept those types of exceptions and treat them in a certain way.
- Using
@ControllerAdvice
- Specialization of
@Component for classes that declare @ExceptionHandler, @InitBinder, or @ModelAttribute methods to be shared across multiple @Controller classes.
@ControllerAdvice(basePackages = {"com.concretepage.controller"} )
public class GlobalControllerAdvice {
@InitBinder
public void dataBinding(WebDataBinder binder) {
SimpleDateFormat dateFormat = new SimpleDateFormat("dd/MM/yyyy");
dateFormat.setLenient(false);
binder.registerCustomEditor(Date.class, "dob", new CustomDateEditor(dateFormat, true));
}
@ModelAttribute
public void globalAttributes(Model model) {
model.addAttribute("msg", "Welcome to My World!");
}
@ExceptionHandler(FileNotFoundException.class)
public ModelAndView myError(Exception exception) {
ModelAndView mav = new ModelAndView();
mav.addObject("exception", exception);
mav.setViewName("error");
return mav;
}
}
or
@ControllerAdvice
public class RestExceptionProcessor {
@ExceptionHandler
@ResponseStatus(value = HttpStatus.NOT_FOUND)
@ResponseBody
public JsonError exception(UserException ex) {
return new JsonError(ex.getMessage());
}
}
or
public class RestExceptionProcessor {
@ExceptionHandler
@ResponseStatus(value = HttpStatus.NOT_FOUND)
@ResponseBody
public JsonError exception(Exception ex) {
return new JsonError(ex.getMessage());
}
}
or
@ControllerAdvice(basePackageClasses = RestExceptionProcessor.class)
public class RestExceptionProcessor {
@ExceptionHandler
@ResponseStatus(value = HttpStatus.NOT_FOUND)
@ResponseBody
public JsonError exception(UserException ex) {
return new JsonError(ex.getMessage());
}
}
HTTP Message Converters
@ResponseBody introduced earlier is also used to facilitate understanding of the REST message format between client and server@ResponseBody is applied to the response@RequestBody is applied to the request- The client must know the format to use, or request a resource with a representation it understands from the server.
- Representations are converted to HTTP requests and from HTTP responses by implementations of the
org.springframework.http.converter.HttpMessageConverter<T> interface
- Convert a
HttpInputMessage to an object of specified type.
- Convert an object to a
HttpOutputMessage.
- Message converters are automatically detected and used by Spring in applications configured with
<mvc:annotation-driven/> or @EnableWebMvc
- Or define explicitly (allows you to register extra convertors) - using
WebMvcConfigurer or <mvc/>
| |
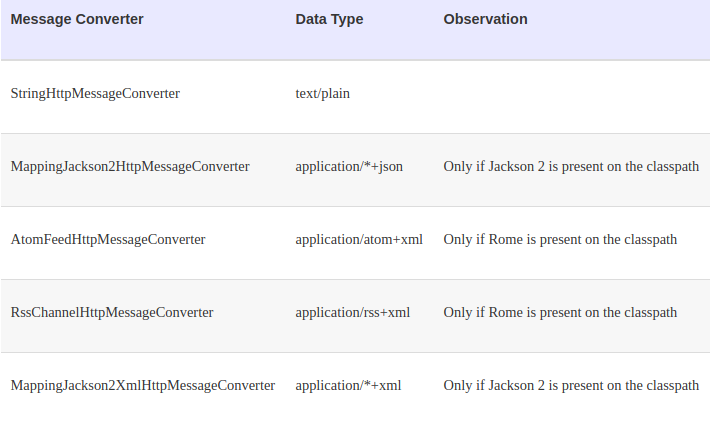 |
public class RestUserController {
@ResponseStatus(HttpStatus.OK)
@RequestMapping(value = "/users/{$username}",
method = RequestMethod.PUT,
consumes = MediaType.APPLICATION_JSON_UTF8_VALUE
produces = MediaType.APPLICATION_JSON_UTF8_VALUE)
public User updateByEmail(
@PathVariable("$username") String username,
@RequestBody User newUser) throws UserException {
User user = userService.findByUsername(username);
if (user == null) {
throw new UserException("User not found with username " + username);
}
copyProperties(newUser, user);
userService.update(user);
return user;
}
}
-
The consumes attribute defines the consumable media types of the mapped request (defined on the server),
and the value of the Content-Type header (defined on the client side) must match at least one of the values of this property in order for a method to handle a specific REST request.
-
The produces attribute defines the producible media types of the mapped request, narrowing the primary mapping,
and the value of the Accept header (on the client side) must match at least one of the values of this property in order for a method to handle a specific REST request.
HATEOAS
- Hypermedia As The Engine of Application State
- Response contains links to other items and actions → can change behavior without changing client
- Decoupling of client and server
- REST clients need no prior knowledge about how to interact with a particular application/server
- Clients interact entirely through hypermedia
- Provided dynamically by application servers
- Serves to decouple client and server
- Allows the server to evolve functionality independently
- Unique compared to other architectures
Building URIs
- An HTTP POST typically returns location of newly
created resource in the response header
UriComponentsBuilder
- Allows explicit creation of URI
- But uses hard-coded URLs
ServletUriComponentsBuilder
- Provides access to the URL that invoked the current controller method
JAX-RS
- Java API for RESTful web services
- JAX-RS is a Java EE 6 standard for building RESTful applications
- Jersey is reference implementation
- Various implementations
- Jersey (RI), RESTEasy, Restlet, CXF
- !!! Spring MVC does not implement JAX-RS
@Path("/persons/{id}")
public class PersonService {
@GET
public Person getPerson(@PathParam("id") String id) {
return findPerson(id);
}
}
RestTemplate
- Clients use
RestTemplate to access RESTful servers
PATCH and others
» Overview of RestTemplate methods
- The return type and the second parameter should be the same.
String result = restTemplate.getForObject("http://example.com/hotels/{hotel}/the bookings/{booking}", String.class, "hotel001", "booking21");
RESTful
» Hypertext Transfer Protocol
- GET: method used to retrieve a representation of a resource
- When resource is not found, a
404 (Not found) status code is returned, 200(OK) otherwise
- POST: method used to create a new resource.
- When the resource being created requires a parent that does not exist, a
404 (Not found) status code is returned.
- When an identical resource already exists, a
409 (Conflict) status code is returned.
- When the resource was created correctly, a
201 (Created) status code is returned
- PUT: updates an existing resource or creates it with a known destination URI.
- When a PUT request refers to an existing resource, the resource is updated
- When the resource is updated correctly and nothing is returned as a response body, a
204 (No content) response status is returned.
- When the resource does not exist, PUT acts like a POST and creates it, and the location of the resource is returned. The response status in this case is
201(CREATED)
- DELETE: deletes a resource.
- When the resource being deleted does not exist, a
404 (Not found) status code is returned.
- When the resource was deleted correctly, a
200 (OK) status code is returned.
- Idempotent methods
- From a RESTful service standpoint, for an operation to be
idempotent, clients can make that same call repeatedly while producing the same result. In other words, making multiple identical requests has the same effect as making a single request.
- Safe methods
- Which means they are intended only for information retrieval and should not change the state of the server.
Testing rest
@RunWith(SpringJUnit4ClassRunner.class)
@ContextConfiguration(classes = {WebConfig.class, StandaloneRestUserControllerTest.TestConfig.class})
@WebAppConfiguration
public class StandaloneRestUserControllerTest {
@Configuration
static class TestConfig {
@Bean
UserService userService() {
return Mockito.mock(UserService.class);
}
}
private RestTemplate restTemplate = new RestTemplate();
private MockRestServiceServer server = MockRestServiceServer.bindTo(restTemplate).build();
@Test
public void findByUsername() {
...
}
}
- Advantages of REST
- REST is simple.
- REST is widely supported.
- Resources can be represented in a wide variety of data formats (JSON, XML, etc.).
- You can make good use of HTTP cache and proxy server to help you handle high load and improve performance.
- It reduces client/server coupling.
- Browsers can interpret representations.
- Javascript can use representations.
- A rest service can be consumed by applications written in different languages.
- It makes it easy for new clients to use a RESTful application, even if the application was not designed specifically for them.
- Because of statelessness of REST systems, multiple servers can be behind a load-balancer and provide services transparently, which means increased scalability.
- Because of the uniform interface, little or no documentation of the resources and basic operations API is necessary.
- Using REST does not imply specific libraries at client level in order to communicate with the server. With REST, all that is needed is a network connection.
RESTful Spring Application with Spring Boot
-
Spring Boot is very practical for writing RESTful applications, because it automatically configures the infrastructure beans necessary in the background, and all that is left for the developer to do is to create REST controller classes
-
Add start point for spring boot appication
@Slf4j
@SpringBootApplication
public class Application {
public static void main(String[] args) throws IOException {
final ConfigurableApplicationContext ctx = SpringApplication.run(Application.class, args);
log.info("Started ...");
System.in.read();
ctx.close();
}
}
- Provide implementation for
@RestController
@RestController
public class RestUserController {
@RequestMapping(value = "/users", method = RequestMethod.GET)
public List<User> all() {
...
}
@ResponseStatus(HttpStatus.CREATED)
@RequestMapping(value = "/users", method = RequestMethod.POST)
public void create(@RequestBody @Valid User newUser,
@Value("#{request.requestURL}")
StringBuffer originalUrl, HttpServletResponse response)
throws UserException {
...
}
...
}
JMX
- JMX is an acronym for Java Management Extensions, this technology provides the tools for building distributed, Web-based, modular, and dynamic solutions for managing and monitoring devices, applications, and service-driven networks
- JMX technology can be used to monitor and manage the
Java Virtual Machine (Java VM).
- JMX allows configuration properties to be changed at runtime
- It is not hard to use. You must create an interface that ends with MXBean or use the annotation
- Using JMX, a given resource can be instrumented by one or more components called
Management Beans, or simply MBeans.
JMX Architecture
- Instrumentation layer: where resources are wrapped in MBeans.
- Agent layer: the management infrastructure consisting of the MBean Server and agents that provide the following JMX services:
- Monitoring
- Reporting cache hit/miss ratios at runtime
- Event notification
- Timers
- Management layer
- Defines how external management applications can interact with the underlying layers in terms of protocols
- Changing configuration properties at runtime
| |
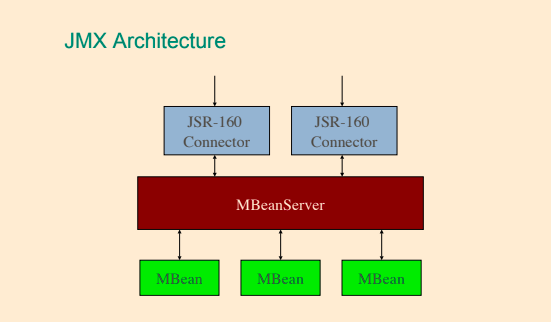 |
- The JMX technology defines standard connectors (known as JMX connectors) that enable you to access JMX agents from remote management applications
- The MBean server acts as a broker for communication between local MBeans and agents and between MBeans and remote clients
-
Common and accessible clients for the MBean Server are provided within the JDK: VisualVM, jconsole, jvisualvm, and jmc.
- MBeans expose a management interface that consists of the following:
- attributes (properties), which can be readable, writable, or both
- operations (methods)
- self description
- By convention, an MBean interface takes the name of the Java class that implements it, with the suffix MBean added.
MBeanServer mbs = ManagementFactory.getPlatformMBeanServer();
ObjectName name = new ObjectName("com.ps.jmx:type=UserCounter");
UserCounter mbean = new UserCounter();
mbs.registerMBean(mbean, name);
Example how to expose MBean
public class ProfilingController implements ProfilingControllerMBean {
private boolean enabled = true;
public boolean isEnabled() {
return enabled;
}
@Override
public void setEnabled(boolean enabled) {
this.enabled = enabled;
}
}
- Create interface for this class with name as class plus
MBean
public interface ProfilingControllerMBean {
void setEnabled(boolean enabled);
}
- Expose MBean as managed resource which can be accessed via JConsole
final MBeanServer platformMBeanServer = ManagementFactory.getPlatformMBeanServer();
platformMBeanServer.registerMBean(controller, new ObjectName("profiling", "name", "controller"));
Spring JMX
- JMX is a technology that enables you to instrument applications for management, monitoring, and configuration
- JMX MBeans makes it possible for a JMX-based management tool such as JConsole or VisualVM to peer inside a running application to view the beans’ properties and invoke their methods.
- Spring’s JMX support provides four core features:
- The automatic registration of any Spring bean as a JMX MBean.
- A flexible mechanism for controlling the management interface of your beans.
- The declarative exposure of MBeans over remote JSR-160 connectors.
- The simple proxying of both local and remote MBean resources.
| |
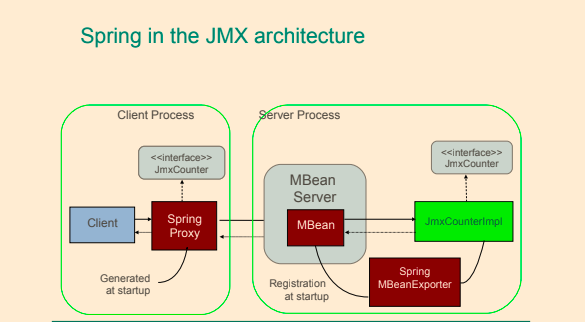 |
| |
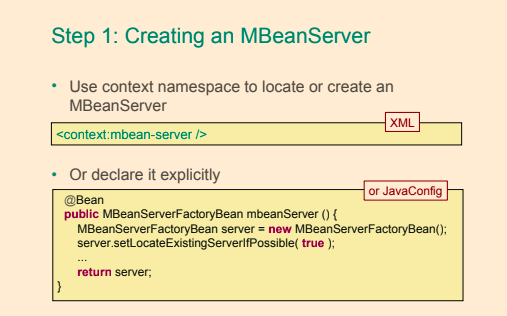 |
| |
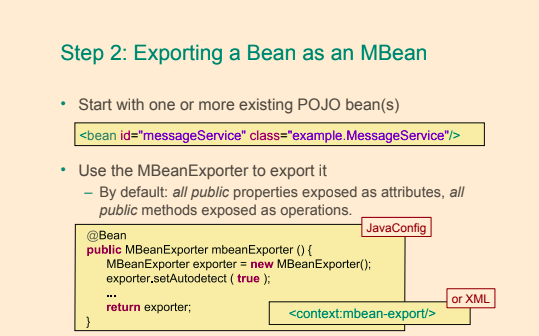 |
| |
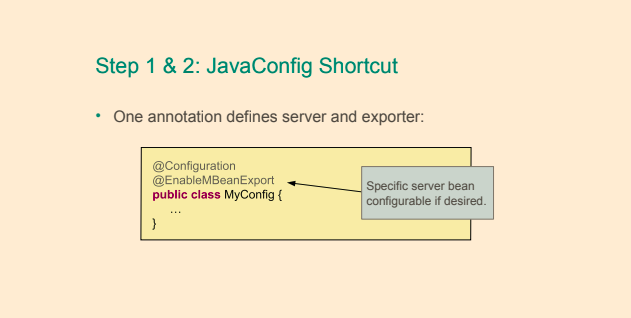 |
| |
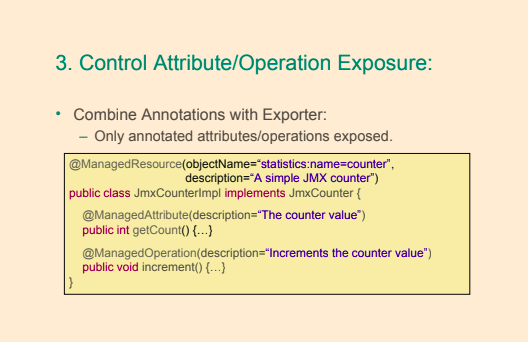 |
-
The <context:mbean-server/> declares a bean of type org.springframework.jmx.support.MBeanServerFactoryBean.
This bean has the responsibility of obtaining a javax.management.MBeanServer reference from the javax.management.MBeanServerFactory.
-
The <context:mbean-export/> declares a bean of type org.springframework.jmx.export.MBeanExporter,
and this is the bean that allows exposing any Spring-managed bean to a MBeanServer without the need to define any Spring-managed bean to a MBeanServer without the need to define any JMX-specific information in the bean classes.
-
@EnableMBeanExport is very important, because it enables default exporting of all standard MBeans from the Spring context and there is no need to configure the exporter bean explicitly.
- Behind the scenes, it basically declares and registers a bean of type
JmxMBeanServer and a bean of type AnnotationMBeanExporter for you that will take care of registering and will expose your Spring managed beans as MBean
@SpringBootApplication
@EnableMBeanExport
public class Application {
public static void main(String[] args) throws IOException {
ConfigurableApplicationContext ctx = SpringApplication.run(Application.class, args);
log.info("Started ...");
System.in.read();
ctx.close();
}
}
- Spring
MBeanExporter exposes existing POJO beans to the MBeanServer without the need to write the registration code. Spring beans must be annotated with the proper annotations.
@ManagedResource marks all instances of a JmxCounterImpl as JMX managed resources.
objectName of the managed bean is either derived from the fully qualified class name or passed as attribute to the @ManagedResource
@ManagedOperation marks the method as a JMX operation@ManagedAttribute marks a getter or setter as one half of a JMX attribute.@EnableMBeanExport – registers with the JMX Agent all components annotated with the @ManagedResource
@ManagedResource(description = "sample JMX managed resource", objectName="bean:name=jmxCounter")
public class JmxCounterImpl implements JmxCounter {
private int counter = 0;
@ManagedOperation(description = "Increment the counter")
@Override
public int add() {
return ++counter;
}
@ManagedAttribute(description = "The counter")
@Override
public int getCount() {
return counter;
}
}
- Using
jconsole we can check our MBean
Spring Microservices with Spring Cloud
» https://martinfowler.com/articles/microservices.html
» LinnykOleh/WickiUp/Microservices The Big Picture
» LinnykOleh/WickiUp/Microservices Architecture
| |
 |
-
Microservices are a specialization and implementation approach for service-oriented architectures (SOA), and they are used to build flexible, independently deployable services.
Microservices is a paradigm that requires for services to be broken down into highly specialized instances as functionality and be interconnected through agnostic communication protocols (like REST, for example) that work together to accomplish a common business goal.
Each microservice is a really small unit of stateless functionality, a process that does not care where the input is coming from and does not know where its output is going
- Microservices’ modular architectural style seems particularly well suited to cloud-based environments.
- A microservice must be able to scale, up or down, independently of other services in the same application.
- Microservices architectural idea is similar to how beans are managed by the Spring container and how they communicate in a Spring application context.
| |
 |
- Spring Cloud builds on Spring Boot
- To develop a microservices application with Spring components, good knowledge of the following Spring technologies is needed:
- a service registration and discovery technology like Netflix’s OSS Eureka
- Spring Cloud projects like Eureka or Consul
- REST concepts
- Spring Cloud is a big umbrella project that provides development tools designed to ease the development of distributed applications.
- configuration management (Spring Cloud Config provides centralized external configuration backed by a Git repository)
- service discovery (Eureka is an AWS Service registry for resilient mid tier load balancing and failover and is supported by Spring Cloud)
- circuit breakers (Spring Cloud supports Netflix’s Hystrix, which is a library that provides components that stop calling services when a response is not received by a predefined threshold)
- intelligent routing (Zuul, used to forward and distribute calls to services)
- micro-proxy (client-side proxies to mid tier services)
- control bus (a messaging system can be used for monitoring and managing the components within the framework, as is used for “application-level” messaging)
- one-time tokens (used for data access only once with Spring Vault)
- global locks (used to coordinate, prioritize, or restrict access to resources)
- leadership election (the process of designating a single process as the organizer of some task distributed among several nodes)
- distributed sessions (sessions distributed across multiple servlet servers)
- cluster state (cluster state request is routed to the master node, to ensure that the latest cluster state is returned)
- client-side load balancing
Registration and Discovery Server
- Implementations
Eureka - by NetflixConsul - by HashicorpZookeeper - by Apache
- Annotate
@SpringBootApplication with @EnableEurekaServer
@EnableEurekaServer annotation, which is responsible for injecting a Eureka server instance into your project.
@SpringBootApplication
@EnableEurekaServer
public class DiscoveryServer {
public static void main(String args) throws IOException {
// Tell server to look for discovery.properties or discovery.yml
System.setProperty("spring.config.name", "discovery");
ConfigurableApplicationContext ctx = SpringApplication.run(DiscoveryServer.class, args);
System.in.read();
ctx.close();
}
}
- Provide Eureka config to
application.properties (or application.yml)
- The
application.yml file contains settings for this server
waitTimeInMsWhenSyncEmpty - it was designed so that clients would not get partial/empty registry information until the server has had enough time to build the registryeureka.client.registerWithEureka property has “true” as a default value and is used to register Eureka clients. Since the application above registers a server, it must be explicitly set to “false” to stop the server from trying to register itself.eureka.client.fetch-registry - Indicates whether this client should fetch eureka registry information from eureka server.server.port - default value for the port is implicitly set to 8761
# Configure this Discovery Server
eureka:
instance:
hostname: localhost
client:
registerWithEureka: false # do not auto-register as client
fetchRegistry: false
server:
port: 3000 # where this discovery server is accessible
waitTimeInMsWhenSyncEmpty: 0
To use the Eureka Server in a project, the spring-cloud-starter-eureka-server starter project must be included as a dependency of the project
Microservices Registration
@EnableDiscoveryClient
@SpringBootApplication
public class ServiceApplication {
public static void main(String[] args) {
SpringApplication.run(ServiceApplication.class, args);
}
}
@EnableDiscoveryClient annotation, which is the key component that transforms this application into a microservice, because it enables service registration and discovery
- The
Spring section defines the application name as pets-service. The microservice will register itself with this name with the Eureka server.
- The
HTTP Server section defines the custom port to listen on.
- The
Discovery Server Access section defines the URL where the server to register to
eureka.client.registerWithEureka property has “true” as a default value and is used to register Eureka clients.eureka.instance.preferIpAddress is used to tell the Eureka server whether it should use the domain name or an IP.eureka.client.service-url.defaultZone - where Discovery Server is located
# Spring properties
spring:
application:
name: pets-service # Service registers under this name
# HTTP Server
server:
port: 4000 # HTTP (Tomcat) port
# Discovery Server Access
eureka:
client:
registerWithEureka: false
fetchRegistry: true
serviceUrl:
defaultZone: http://localhost:3000/eureka/
instance:
leaseRenewalIntervalInSeconds: 5
preferIpAddress: false
- Inject
RestTemplate using @Autowired with additional @LoadBalanced
RestService automatically looks up microservice by logical name and provides load-balancingRibbon service by Netflix provides load balancing@LoadBalanced annotation, which marks the injected RestTemplate bean to be configured to use a LoadBalancerClient implementation.
RestTemplate is thread-safe
Rest clients
RestTemplate
@Autowired
@LoadBalanced
private RestTemplate restTemplate;
- Then call specific Microservice with the
restTemplate
User user = restTemplate.getForObject(usersServiceUrl + "/users/id/{id}", User.class, id);
Feign
- Define feign client proxy, this is a different microservice
@FeignClient(name = "currency-exchange-service", url = "http://localhost:8000/")
public interface CurrencyExchangeServiceProxy {
@GetMapping("/currency-exchange/from/{from}/to/{to}")
CurrencyConversionBean retrieveExchangeValue(@PathVariable("from") String from, @PathVariable("to") String to);
}
- Then
@Autowire the Proxy client
@Autowired
private CurrencyExchangeServiceProxy currencyExchangeServiceProxy;
final CurrencyConversionBean response = currencyExchangeServiceProxy.retrieveExchangeValue(from, to);
final BigDecimal conversionMultiple = response.getConversionMultiple();
Application Configuration server
Using Spring Cloud Config Server
Config Server REST Support: Parameters
Config Server REST Support: Endpoints
Using Spring Cloud Config Client
Refreshing configuration at runtime
Intelligent Routing with Netflix Zuul
Load Balancing with Netflix Ribbon
- Client-side load balancing is a natural fit for cloud native architectures
- By default it uses round-robbin algorithm for distributing the load
- Another way is to use
@RibbonClient
@FeignClient(name = "currency-exchange-service")
@RibbonClient(name = "currency-exchange-service")
public interface CurrencyExchangeServiceProxy {
@GetMapping("/currency-exchange/from/{from}/to/{to}")
CurrencyConversionBean retrieveExchangeValue(@PathVariable("from") String from, @PathVariable("to") String to);
}
Load Balancing Strategies
Liveliness Check
Circuit Breaker with Netflix Hystrix
- Multiple issues at play
Fault tolerance problemResourse overloading problem
Netflix Hystrix Dashboard
Aggregating Hystrix Metrics with Netflix Turbine
- Go to
http://localhost:8080/hystrix
Bring all together
Spring Cloud Security